
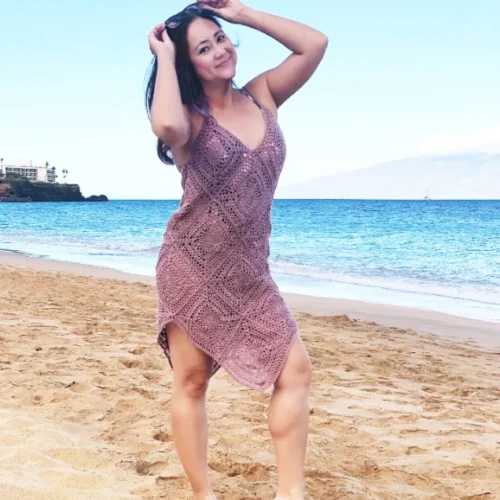
Dreaming of warm days, sandy toes, and cute beach outfits? We’ve got the perfect addition to your summer wardrobe with this free crochet beach cover-up pattern. This beautiful crochet beach cover is light and breezy, made with airy yarn, perfect for throwing on over your swimsuit for a quick trip to the beach or pool. This fun everyday look is made from granny squares, a crochet technique that’s both beautiful and surprisingly versatile.
Imagine yourself draped in this crochet masterpiece, designed not just for style but for versatility and comfort. This perfect pattern is lightweight, airy, and oh-so-chic.
And if you’ve been following my creations, you already know I’m all about maximizing functionality. This crochet cover up is not just a bathing suit cover-up but it also doubles as a crochet tank top and can be worn as a crochet lace dress on its own!
Just like my Sienna Two Way bralette and the Desert Bikini Bottom, style them in any two ways because when it comes to crochet, double is not always trouble!
This free crochet beach cover pattern is made for sizes ranging from S all the way to XL and is also available on my YouTube channel, where it is made in size medium.
And for those who prefer a hassle-free, ad-free experience, grab the printable PDF version from my shop or add it to your Ravelry queue.

DESIGN INSPIRATION
With lightweight yarn as my material of choice, I wanted to create a versatile piece that seamlessly blended into any summer wardrobe, effortlessly transitioning from beachwear to casual attire.
My primary goal was to make an easy-to-wear beach cover while remaining effortlessly chic. Choosing simple crochet stitches and easy construction methods were ideal for achieving this vision.
Opting to use simple crochet granny squares, the repetitive process of crafting each square allowed for a relaxing creative journey, perfectly suited for lazy summer days.
Additionally, the breathability of the lacey stitchwork ensured comfort in the heat, while the lightweight yarn promotes air flow throughout the garment.
This ensures that is will support endless hours of seaside fun, poolside relaxation, and carefree lounging under the sun without the need for multiple outfit changes.
Ultimately, this free pattern is the perfect summer-style outfit that is easy-going, breezy, and effortlessly cool for warm weather.
Inspired to still be trendy, your soon to be favorite Granny-Square beach cover is here to accompany you this summer!
If you are looking to explore more crochet beach cover up patterns like this then you’ll have to first read up about our beautiful crochet beach cover-up patterns here.

CONSTRUCTION
Let’s start with basic crochet stitches. While some crocheters thrive on complex techniques and intricate patterns, many of us prefer simple construction, sticking to an easy pattern and using granny squares.
These timeless motifs not only offer a cozy texture but also serve as building blocks for a myriad of cover-up designs. Learn how to effortly work up the Magic Ring / Magic Circle and make this your favorite technique.
This stunning geometric lace pattern is symmetrical on both the front panel and the back making this crochet coverup an easy pattern to follow for beginner crocheters.
When it comes to beach cover-ups, think breathable fibers that dry in a flash under the sun’s warm embrace.
Although cotton yarn and linen blends are popular choices, another important factor to consider is the weight of the yarn that can offer the perfect balance of softness and durability.
Lightweight and fingering yarns are an ideal option to consider. For this swimsuit cover up, I am using a fingering weight yarn from Woolike Simili-Laine by Loops & Threads in the color rose.
This yarn is a blend of nylon and acrylic which offers the perfect balance of soft and breezy to your crochet cover up. And despite it being a fingering weight yarn, I chose to use a 3.0 mm crochet hook to create a loose and drapey stitch throughout.
We believe that fashion should be inclusive of all shapes and sizes. That’s why we love this easy crochet pattern that comes in a range of sizes all the way up to extra large.
Whether you’re petite or curvy, everyone deserves to feel fabulous in their beachwear.


If you would like to receive free written patterns and video tutorials straight into your inbox, just click Subscribe above to get into our mailing list.
Related Post:
What to make (crochet) this Summer
Granny Square Swimsuit Cover-up Free Crochet Pattern


* Square is measured diagonally from tip to tip
**Size above is measured when laid flat
PART 1: Granny Square Pattern

1. Foundation row: Magic Ring (MR) – See tutorial here
2. Rnd 1: Work 10 Sc on MR, Slst to join, Ch up 1,
3. Rnd 2: Work 2Dc in each St, Slst to join, Ch 1 (20 Sts)
4. Rnd 3: Dc in the 1st St, *(Ch 1, Dc) in each St, Rep (*) in the round. Slst to join
5. Rnd 4: Sc on Ch Sp, *(Ch 5, Sc on next Ch Sp) . Rep (*) in the round, Slst to join
6. Rnd 5: 2 Slst on next Ch, Sc on Ch Sp, *(Ch 6, Sc on next loop) . Rep (*) in the round, Slst to join
7. Rnd 6: 3 Slst on next Ch, Sc on Ch Sp, *(Ch 4, Sc on next loop) . Rep (*) in the round, Slst to join
8. Rnd 7: Dc in the same St, work **[(3Dc, Ch 2, 3Dc) in the next Ch Sp, *(Dc on the next St, 2Dc in the next Ch Sp) Rep (*) 3 more times], Rep [**] in the round, Slst to join
9. Rnd 8: Dc in the same St, **[Ch 3, Sk 3, (Dc, Ch 1, Dc) in the next Ch Sp, Ch 3, Sk 3 Sts, Dc, *(Ch 2, Sk 2, Dc) Rep (*) 5 more times], Rep [**] in the round, Slst to join
10. Rnd 9: Sc on Ch sp, work Dc Puff St in the same Ch Sp, **[Ch 2, work (3Dc, Ch 2, 3Dc) in the next Ch Sp, Ch 2, *(Dc Puff St in the next Ch Sp, Ch 2) Rep (*) 7 more times, Rep [**] in the round, Slst to join. 8. (Size Small will go straight to Step 14. M will proceed to the next step. L & XL will repeat Step 10 for one more round.)
11. Next Rnd (Rnd 10): Slst, Sc on Ch Sp, Dc in the same Ch Sp, **[Ch 3, Sk 3, (2Dc, Ch 2, 2Dc) in the next Ch Sp, Ch 3, Sk 3, *(Dc in next Ch Sp, Ch 2), Rep (*) 8 more times, Rep [**] in the round, Slst to join
12. Next Rnd (Rnd 11): Slst, Sc on Ch, **[Ch 2, work (3Dc, Ch 2, 3Dc) in the next Ch Sp, Ch 2, Sc on next Ch Sp, (Ch 5, Sc in the next Ch Sp) Rep (*) 9 more times, Rep [**] in the round, Slst to join. 11. (M & L will proceed to the next step. XL will repeat Step 12 for one more round. )
13. Next Rnd (Rnd 12): Slst, Sc on Ch, **[Ch 3, Sk 2, work (2Dc, Ch 2, 2Dc) in the next Ch Sp, Ch 3, Sk 3, Sc on next Ch Sp, (Ch 3, Sc in the next loop) Rep (*) 9 more times, Rep [**] in the round, Slst to join
14. Last Rnd: **[Work 2 Sc on Ch Sp, Sc 2, Sc in Ch Sp, Picot St Sc in the same Sp, Sc 2, 2 Sc on Ch, *( Sc, 2 Sc on Ch Sp) Rep (*) for 10 more times], Rep [**] in the round, Slst to join. Bind off
15. Rep Steps 1 – 14 and make 13 more squares if you’re making a top and 21 more squares if you’re making a dress.
Part 2: Straps

1. Place 2 squares (sqrs) on top of another 2 sqrs together RS up like image 1 and Slst each St (individual sqrs) across starting from the right side, working your way up, then across the neckline joining the 2nd sqr, then back down.

- Image 2 – Back
2. Turn to the back, join 3rd sqr and Slst to the top, once you’ve reached the Picot loop, work 1 Sc in the loop and measure the length you want your strap to be. For ref, mine is 10 in / 25cm and I have Ch 48. ( 1 in/ 2.5cm = approx. 5 chains)
3. Join chain to the Front sqr #2 by working 2 Sc in the Picot loop, Ch 1 turn, and Dc each Ch back to sqr #3, Sc in the Picot loop.
4. Cont to Slst along the neckline across while joining the next sqr until you reach the next Picot loop at the top. Sc in the Picot loop and work your # of chains.
5. Join chain to the Front sqr #1 by working 2 Sc in the Picot loop, Ch 1 turn, and Dc each Ch back to sqr #4, Sc in the Picot loop.6.Cont to Slst down and join. Bind off.
Part 3: Assembling Squares.
-

Image 3
1. Working on the RS, arrange all squares together like image 3. Each row will have 4 sqrs except for the last row.

- Image 4
2. We will now work on Row 2. Starting with sqr #5 and the top right square #2, place both ends together (ref image 4), you can use SMs to tack both sides together if you pref. Insert hook through both Picot loops, and Ch1, Sc through both loop spaces. Sc each St together across.
4. At the end of the row, work 1 Sc through both Picot loops, align sqr #4 to the side of sqr #1 and work 1 Sc through sqr #4 and #1’s Picot loop together. Cont to Sc both sqrs together across.
Part 4: Edging
1. From the last St, Ch 5, *(Sk 1, Tr, Ch 1) rep (*) until you reach the bottom picot tip on the last row.
2. 2Tr, Ch 2, 2Tr, *(Ch 1, Sk 1, Tr) rep (*) until the next bottom tip.
3. Rep step 2 in the round. Slst to join, Ch up 1
4. Work 1 Hdc on each Ch and St until you reach the bottom picot tip on the last row.
5. Hdc each Tr, 2Hdc in the Ch Sp, Hdc each Tr, rep step 4 & 5 in the round.
6. Slst to join7. Bind off and weave in all loose ends
How to do a Picot (Pee-koh) Stitch

- How to Crochet Picot
- Ch 5, Slst in the 1st Ch, Sc in the next St
How to do a Puff stitch

- How to Crochet Puff
- (YO, insert hook, draw up a loop, YO, Pt2) 5x, YO, Pt all 6 loops, Ch 1
END
**If you are looking for the entire tool used to make this Granny Square Top/ Beach Cover crochet pattern, check them out here below:
- Clover Amour Crochet Hook, 3.00mm
- Woolike Simili-Laine Yarn in Rose
- Granny Square Top/Beach Cover up PDF File

Granny Squares Beach Dress / Cover Up Dress Crochet Pattern
$4.50
***
If you would like to receive free crochet patterns and video tutorials straight into your inbox, join our mailing list now. Don’t forget to tag me on Instagram and Facebook @theknottylace, I would love to see your work!
Happy hooking
Shaz 


4 Responses
I have a question about round 8. After you make the first corner, it says to DC, *(Ch 2, Sk 2, DC) Rep (*) 5 times. But I can’t seem to make the 5 times before I get to the next corner and need to do the chain 3 Sk 3. Then in the video tutorial for this pet, you describe that straight edge after making the corner as “Chain one and skip one until you get to the next corner.” (It’s at 8:49 in the video tutorial)
I’m just confused. Can you help? Should I just DC, Ch 2, Sk 2 repeat 4 times? Or should I chain one skip one on the edges for round 8?
That’s as far as I’ve gotten so I may have more questions later.
I appreciate your help, also I think this is absolutely beautiful and can’t wait to make it!
Thank you,
Riann Queen
Hi Rian, Thank you for highlighting this. The video should be correct. Let me quickly make the corrections! x
Is it possible to use Alize Diva Stretch yarn for this pattern?
I believe Alize Diva is much thicker than this fingering yarn, however you can use it but you would have to adjust the sizing as the gauge will run much larger. x