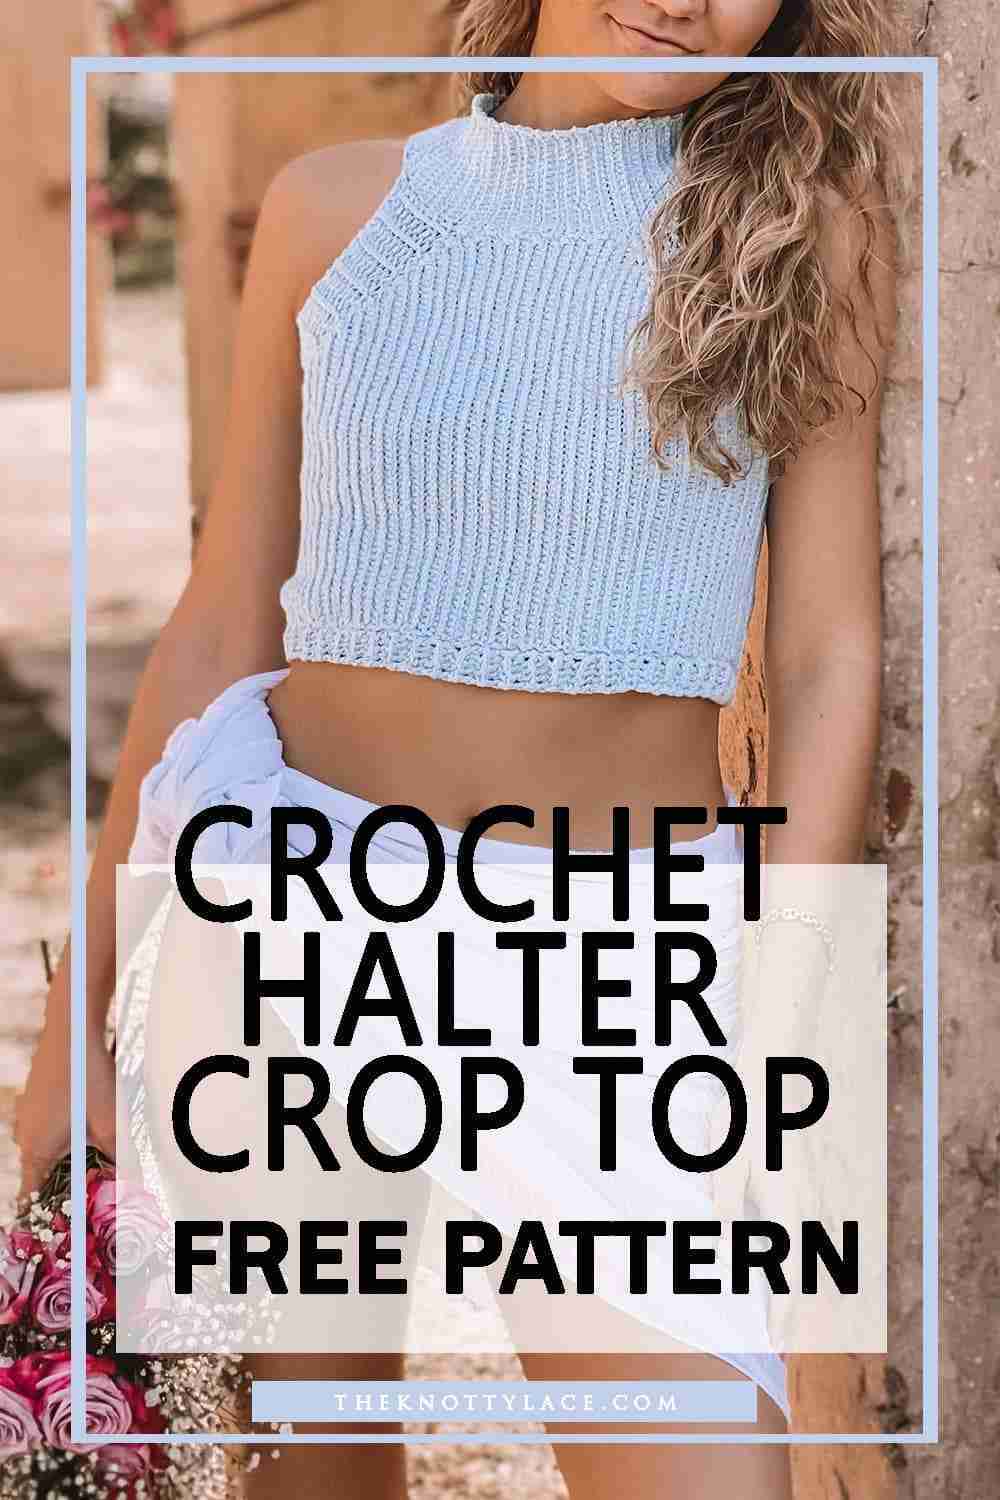
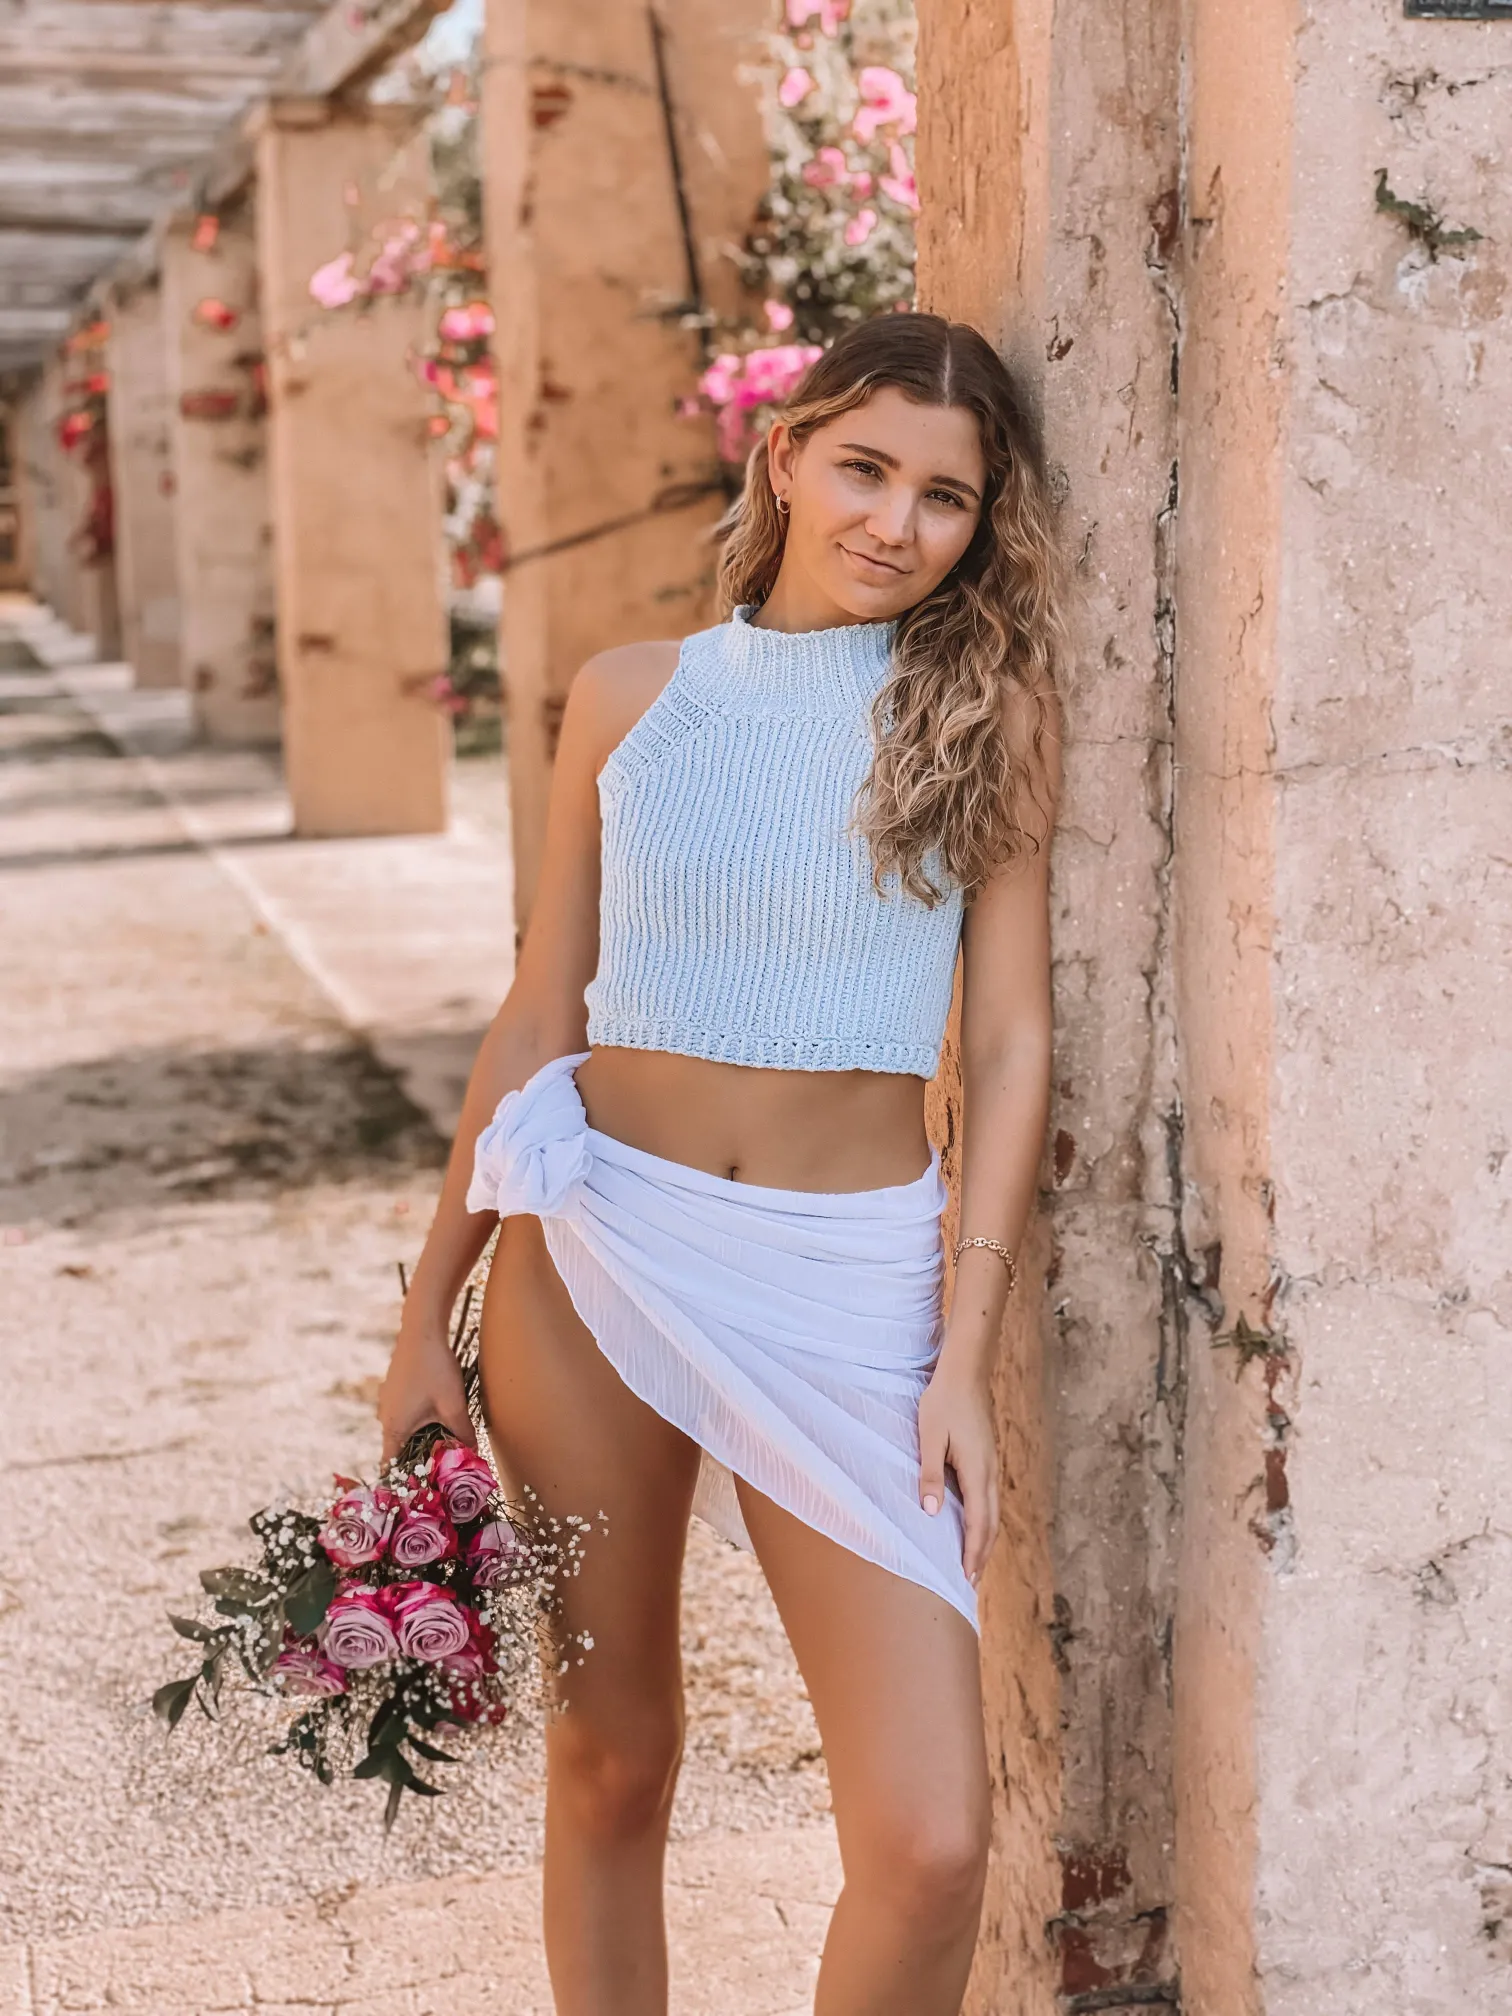
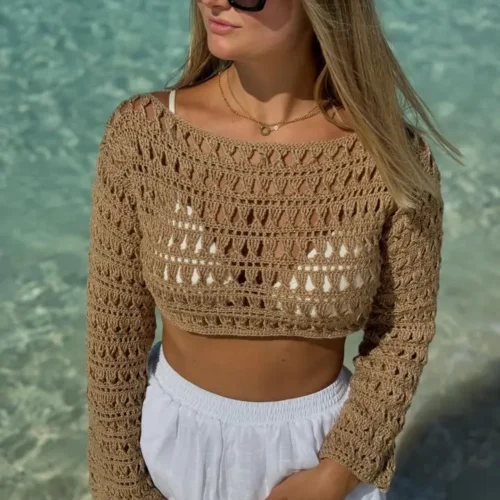
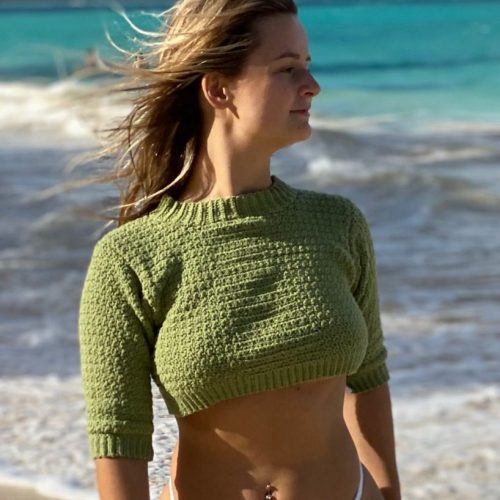
Let me just start by saying I love this top. It has everything you need in one top. It comes with a glorious mock neck collar, sleek halter sleeves, cropped nicely at the midriff, and is light and airy.
If you’re wondering how you could make this top too, well I’m giving you the full written free pattern down below. Plus this crochet crop top also comes in 9 all-inclusive sizes. Yay!
DESIGN INSPIRATION
I believe crop tops are here to stay for a while and I wanted a top that checks up in all the right boxes.
I love the idea of the mock neck as you don’t see this style very often and the cut and length make it light enough to wear throughout the warmer months.
And if you switch up the yarn, then you’ll get a warmer top for those chillier days.
If you would like a printable ad-free PDF copy of this pattern, it is readily available for purchase
in my shop or add it to your Ravelry queue.
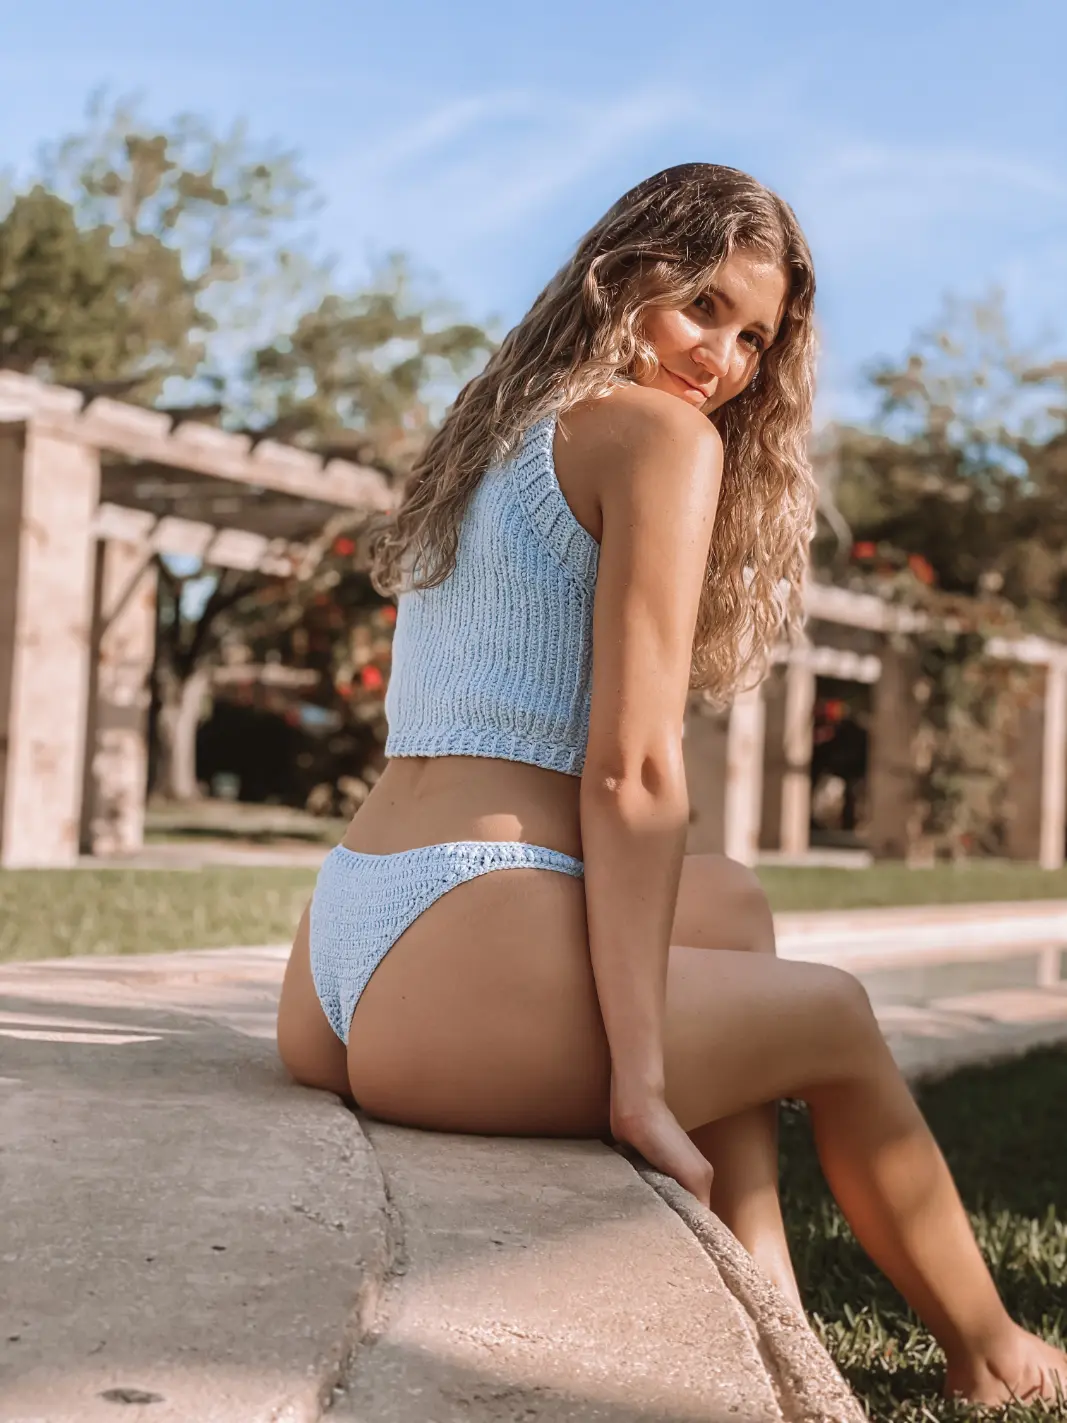
And did I forget to mention that this top also comes with its matching bikini bottom too? But as always, it pairs really well with those cute shorts or jeans just as well too.
DESCRIPTION
Working from side to side, a continuous increase and decrease of half double crochet front loop and back loop are all you need for the front and back panel. Check out my Video tutorial here
This pattern would ideally be suited for advanced beginners, but with the detailed step-by-step tutorial, it shouldn’t make you sweat.
CHECK OUT MY LATEST VIDEO
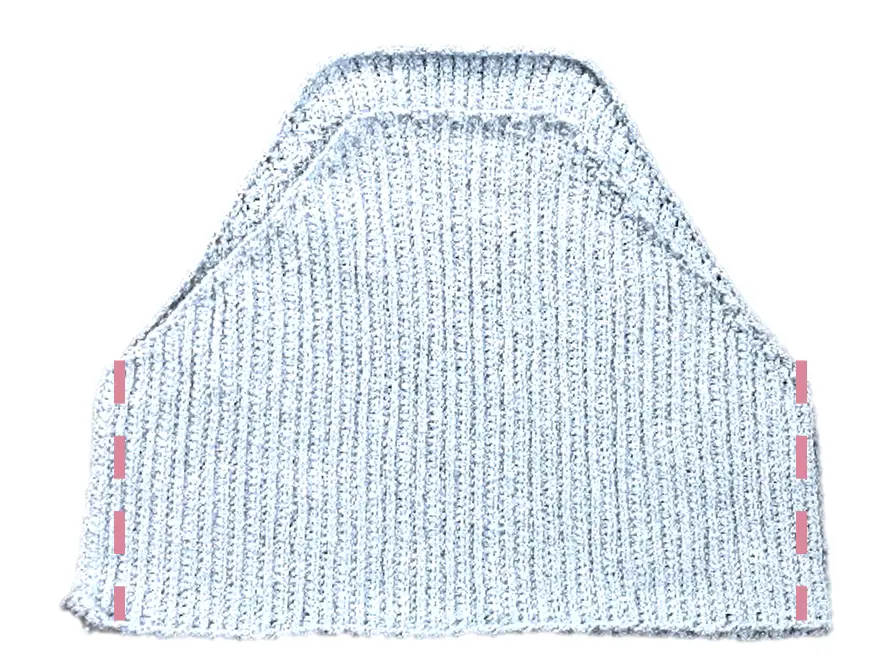
If you would like to see more video tutorials like this you can check them out here on the blog or Subscribe to my Video Channel on YouTube.
Tools and Materials:
Yarn weight: Category 3/ DK
Brand: Cascade Fixation
Color: Blue Glass
Hook: 4.0mm & 3.0mm
Gauge: 4.0mm: 24 Hdc BLO/Hdc FLO Sts x 13 rows = 4”x 4” 3.0mm: ribbing 5 Hdc FP Sts x 7 rows = 3/4” x 4”
No. yarns (balls): XS[S/M/L/XL] [2XL/3LX/4XL/5XL] = 4 [5/ 6/ 7/ 8] [9/ 10/ 11/ 12]
Tools: tapestry needle, measuring tape, scissors
Skill: Easy
This post contains affiliate links designed to provide a commission on purchases made at no cost to you. As an Amazon Associate, I earn from qualifying purchases that support my work in providing new content and information on this site.
If you like this pattern, you might also like these Or check out more Crochet Tops here.


If you would like to receive free written patterns and video tutorials straight into your inbox, just click Subscribe to get into our mailing list.
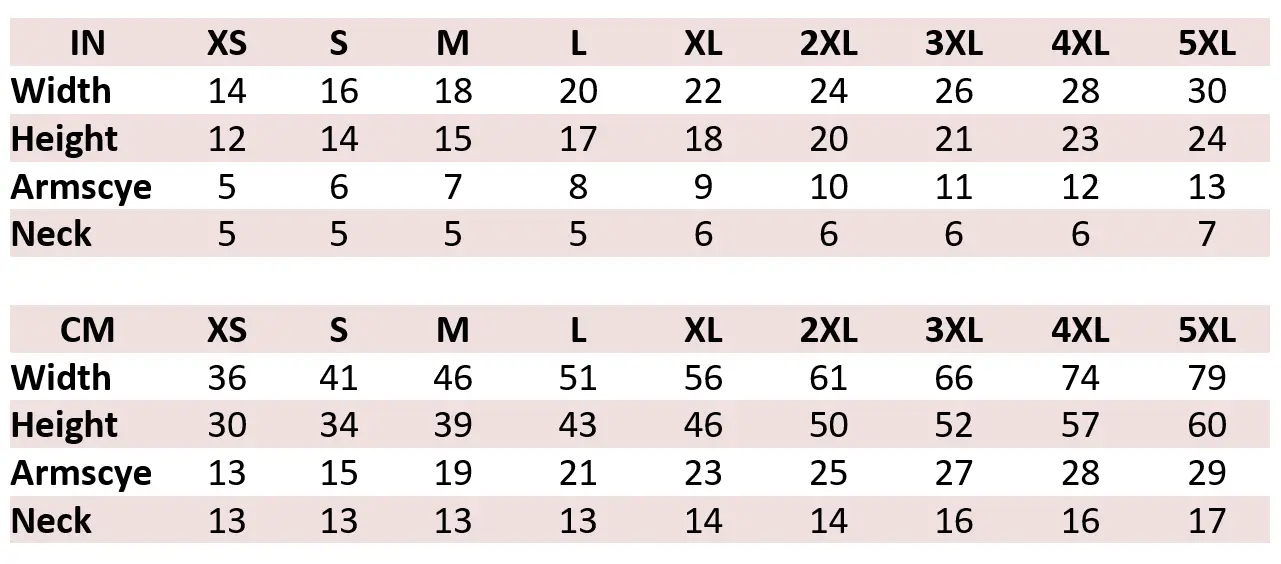
Hanna Mock Neck Halter Crop Top Free Crochet Pattern
PART 1: Front Panel
We will be working on the Front panels left side first.
1. Foundation row: With a 4.0mm hook, Ch 37 [37/ 40/ 43/ 46][49/ 52/ 55/ 58]. This will be the length from your underarm to your midriff. Feel free to add more stitches here if you want it longer.
2. Row 1: Insert hook through the second Ch from hook and Hdc St across the Ch, you should have 36 [36/ 39/ 42/ 45][48/ 51/ 54/ 57] Sts. Ch 1 turn
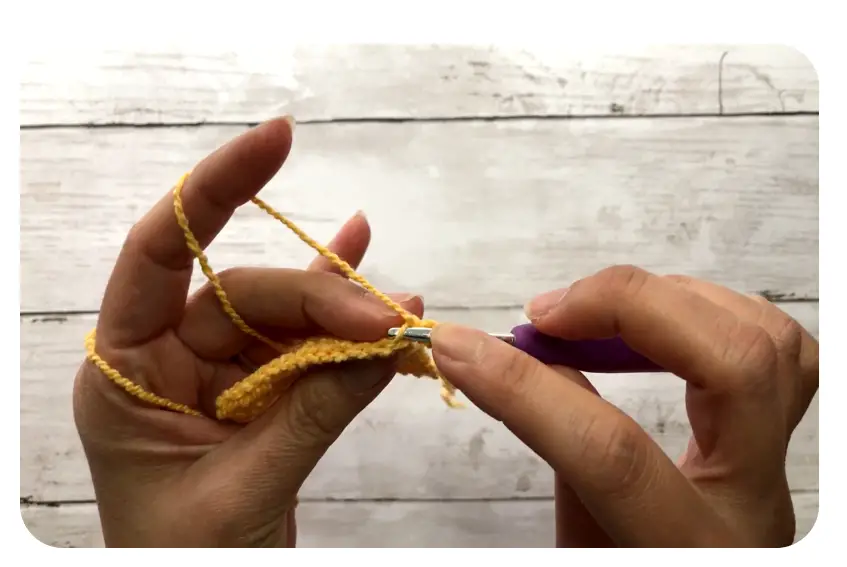
3. Row 2: On the first St, insert hook through the back loop and work 1 Hdc St (this will be ref to as Hdc BLO). Cont to Hdc BLO across until the 3rd last St. Increase the next 2 Sts with a 2 Hdc BLO on each St, Ch 1 turn (Video tutorial)
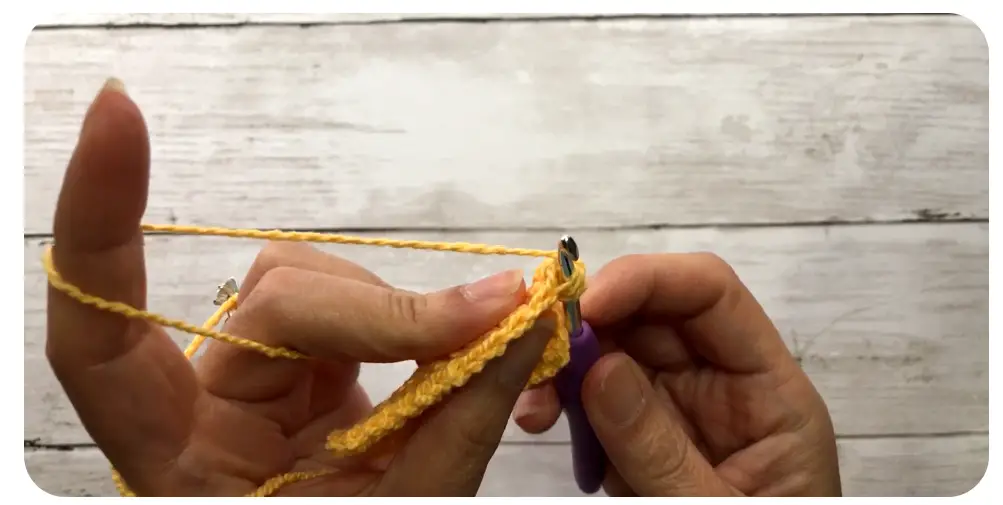
4. Row 3: Insert hook through the front loop (FLO) and work 2 Hdc FLO increase Sts, 2 Hdc FLO on the next St, work 1 Hdc FLO St across, Ch 1 turn
5. Row 4: Repeat Row 2 and 3 for 13 [15/ 19/ 23/ 25] [37/ 29/ 33/ 35] more rows.
6. Next Rows: Stop increasing and Hdc BLO each St across, Ch 1 turn
7. Next Row: Hdc FLO each St across, Ch 1 turn
8. Next Rows: Rep Step 6 & 7 for 14 [14/ 14/ 14] [16/ 16/ 18/ 18/ 20] more rows. This will be your middle Front Panel. You may adjust accordingly to fit your preferred measurement or size
9. Reduce Rows: Hdc BLO each St across until the last 5th St. Hdc2tog BLO on 1st and 2nd St, and again on 3rd and 4th St, Ch 1 turn
10. Next Row: Hdc2tog FLO on 1st and 2nd St, and again on 3rd and 4th St, Hdc FLO each St across, Ch 1 turn
11. Next Row: Repeat step 9 and 10 for total of 13 [15/ 19/ 23/ 25] [37/ 29/ 33/ 35] rows.
12. Last row: Hdc each St across. Ch 1 and turn to the side
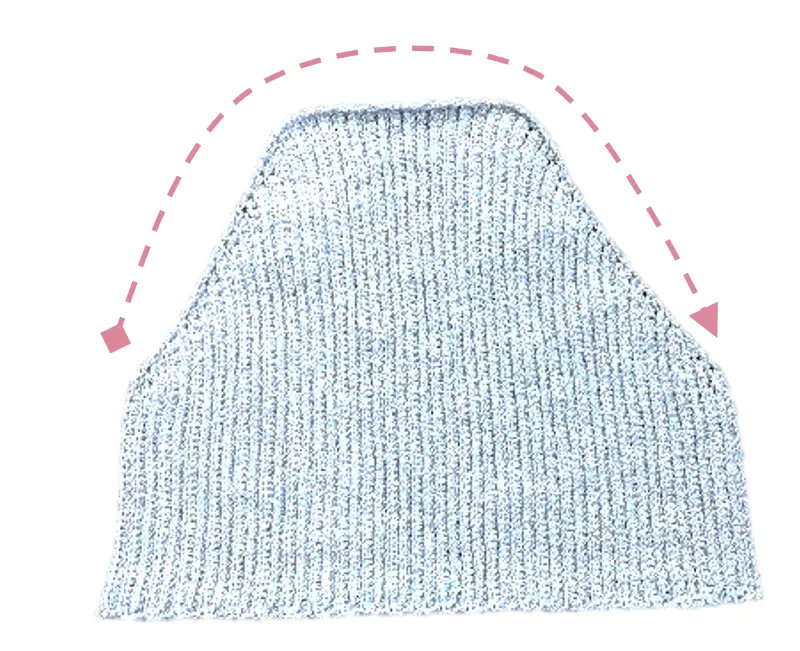
13. Sc each row by switching bet 1 Sc and 2 Sc along the edge of the arm and neck side. Ref to the image below. (edges will curl slightly).
14. Bind off
PART 2: Back Panel

- Foundation row: With a 4.0mm hook, Ch 37 [37/ 40/ 43/ 46] [49/ 52/ 55/ 58].
- Row 1: Insert hook through the second Ch from hook and Hdc each St across the Ch, you should have 36 [36/ 39/ 42/ 45] [48/ 51/ 54/ 57] Sts. Ch 1 turn
- Row 2: On the first St, insert hook through the back loop and work 1 Hdc. Cont to Hdc BLO across until the 4th last St. Increase the next 3 Sts with a 2 Hdc BLO on each St, Ch 1 turn
- Row 3: Insert hook through the front loop and work 2 Hdc FLO increase Sts, 2 Hdc FLO on the next 2 Sts, work 1 Hdc FLO St across, Ch 1 turn
- Row 4: Repeat Row 2 and 3 for 13 [15/ 19/ 23/ 25] [37/ 29/ 33/ 35] more rows.
- Next Rows: Stop increasing and Hdc BLO each St across , Ch 1 turn
- Next Row: Hdc FLO each St across, Ch 1 turn
- Next Rows: Rep Step 6 & 7 for 14 [14/ 14/ 14] [16/ 16/ 18/ 18/ 20] more rows. If you have adjusted the Front panel, repeat the same number of rows here as well.
- Reduce Rows: Hdc BLO across until the last 7th St. Hdc2tog BLO on 1st and 2nd St, 3rd and 4th St and again on the 5th and 6th St, Ch 1 turn
- Next Row: Hdc2tog FLO 3 times, Hdc FLO each St across, Ch 1 turn
- Next Row: Repeat step 9 and 10 for total of 13 [15/ 19/ 23/ 25] [37/ 29/ 33/ 35] rows.
- Last row: Hdc each St across. Ch 1 and turn to the side
- Sc each row by switching bet 1 Sc and 2 Sc along the edge of the arm and neck side, Ch 1 turn
- Place both panels on top of each other (RS in) and Sc both pieces together along the side to join. Bind off and rep on the other side
- Bind off
PART 3: Shaping Collar
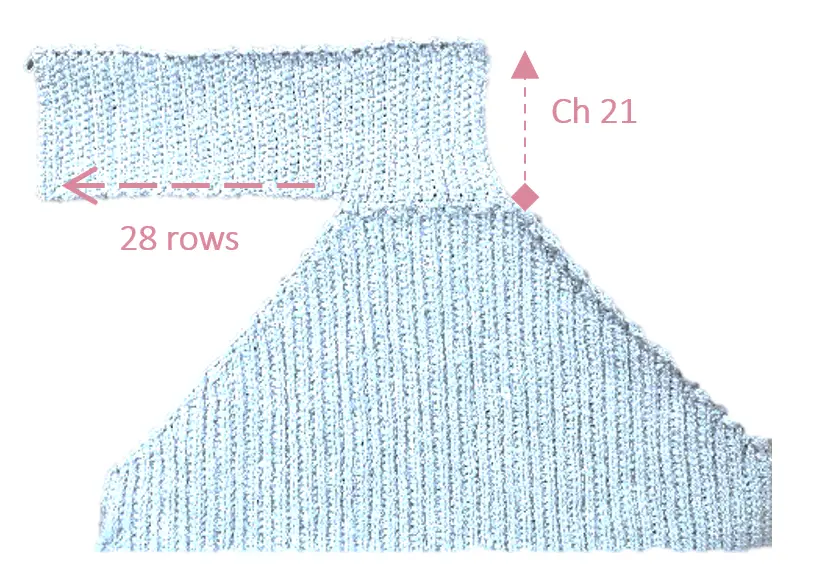
- Foundation row: Switch to a 3.0mm hook. Insert your hook through the Back panels’ neckline (RS) on the first row and Ch up 21
- Row 1: Sc in the second chain from hook and Sc across the Ch. Work Sl sts on the next 2 row, turn <20 sts>
- Row 2: Sk the prev 2 Sl Sts, insert hook through the back loop of the first St and work a Sc BLO St and for the rest of the Sts across, Ch 1 turn
- Row 3: Insert hook through the back loop of the first St and work a Sc BLO St and for the rest of the Sts across. Slst on the next 2 rows, turn
- Row 4: Repeat Row 2 and 3 and until the end of the row/ neckline.
- Next Rows: Cont to Sc BLO independently for another 28 rows. (Your last St should be at the bottom of the collar. If not add 1 more row)
- Next Row: Sl St 2 rows on to the Front Panels collar and turn work. Rep Steps 3 – 6.
- Joining Row: Join both ends and Sl St BLO to join in the round
- Bind off
PART 4: Shaping Sleeves
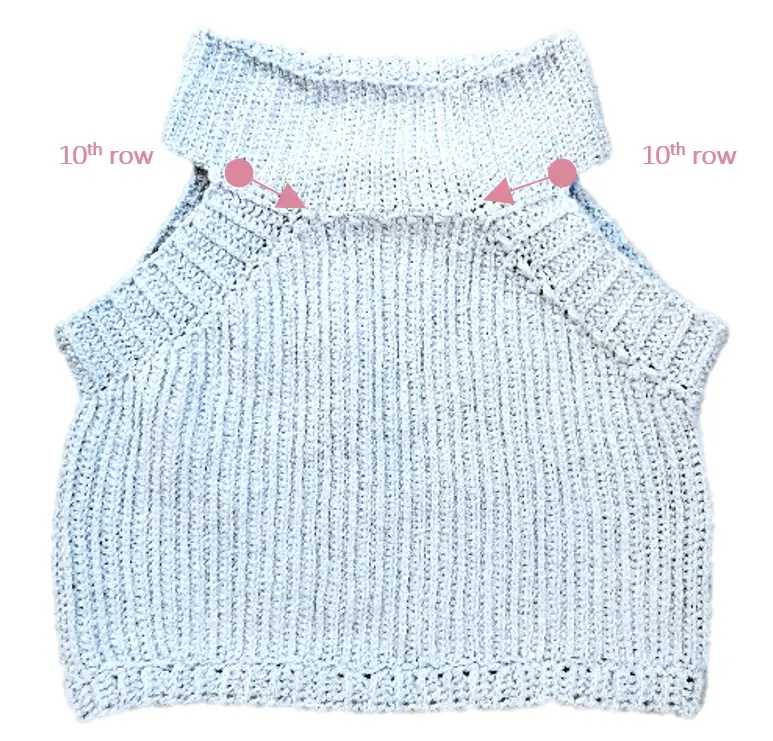
- Switch to a 4.0mm hook. On the RS, insert your hook through the 10th row counting up from the collar and draw up a loop, Ch 1.
- Row 1: Hdc each row down towards the Front panel. Slst on the next 2 rows of the Front panel, turn
- Row 2: Sk the prev 2 Sl Sts, and Hdc BLO across, Ch 1 turn
- Next Rows: Rep Row 1 and 2 until you reach the back collar.
- Last Row: Join both ends and Sl St BLO to close.
- Bind off and repeat on the other side.
PART 5: Bottom Ribbing
- Foundation row: Switch to a 3.0mm hook, On the RS, insert your hook through the last row of the bottom Back panel (pref on the side) and draw up a loop, Ch 6.
- Row 1: Dc each Ch down towards the Back panel. Slst on the next 3 rows, turn <5 Sts>
- Row 2: Sk the prev 3 Sl Sts, and work a Dc Front Post St (ref to image below), Dc FP each St across, Dc on the last St, Ch 1 turn
- Row 3: Dc, Dc FP each St across, . Sl st on the next 2 rows, turn
- Next Rows: Rep Row 2 and 3 in the round.
- Last Row: Sl St BLO on both ends to join .
- Bind off and Weave in all loose ends.

END
**If you are looking for the entire tool used to make this Hanna Crop Top crochet pattern, check them out here below:
- 3.0 mm Clover Amour Crochet Hook
- 4.0 mm Clover Amour Crochet Hook
- Cascade Fixation Yarn in Blue Glass
- Hanna Crop Top Pdf Pattern file
If you would like to receive free written patterns and video tutorials straight into your inbox, join our mailing list now. Don’t forget to tag me on Instagram and Facebook @theknottylace, I would love to see your work!
Happy hooking
Shaz 🌺


4 Responses
Hi,
I’m working on the Hanna Mock Turtleneck Crop top and the top of the back panel is curving ALOT with the 3 stitch increase. Do you have an idea why that is happening? Do you have a solution? I am hesitant to continue until I hear from you. It is frustrating. I’ve frogged these rows so many times trying to correct the curve.
Thanks, Jackie
Hi Jackie, Yes it does curve! Once you assemble them together it should straigthen out nicely!
Hi starting Hannah top but having trouble even starting it! Row 3 states last 3rd st then blo 2 tog x 2. But there are only 3 st how is this possible. I must becreadingbuf wrong
Hi Jo, which part of Row 3 are you referring to? I’m trying to look for it in the pattern and I don’t see it. ?