DESIGN INSPIRATION
If you didn’t already know the meaning of Matahari – well it also means The Sun and that is how I got my inspiration for each granny square design.
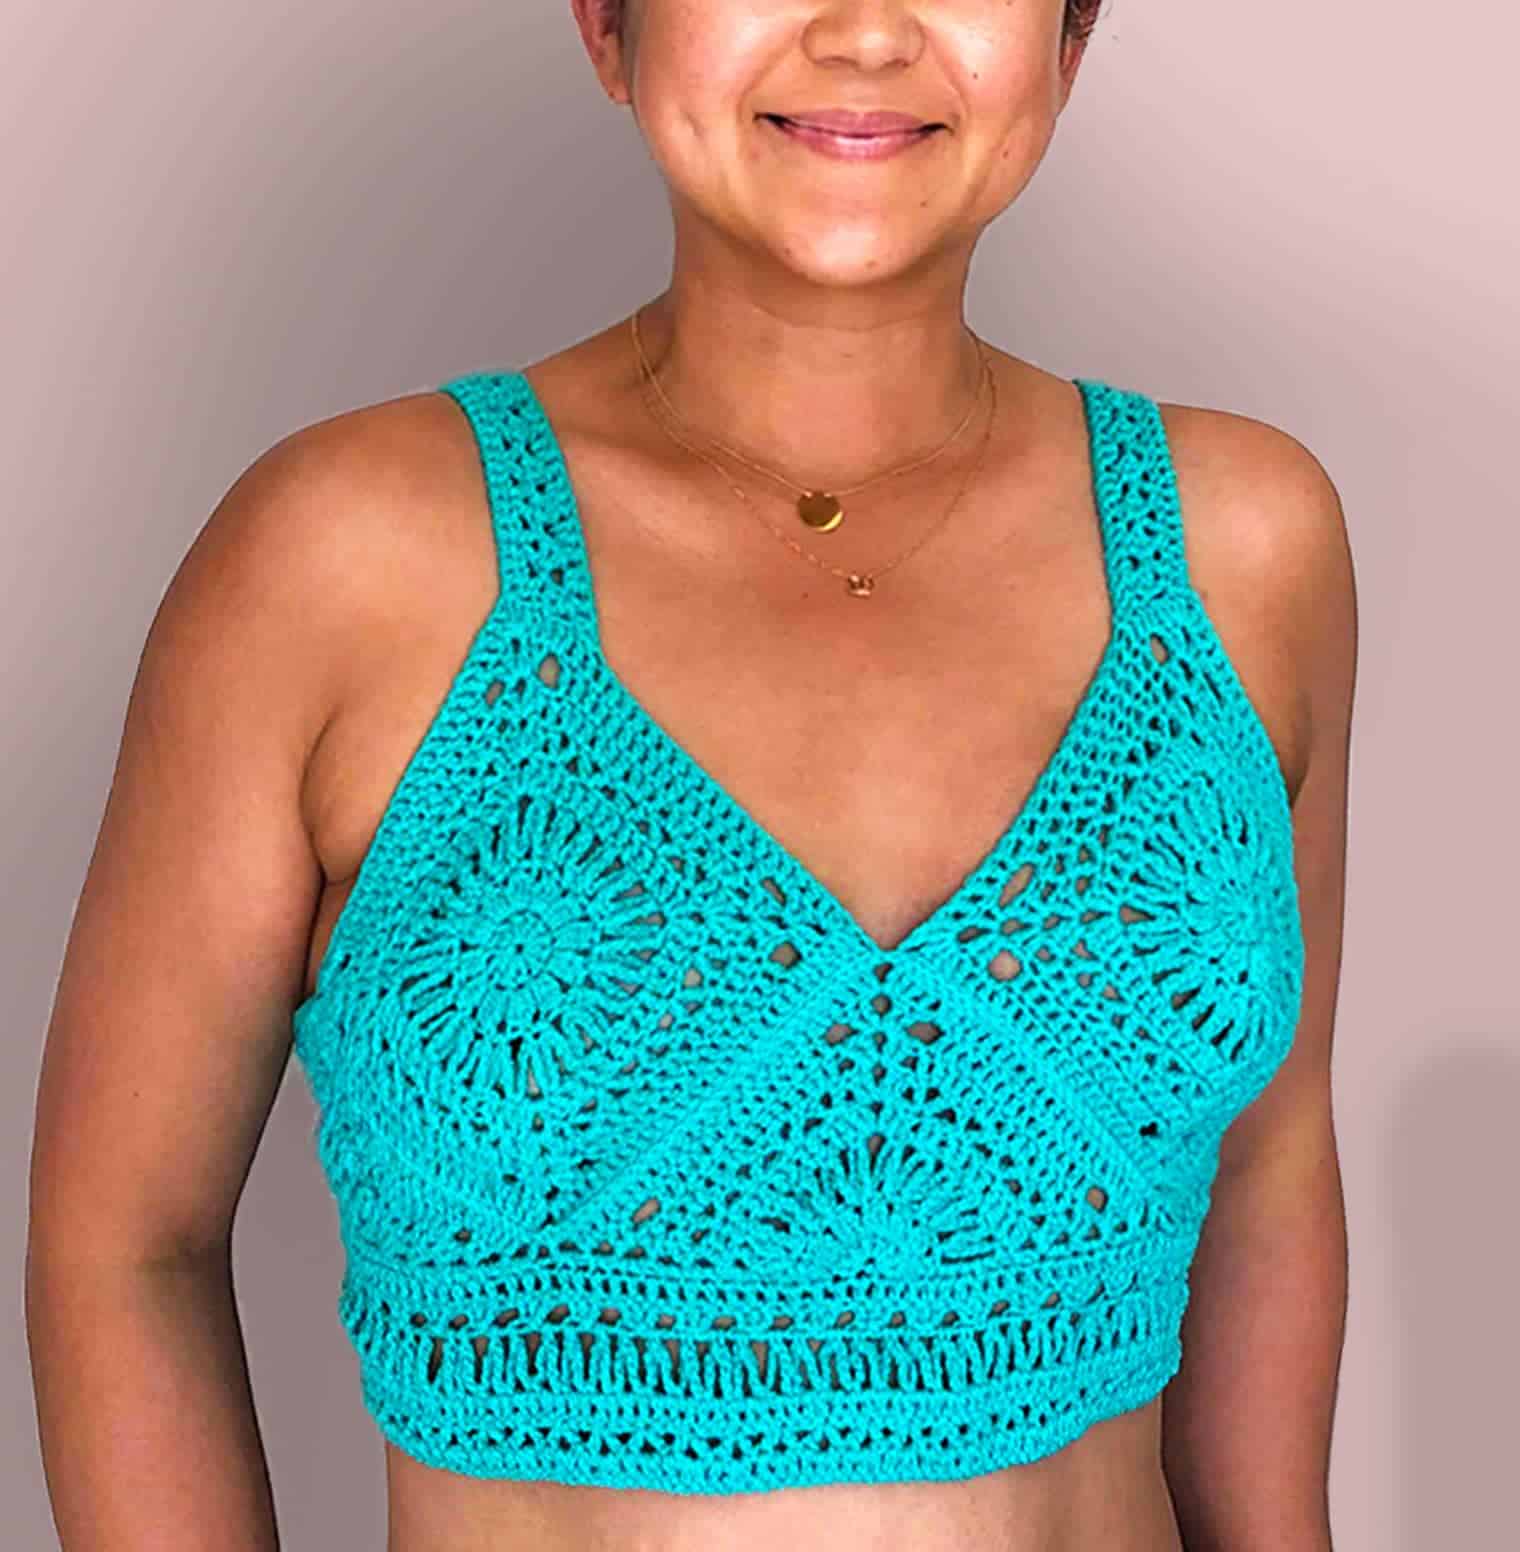
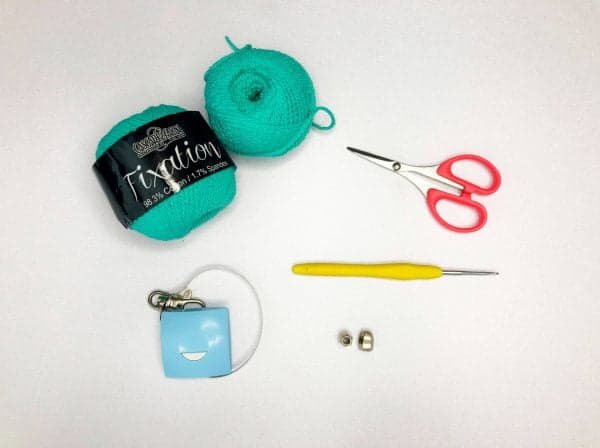
Knowing that this pattern will have some gaps in between loops, you will definitely need to use a small hook and a lightweight yarn. I am using Cascade Fixation yarn in the color Seaglass which is a turquoise-y color and a 2.5mm crochet hook.
Here is some great information about this yarn and some other patterns you might like using this yarn.
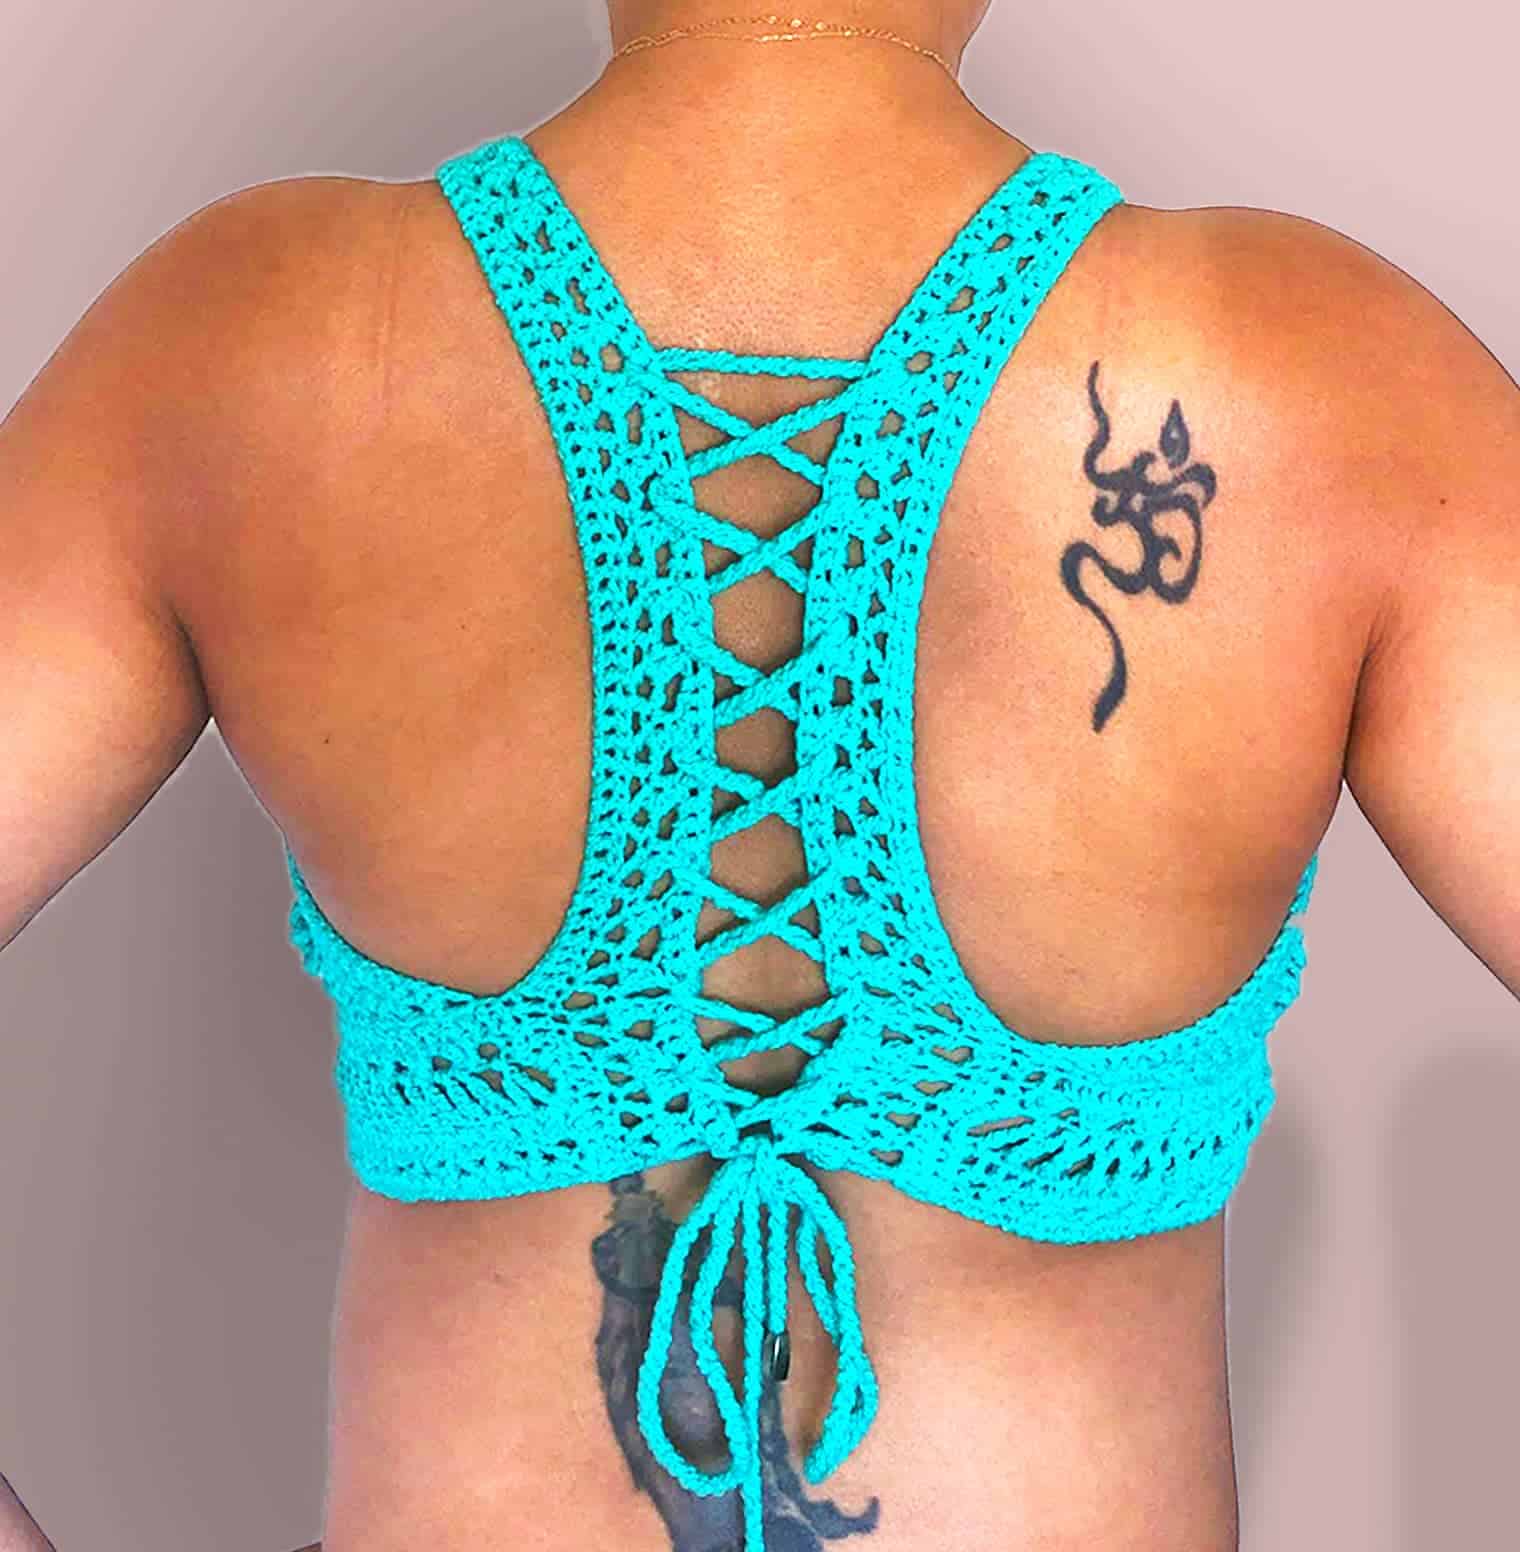
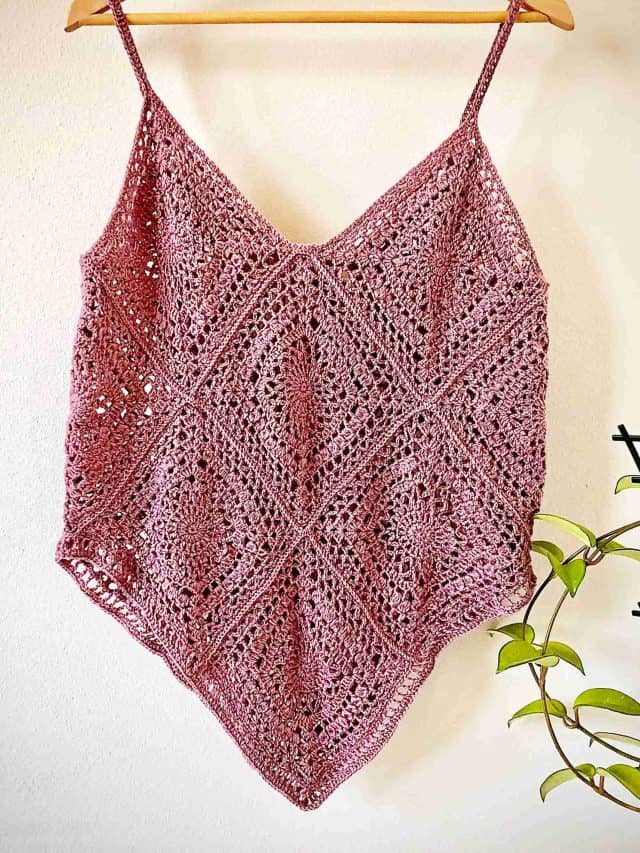
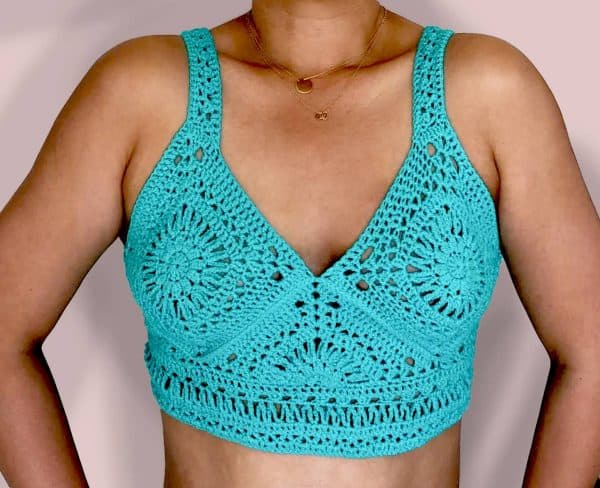
This top is multi-adjustable at the back allowing you to create a different look each time on how to want to wear it. Plus it also comes in 9 sizes in a group of 4.


Things to Note:
§ Prepare pattern gauge to get the right size. You may need to adjust your tension or change hook size to achieve the same gauge.
§ Turning chain does not count as a stitch unless mentioned otherwise
§ Corner Group Stitch – 2Dc, Ch 2, 2Dc in the same Ch Sp.
§ Step by step Video Tutorial available here
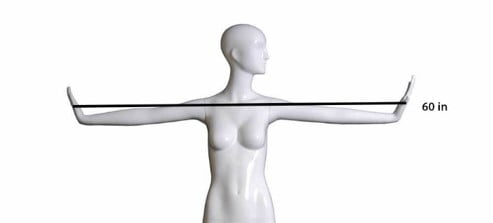
Your body measurement:
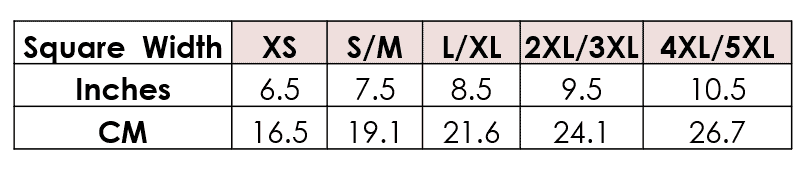
§ Measurements above are the finished size for your cup size/ width
§ If you are in between sizes, size down as this top/yarn will stretch
§ I am wearing size S-M, 5”3 / 160cm in these pictures for reference
§ Abbreviation page available in English US format
**
PART 1: Square Pattern (See Video Tutorial)
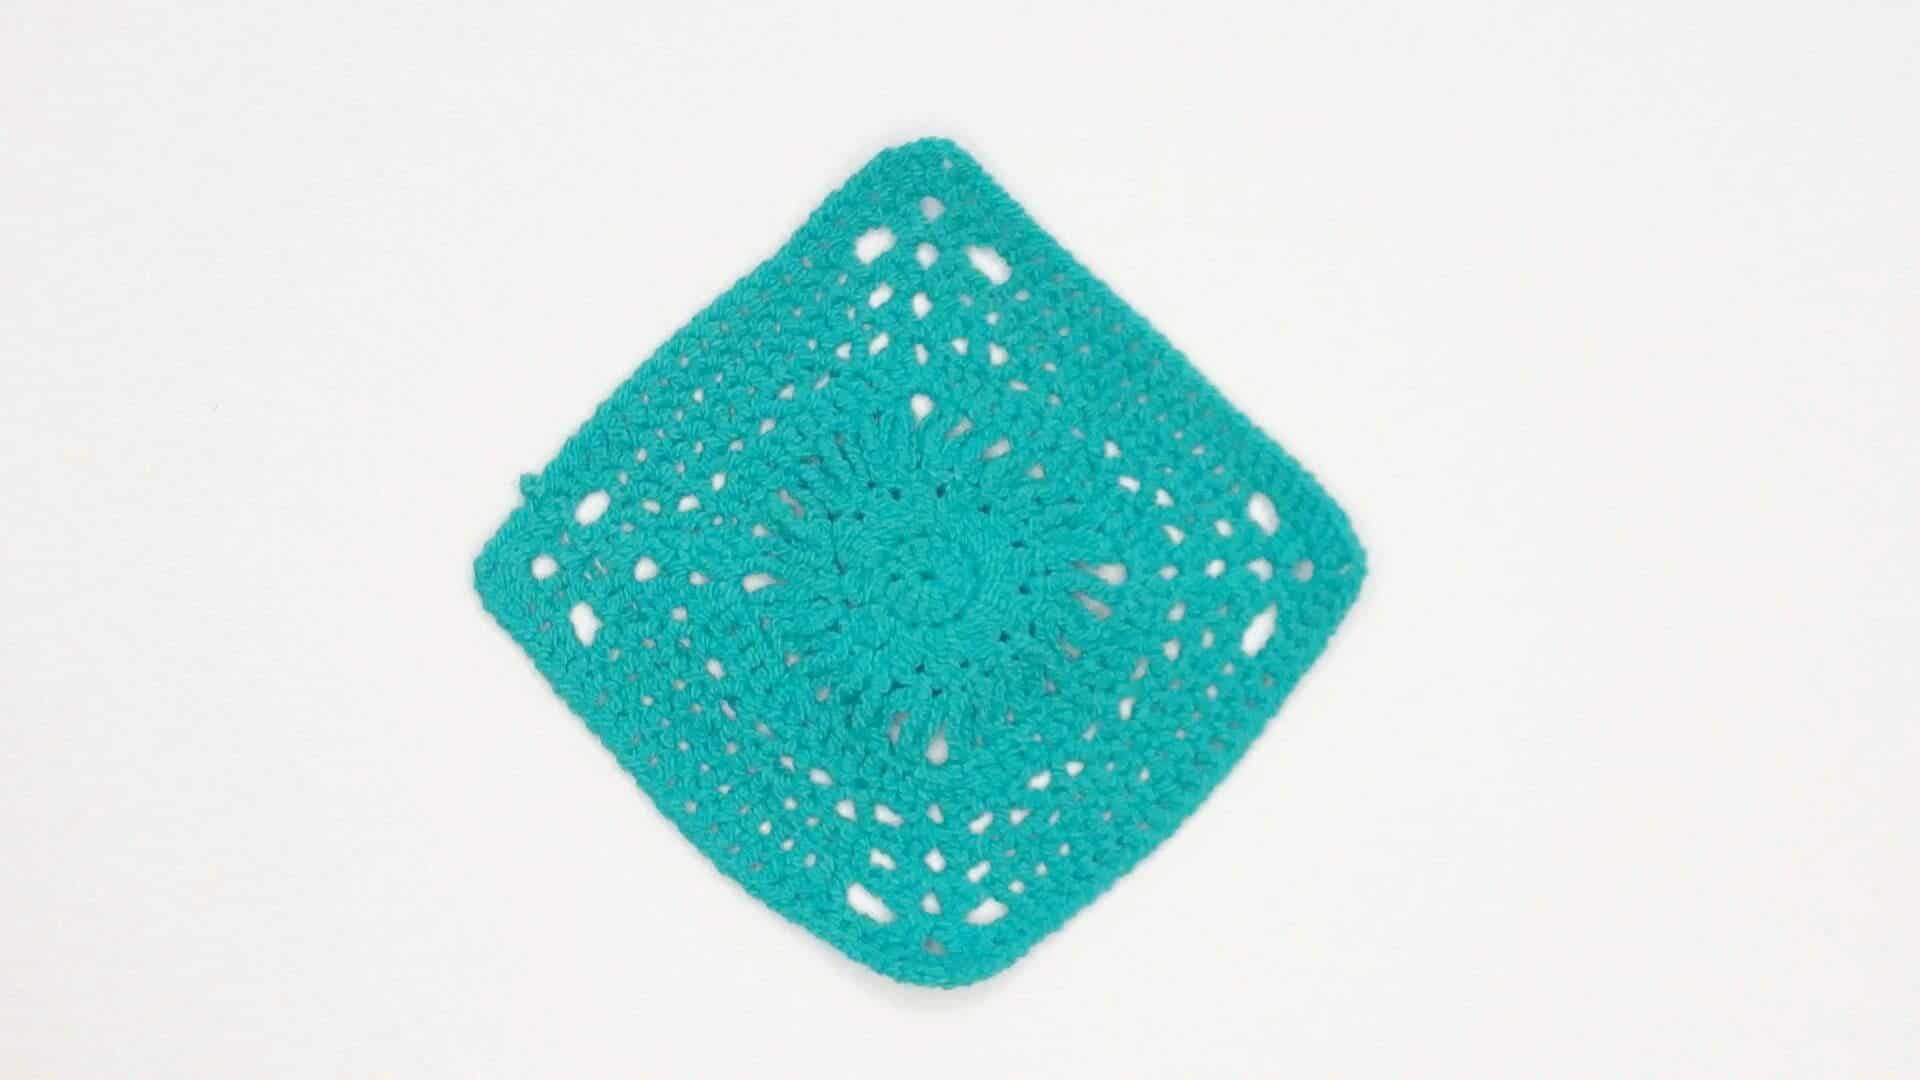
1. Magic Ring (All Sizes): Work up a magic ring, and work 12 Dc in the ring, pull tail to close ring, Slst to join in the rnd, Ch 2
2. Rnd 2: Work 2Dc Puff St in the same Slst, Ch 2, *(3Dc Puff St in the next St, Ch 2), Rep (*) in each St in the round, Slst to join in the rnd,
3. Rnd 3: Ch 10 *(Sc in the Ch Sp, Ch 10, Sc on the puff St, Ch 10), Rep (*) in the round until the last St, Ch5, Yo 4x and Trtr on the 1st St to join in the rnd,– Make sure you have 24 loops.
4. Rnd 4: Ch 2 *(Sc into the next loop, Ch 2), Rep (*) on all loops, Slst to join in the rnd, Sc in the next Ch Sp
5. Rnd 5: *(Work a corner group St in the Ch Sp, Dc on each St and each Ch Sp for 11 total Sts), Rep (*) on each side. Slst on to the first St to join in the rnd, Sc in the middle Ch Sp
6. Rnd 6: **[Work a corner group St in the Ch Sp, Sk 1 St, *(Dc, Ch 2, Dc in the same St to form a “V”, Sk 2), Rep (*) until the 2nd last St from the corner St, Dc, Ch 2, Dc in the same St to form a “V”, Sk 1], Rep [**] on each side, Slst to join in the rnd, Sc in the middle Ch Sp
7. Rnd 7: **[Work a corner group St in the Ch Sp, *(Dc on the triangle St, 2Dc in the Ch Sp), Rep (*) until the last St before the corner St], Rep [**] on each side, Slst to join in the rnd, Sc in the middle Ch Sp
––For sizes 2XL to 5XL repeat Step 6 & 7 for 1 more row each, then proceed to next step. All other sizes proceed to the next step.
8. Rnd 8: *(Work a corner group St in the Ch Sp, Ch 2, Sk2, Dc in the next St and in each St across until the 3rd last St, Ch 2, Sk 2), Rep (*) on each side, Slst to join in the rnd. Slst once more, Sc in the middle Ch Sp
––For sizes XS: Proceed to Step 10. S – 5XL: Proceed to Step 9.
9. Rnd 9: *(Work a corner group St in the Ch Sp, Dc in the next 2 Sts, Dc 2 in the Ch Sp, Dc in each St across until the last St, Dc 2 in the Ch, Dc in the next 2 Sts), Rep (*) on each side, Slst to join in the rnd,
––For sizes: L/XL & 4XL/5XL: Rep Step 9 for 1 more row.
10.Bind off and make 1 more square.
PART 2: Tringle Pattern (See Video Tutorial)

1. Magic Ring (All Sizes): Work up a magic ring, work 7 Dc in the ring, pull tail to close ring, Ch 2
2. Rnd 2: Work 2Dc Puff St in the same St, Ch 2, *(3Dc Puff St, Ch 2), Rep (*) in each St across, Ch 10, turn
3. Rnd 3: Sc in the Ch Sp, *(Ch 10, Sc on the prev puff St, Ch 10, Sc in Ch Sp ), Rep (*) across until the 2nd last loop, Ch5, Yo 4x and Trtr on the 1st St, Ch 2, turn
4. Rnd 4: *(Sc into the next loop, Ch 2), Rep (*) on all loops, Ch 4, turn
5. Rnd 5: Work 2Dc in the Ch Sp, *(Dc on each St and each Ch Sp for 10 total Sts), Work a corner group St in the next Ch Sp. Rep (*) across. Work a half corner group St in the last St, Ch 4 turn
–-A Half Corner Group Stitch consists of 2Dc, Ch 2, 1Dc Sts in the Ch Sp
6. Rnd 6 Work 2Dc in the Ch Sp, Sk 2, *(Dc, Ch 2, Dc in the same St to form a “V”, Sk 2), Rep (*) until the 2nd last St before the corner St, Dc, Ch 2, Dc in the same St to form a “V”, Sk 2, Work a corner group St in the next Ch Sp. Sk 2, Rep (*) across. Work a half corner group St in the last St, Ch 4 turn
7. Rnd 7 Work 2Dc in the Ch Sp, *(Dc on the triangle St, 2Dc in the Ch Sp), Rep (*) until the last St before the corner St, Work a corner group St in the next Ch Sp. Rep (*) across. Work a half corner group St in the last St, Ch 4 turn
–For sizes 2XL to 5XL repeat Steps 6 & 7 for 1 more row each, then proceed to next step. All other sizes proceed to the next step
8. Rnd 8: Work 2Dc in the Ch Sp, *(Ch 2, Sk2, Dc in the next St and in each St across until the 3rd last corner St, Ch 2, Sk 2), Work a corner group St in the next Ch Sp, Rep (*) across, Work a half corner group St in the Ch Sp, Ch 4 turn
––For sizes: XS: Proceed to Step 10. S – 5XL: Proceed to Step 9
9. Rnd 9: Work 2Dc in the Ch Sp, *(Dc in the next 2 Sts, Dc 2 in the Ch Sp, Dc in each St across until the last St before the corner St, Dc 2 in the Ch, Dc in the next 2 Sts), Rep (*) across, Work a half corner group St in the Ch Sp.
––For sizes: L/XL & 4XL/5XL: Rep Step 9 for 1 more row.
10.Bind off and make 2 more triangles.
PART 3: Joining Pieces (See Video Tutorial)
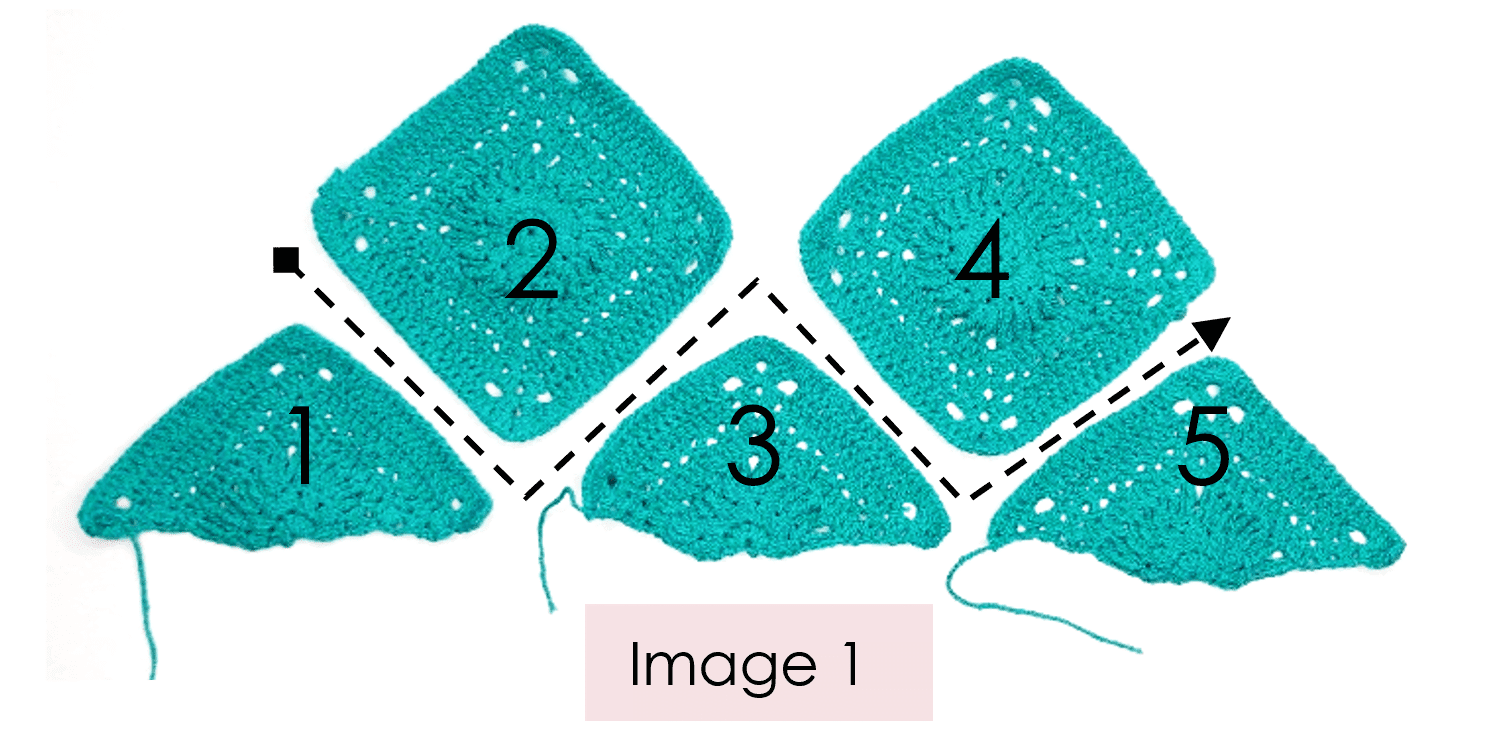
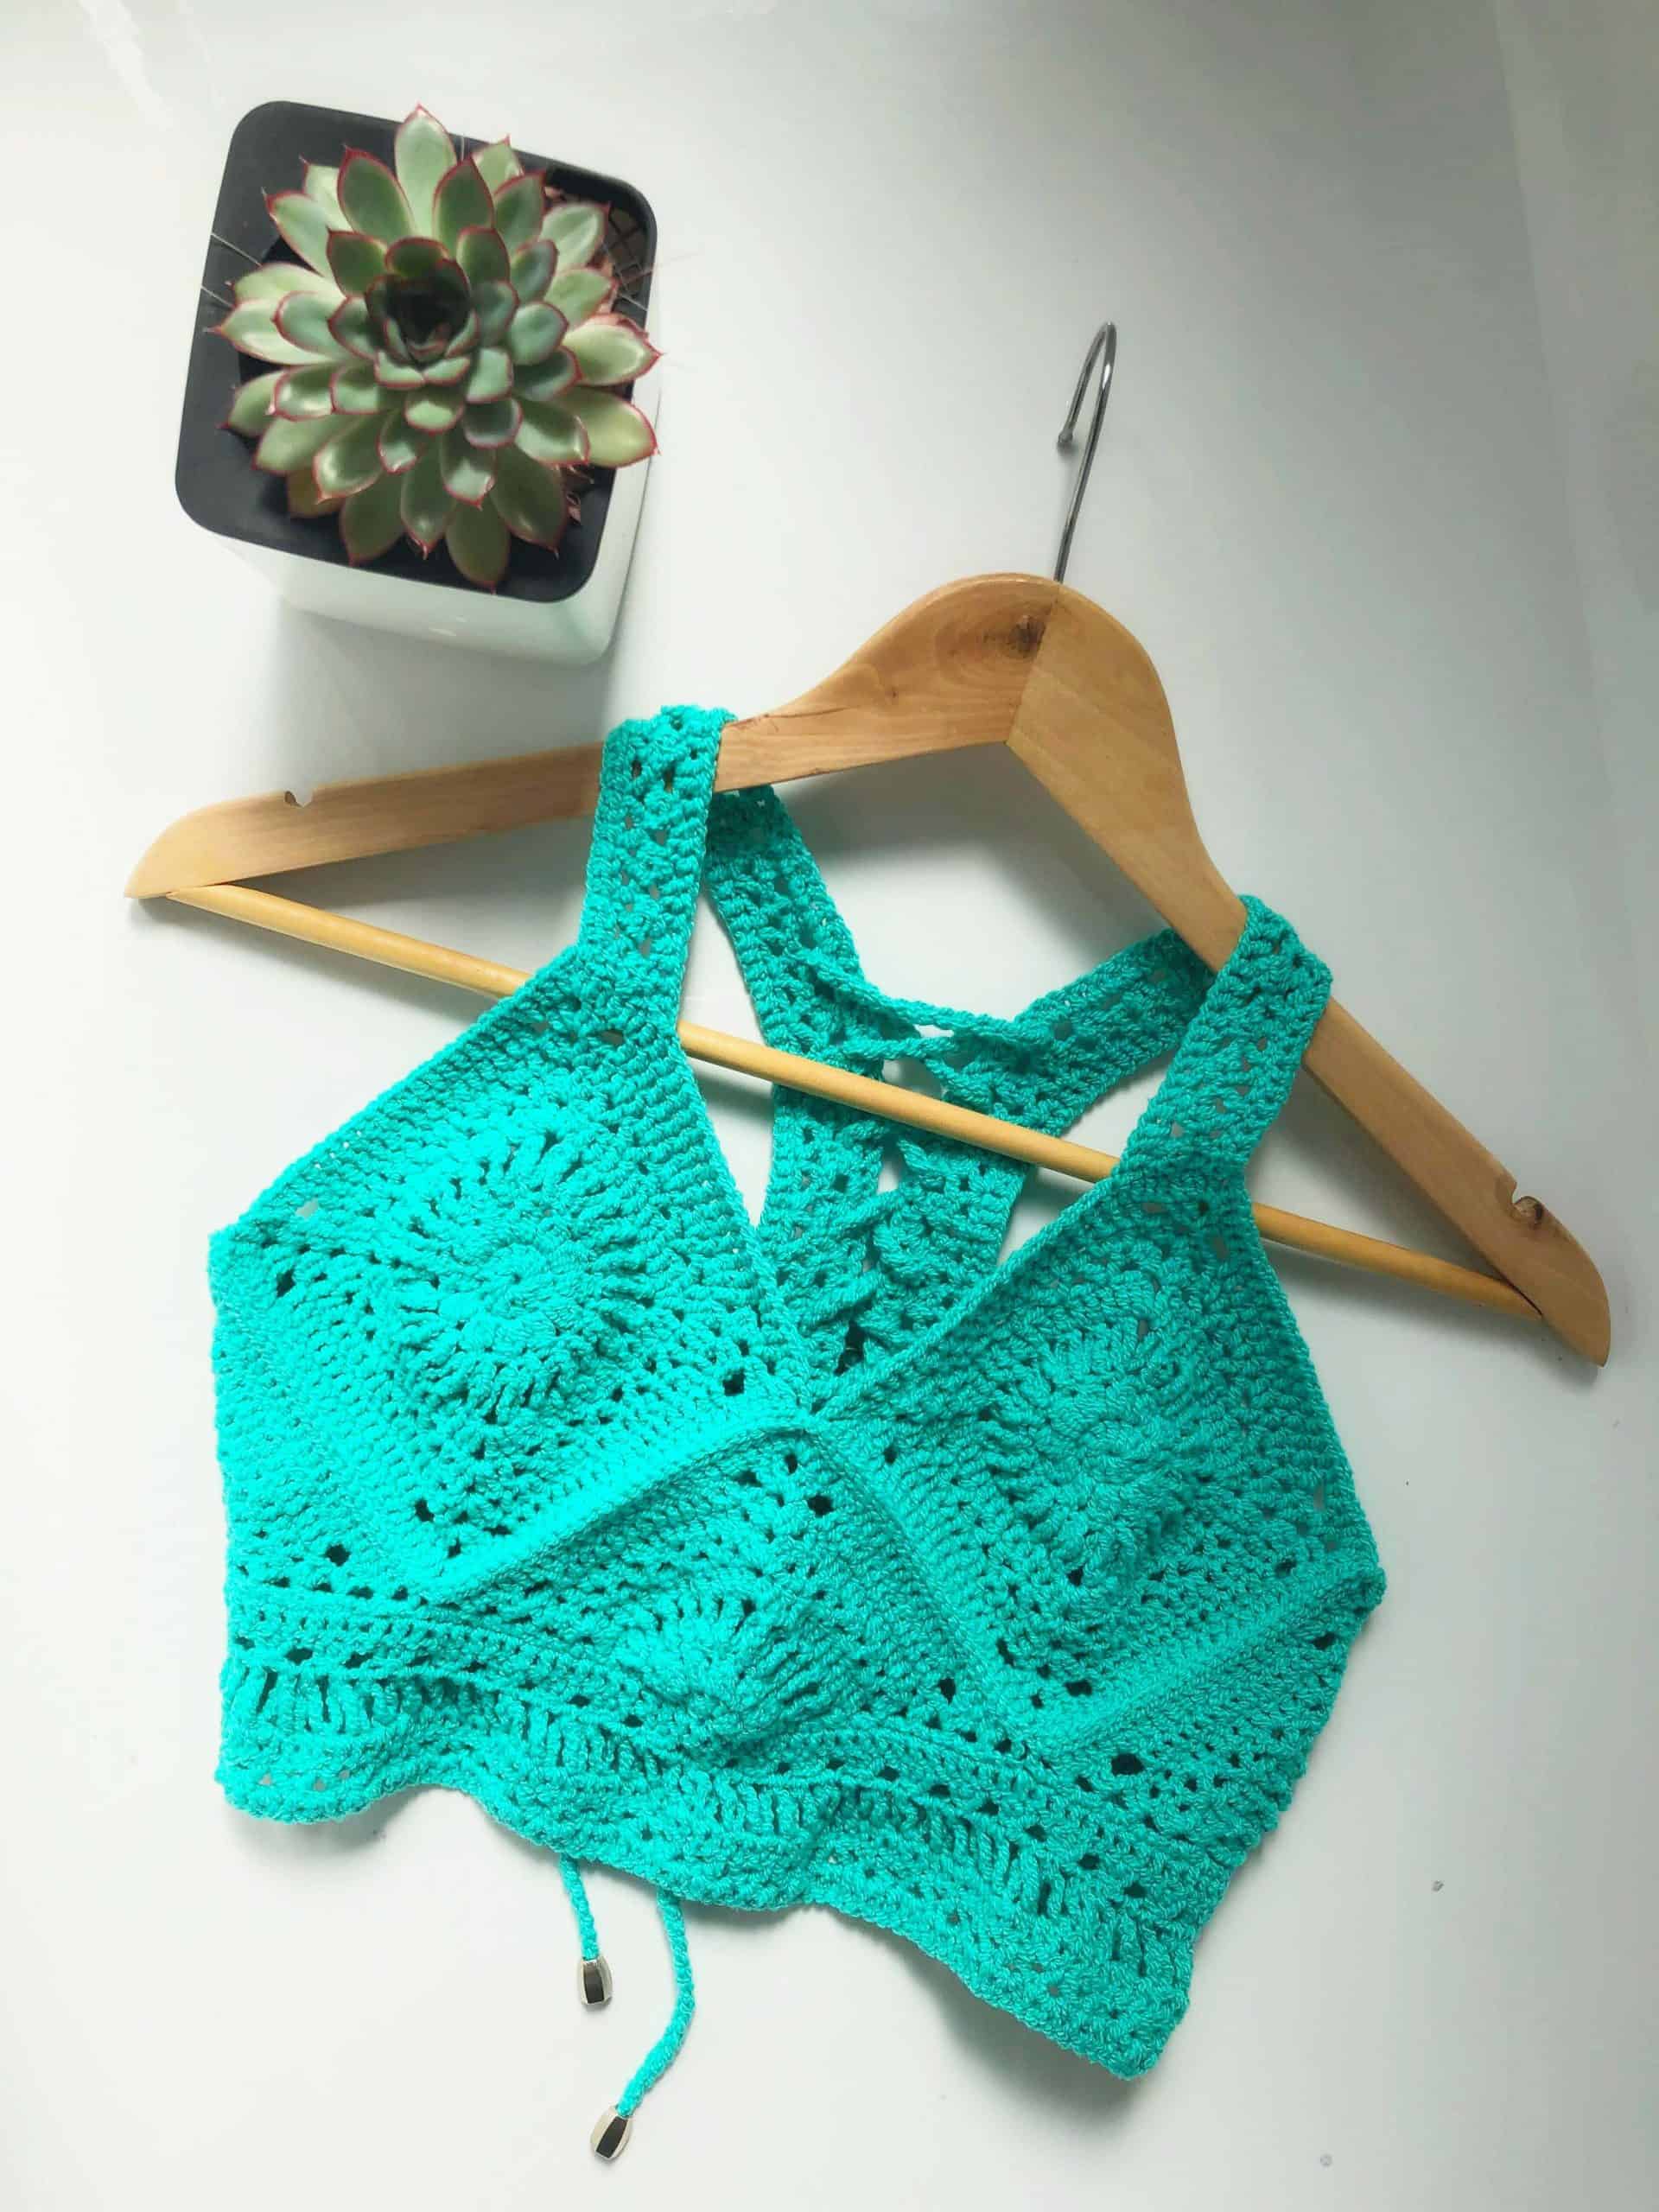
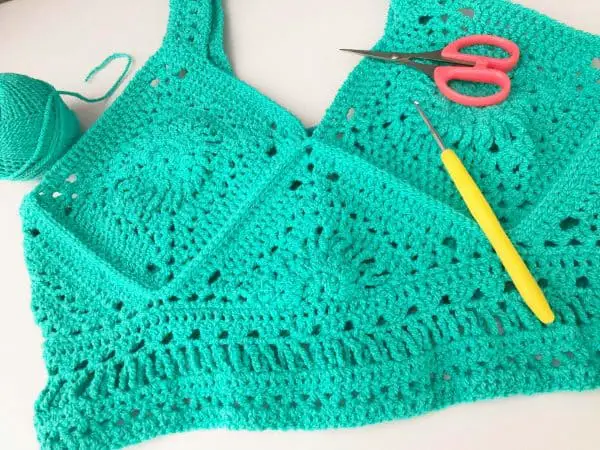
1. Arrange 2 squares at the top, and the 3 triangles at the bottom. (See image 1)
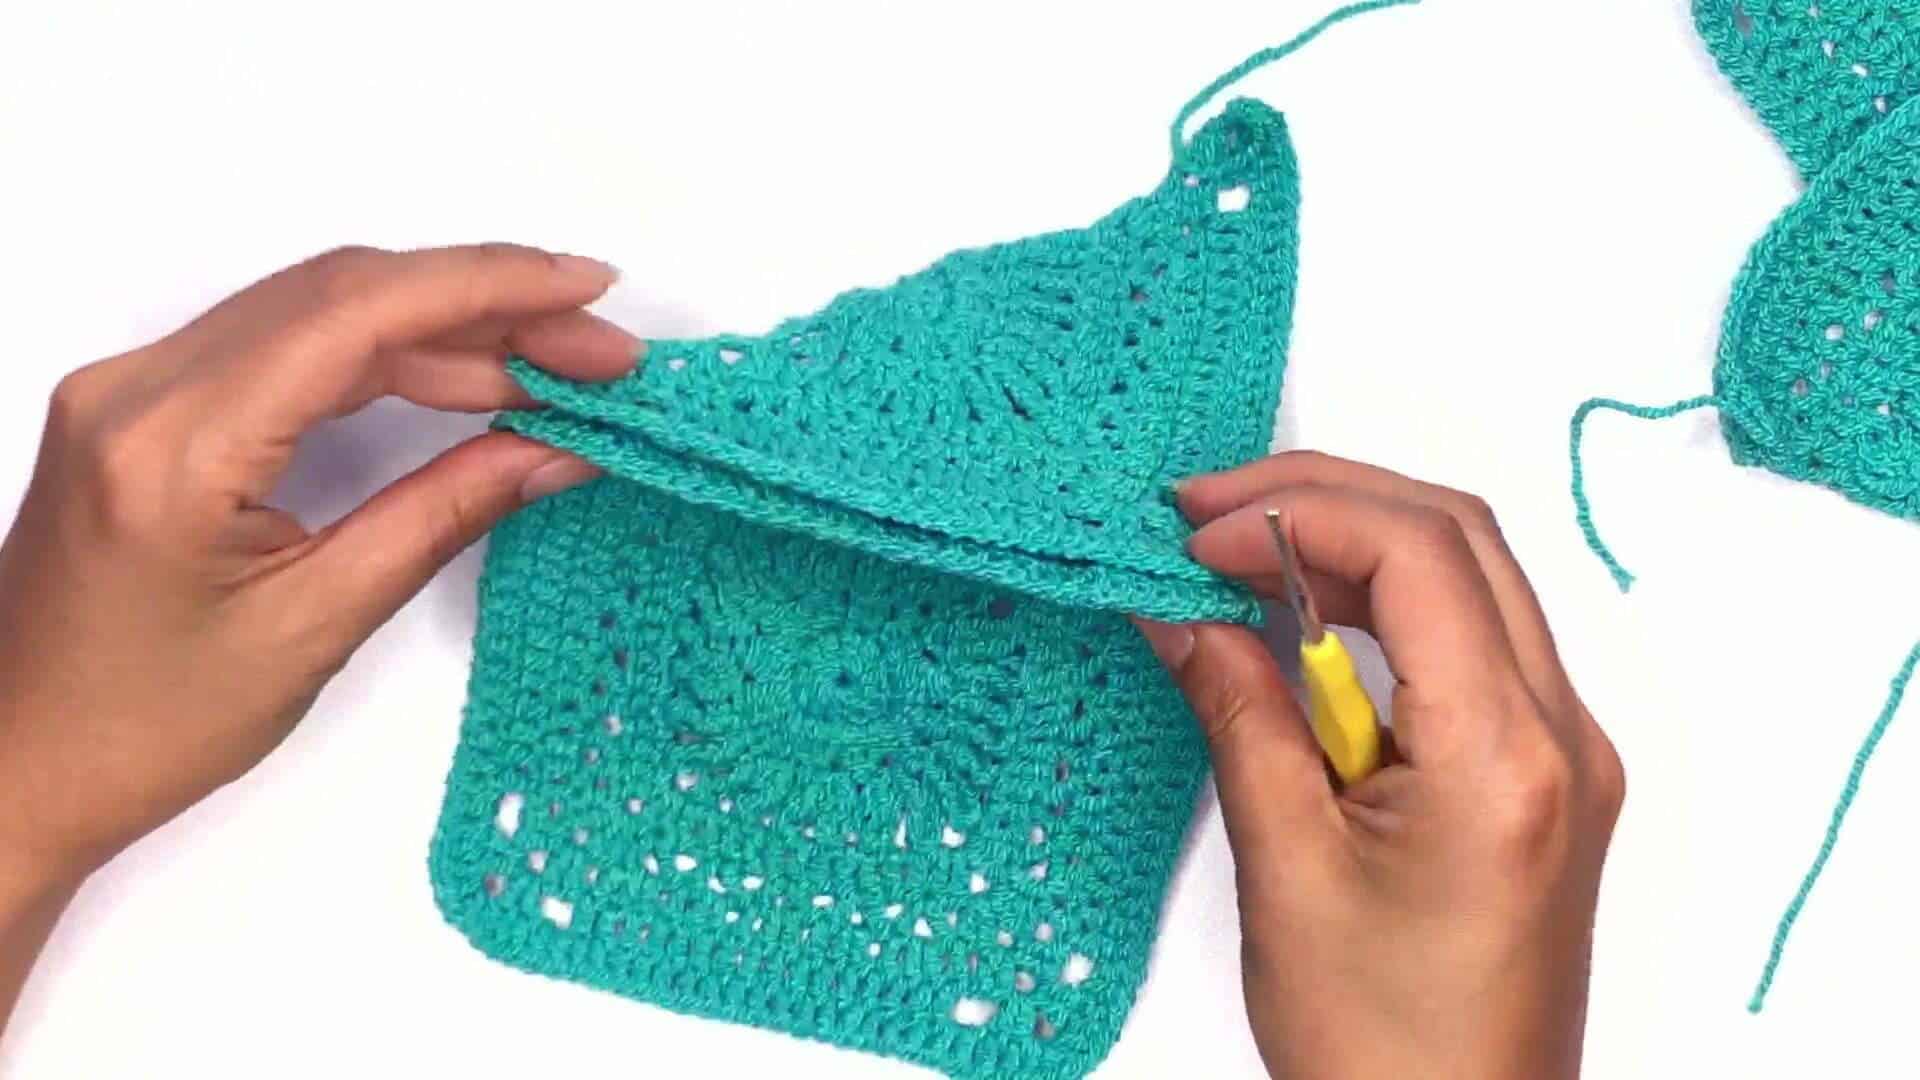
2. Starting with Square #1 and #2, *(sandwich both pieces together RS out, insert hook through the corner Ch Sp of both pcs and Ch 1 to secure. Next insert hook through the back loop of the 1st St of both pcs, and Slst. Rep the back loop Slst on each St across), Sc on the corner Ch Sp,
3. On the last St, release Square #1 and place #3 on the following stitch side, and Rep (*) above.
4. On the last St, release Square #2 and place #4 on the following stitch side, and back loop Slst each St across.
5. On the last St, release Square #3 and place #5 on the following stitch side, and back loop Slst each St across. Bind off
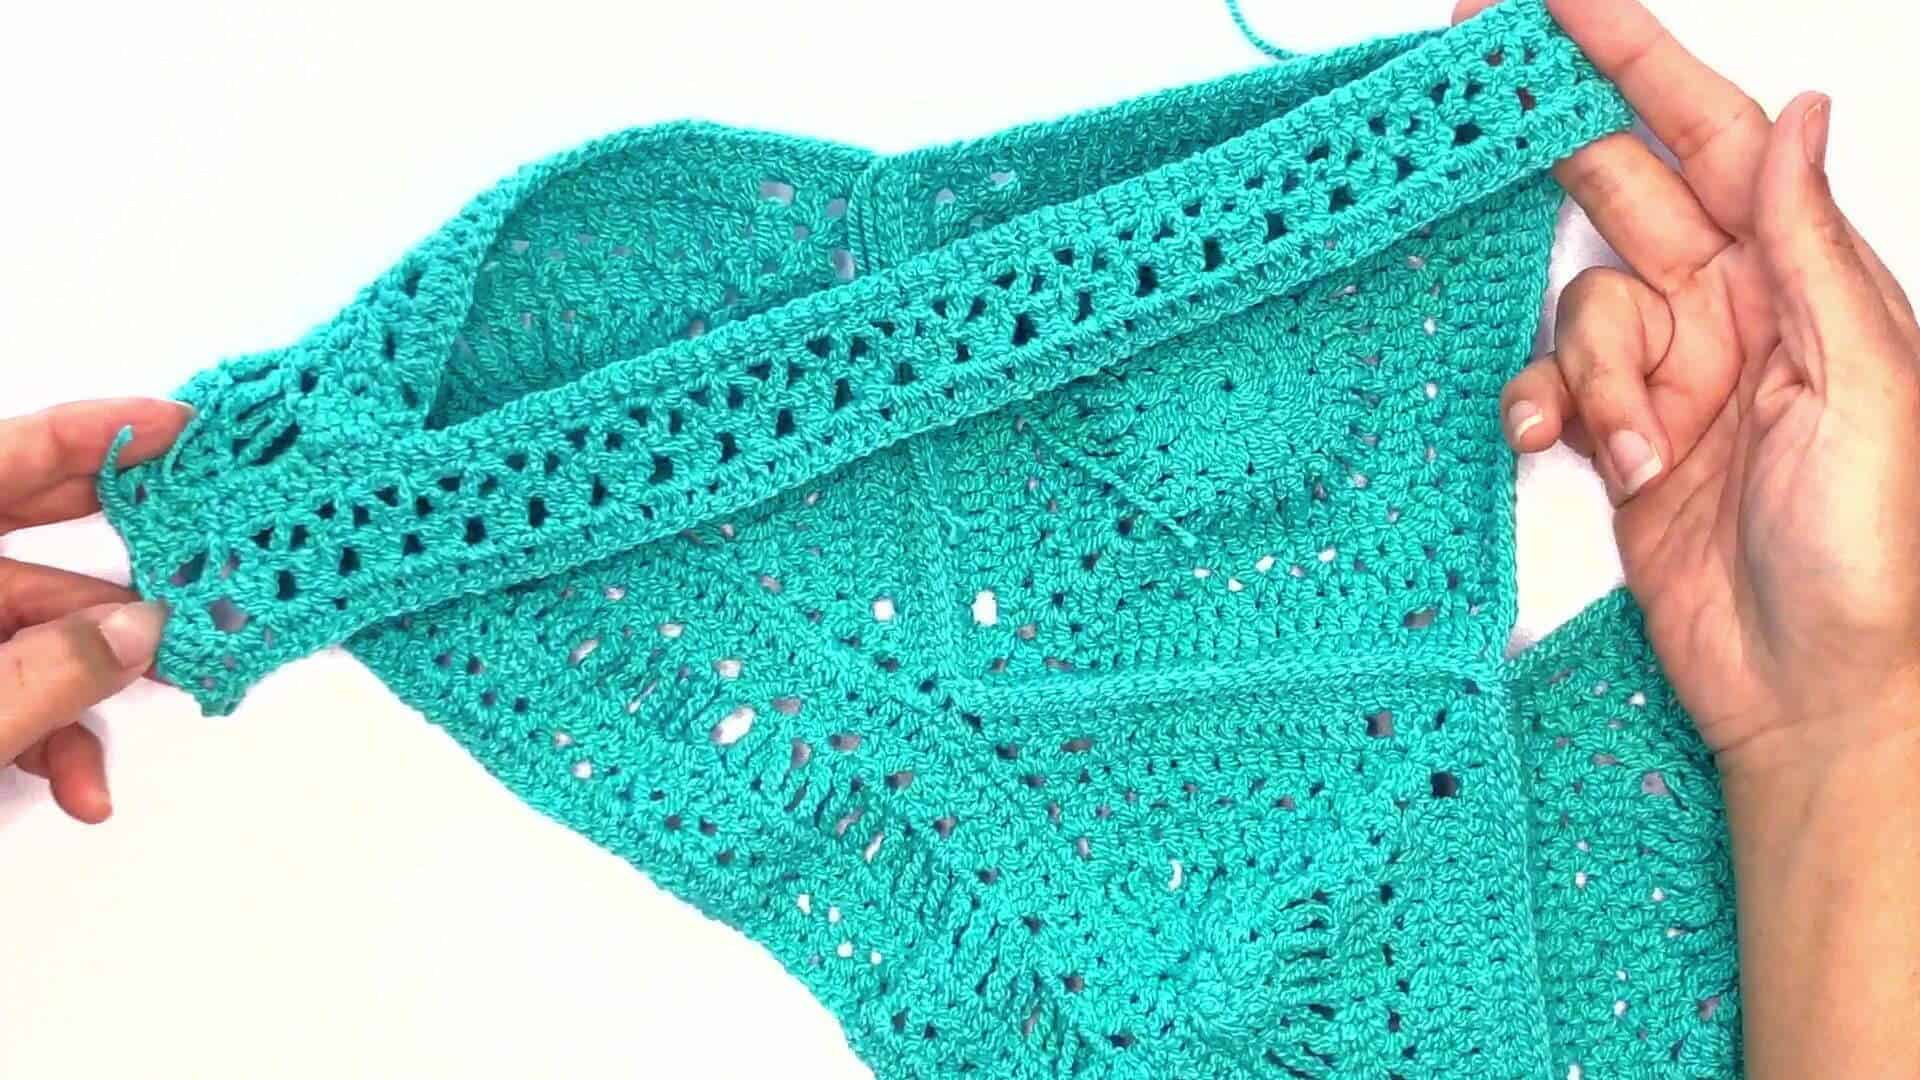
PART 4: Bottom Panel (See Video Tutorial)

1. Row 1: Turn work downside up, and insert hook through the corner chain Sp on the Righ (RS). Sc each Row evenly across, Ch 1 turn
2. Row 2: Dc each St across, Ch 1 turn
3. Row 3: *(Dc3tog the next 3 Sts, Ch 2), Rep(*) across. Ch 10 turn
4. Row 4: *(Sc into the Ch Sp, Ch 10, Sc into the St, Ch 10) Rep (*) across until the 2nd last loop, Sc in the Ch Sp, Ch 5, Yo4x, Trtr into the last St, Ch 2, turn
5. Row 5: Sc the next loop, *(Ch 1, Sc in the next loop) Rep(*) across, Ch 1 turn
6. Row 6: 1 Dc each St and in each Ch Sp across, Ch 1 turn
7. Row 7: Dc in the 1st St, *(Sk 2, Dc in the next, Ch 2, Dc in the same St), Rep (*) across, Ch 1 turn
8. Row 8: Dc each St across.
9. Bind off
–If you would like a longer bottom panel, Rep Steps 1 – 8 again.
PART 5: Straps (See Video Tutorial)
1. Foundation Row: Place your hook at the top corner of the square, draw up a loop and Ch 60 [70/75/80/85] or adjust accordingly to your size. On the last St, insert hook at the top row of the bottom panel and Sc. Work Sc Sts evenly across, Ch 1 turn
2. Row 2: Dc each St and each Ch across, Sk 2 Sts at the top square, Slst, Ch 2 turn
3. Row 3: Dc on the prev Slst, *(Sk 2, Dc, Ch 2, Dc on the same St), Rep (*) across, Ch 1 turn
4. Row 4: Dc in the 1st St, *(2Dc in the Ch Sp, Dc in the next St), Rep (*) across, Sk 2 Sts at the top square, Slst 3, Ch 1 turn
5. Row 5: *(Dc each St , 2Dc in each Ch Sp) Rep (*) across, Bind off
6. Rep Steps 1- 5 on the other strap.
PART 6: Ties (See Video Tutorial)
1. Take your yarn, and pull approx. 2 arms’ length worth of yarn. Hold the top of the yarn and pull 3 – 5 more times.
—Depending on how long you need it to be, a chained 4x yarn is about 40in or 100 cm in length, 6x yarn is 60in or 152cm
2. Next, grab both yarns at the top and drag a second layer all the way down. Snip off the remaining yarn. Work a double slip knot and Ch across.
—You might want to change hook size if you need to.
3. Add decorative beads at the end of each tie (Optional)
PART 6: Assembling Ties (See Video Tutorial)

Matahari Crochet Crop Top
$4.99