

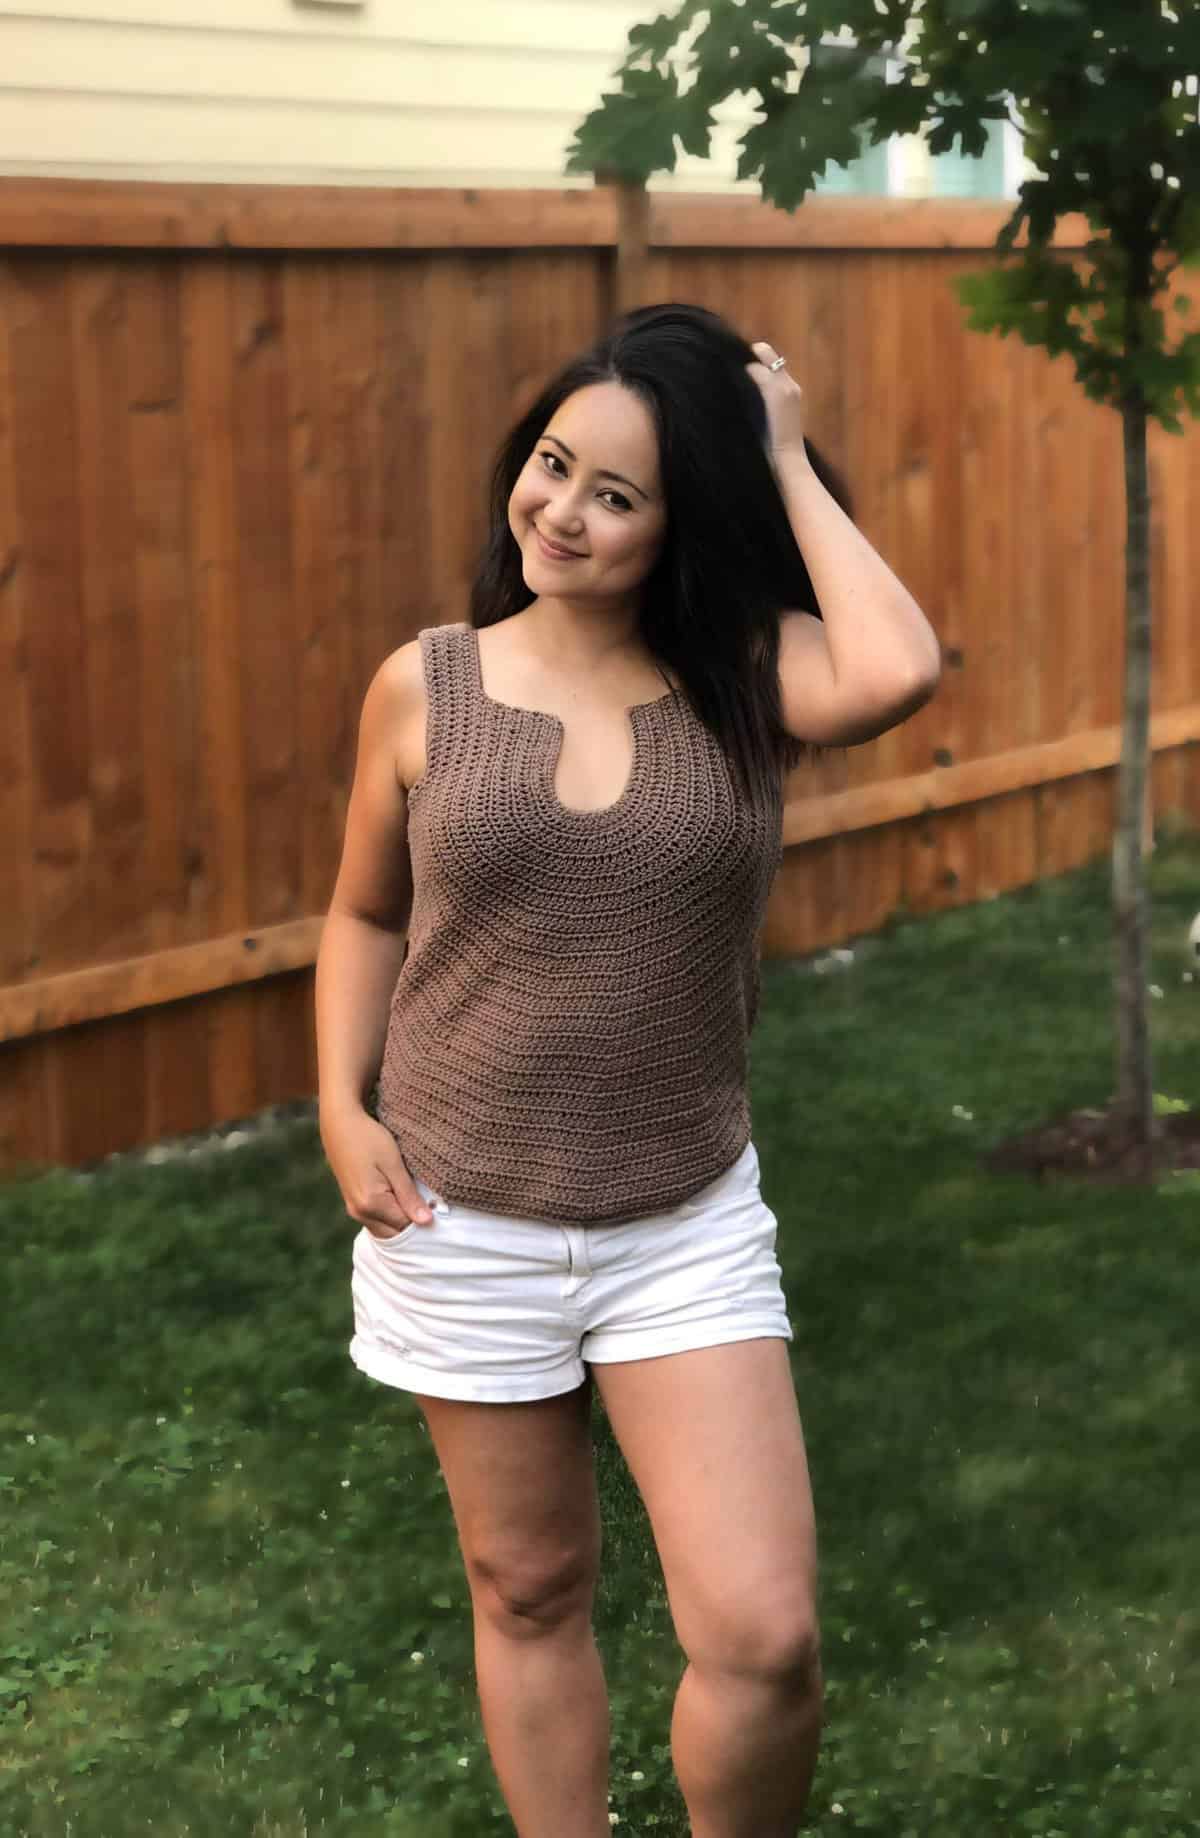
This versatile and stylish free crochet tank top pattern is the perfect addition to any wardrobe intended for any gender.
I wanted to make a unisex all-gender approved tank top perfect for the warm weather.
This versatile and stylish free crochet tank top pattern is the perfect addition to any wardrobe intended for any gender perfect for the warm weather.
With sizes ranging from XS to 5XL, it’s inclusive and ensures that it is available for every body type. The rainbow colors are not only a symbol of pride and unity, but they also add a burst of brightness and joy to any outfit.
It’s not just a piece of clothing, but a statement of pride, love, and acceptance.
This style is simple, casual, and fun. This V neckline is also an easy pattern any advanced beginner can make. It is also made in one simple stitch throughout the entire pattern.
At the end of this project, you will not only master the V stitch but also learn how to change yarn colors effortlessly.

This top is made using basic stitches from chains, single crochet, slip stitches and double crochet stitches. This top is crocheted from the straps, down shaping the neckline, then increasing along the armhole to fit the chest width.
The sides are then added with repeat rows of the V stitch allowing the top to flow effortlessly. The armhole for this tank is intentionally made on the larger / wider side, so feel free to adjust if needed.
The back panel is made very similar to the front except for a shorter neckline. Once both sides are complete, the sides and straps are seamed together with an easy single crochet stitch. The best part about this pattern is that there is no wrong side so both sides can be used.

One of the highlights of this crochet tank pattern is the use of the pretty V-stitch pattern. Not only is it simple to learn, but it is also a great way to add a touch of elegance to the overall design.
You will also learn how to work in increases making each row flow smoothly. This stitch allows for a beautiful mesh finish, making the tank top comfortable and breathable to wear.
On top of that, I will also show you how to change yarn colors effortlessly, avoiding the need to weave in countless ends. The trick is to leave a long tail that is then brought forward and worked around across the following row. Neat huh! Check out the full tutorial here.

With its stunning finish and vibrant color palette, this project is bound to become a staple in your summer wardrobe. And if you’re looking for more similar crochet tank top patterns and summer tops here are some free patterns to check out.
Materials Needed

To create this lovely tank top, you will need soft breathable yarn, preferably a sport weight yarn or any lightweight cotton yarn. Here I have cascade fixation yarn in 6 colors – red, orange, yellow, green, blue, and purple.
This yarn is the perfect choice for this project to ensure a breathable and comfortable finished crochet summer tank top. And because we already have 6 skeins of yarn, we will not need much yarn for the entire project.
If cascade fixation yarns are not readily available to you, don’t worry! You can always find a substitute yarn in the same weight category (category 3). There are plenty of options out there, so make sure to choose one that matches your personal preference and style. A quick search on yarnsub.com will provide you with other alternative choices.
Working with this yarn, I chose to go with a slightly larger hook size, choosing 4.5 mm crochet hook as the best size. However, if you prefer a bigger stitch finish, feel free to go for a larger hook. This will create a more airy and loose texture in your tank top. Make sure to have a tape measure handy to keep track of your progress and ensure accurate sizing.
Lastly, don’t forget to have a tapestry needle on hand. This will be essential for weaving in any loose ends to keep our work neat and tidy.
If you would like to receive free crochet patterns and video tutorials straight into your inbox, just click Subscribe to get into our mailing list
Tips For Beginners

If this is your first time attempting to make a crochet tank top, here are some additional tips to ensure success:
Hook Size Matters: Pay close attention to the recommended hook size in the pattern. Using the wrong size can significantly affect your gauge and, subsequently, the fit of your top.
Yarn Considerations: Consider using a lightweight yarn made from cotton ideal for the warmer weather. This modification allows for breathability and comfort in the summer months. Here are some great substitutes to consider – Yarn Sub
Customizing Your Top: Don’t be afraid to add your personal touch. Experiment with other colors, edging, or even adjusting the length!
Gauge: Always take the time to create a gauge swatch. This first step is crucial in ensuring your project size does not derail from the written pattern
Things to Note:
- Prepare a pattern gauge to get the right size. You may need to adjust your tension or change the hook size to achieve the same gauge.
- Pattern consists of the V Stitch which also includes Chains, Slip Stitch, and Double Crochet stitches.
- Video Tutorial available here
- The abbreviation is available in English US format here.
Crochet Abbreviations (US term)
Ch – Chain Stitch
Ch Sp – Chain Space
RS – Right Side
WS – Wrong Side
inc – Increase
Sl St – Slip Stitch
Sc – Single Crochet
Dc – Double Crochet
V St – V Stitch = (Dc, Ch1, Dc)
Rainbow Tank Top Measurement Chart:

- Pattern consists of 9 sizes.
- Measurements above are only an estimate of the finished garment based on gauge and not body size
- This Tank top has a large armhole and is meant to be on the larger side. Size can be adjusted to your liking
- If you are in between sizes, size up or measure along
- I am wearing size small in these pictures.
**

PART 1: Front Strap
Working from the top down
- Foundation Row (Red Yarn): Ch 10 [10/ 13/ 16/ 19] [19/ 22/ 22/ 25] , Ch 1 turn to start the next row
- Row 1: Into the 2nd Ch from hook, work a Dc St, *[Sk 2, (Dc, Ch 1, Dc) in the same Ch], Rep [*] 1[1/2/3/4] [4/5/5/6] more times, Sk 2, Dc into the last Ch, Ch 1 turn (Dc, Ch 1, Dc) will now be called V St
- Row 2 (Inc Row): V St into the 1st St, work 1 V St into every Ch Sp, on the last St work a Dc and switch to Orange Yarn, Ch 1 turn
Refer to this tutorial on how to change yarn colors
- Row 3: Dc into the 1st St, work 1 V St into every Ch Sp, Dc into the last St, Ch 1 turn
- Row 4 (Inc Row): V St into the 1st St, work 1 V St into every Ch Sp, on the last St work a Dc and switch to a Yellow Yarn, Ch 1 turn
- Next Rows: Rep Steps 4 & 5 for a total of 17 [18/ 20/ 21/ 22] [23/ 25/ 26/ 27] rows while switching to the next yarn color on every 2 rows in this order – Red, Orange, Yellow, Green, Blue, Purple.
- Next Row (Inc both sides): V St into the 1st St, work 1 V St into every Ch Sp, on the last St work a V St.
- Bind off and rep Steps 1 – 7 to make a second piece.
Part 2: Joining Front Straps
Remember to continue to change to the next yarn color after every 2 rows
- On the last row of the 2nd Strap, Ch 1 turn, V St into the 1st St, work 1 V St into every Ch Sp across, on the last St work a Dc and join the 1st Strap with another Dc into the 1st St, V St across each Ch Sp, V St into the last St, Ch 1 turn
- Next Rows (Inc Row): V St into the 1st St, work 1 V St into every Ch Sp across, When you reach the middle of the row, work a V St on the Ch Sp and all the way across, on the last St work a V St, Ch 1 turn
- Rep Step 2 for 2 [3/ 4/ 5/ 7] [8/ 9/ 10/ 12] more rows while switching to the next yarn color on every 2 rows. Ch 1 turn
The width should be half your chest circumference. If not adjust accordingly.
- Next Rows: Stop decreasing by working Dc into the 1st St, 1 V St into every Ch Sp across, Dc into the last St, Ch 1 turn
- Rep Step 4 for a total of 30 [28/ 31/ 28/ 31] [28/ 31/ 28/ 31] rows or until you reach you’re preferred length.
- Bind off.
PART 3: Back Strap
- Foundation Row (Red Yarn): Ch 10 [10/ 13/ 16/ 19] [19/ 22/ 22/ 25] , Ch 1 turn to start the next row
- Row 1: Into the 2nd Ch from hook, work a Dc St, *[Sk 2, (Dc, Ch 1, Dc) in the same Ch], Rep [*] 1[1/2/3/4] [4/5/5/6] more times, Sk 2, Dc into the last Ch, Ch 1 turn
- Row 2 (Inc Row): V St into the 1st St, work 1 V St into every Ch Sp, on the last St work a Dc and switch to Orange Yarn, Ch 1 turn
- Row 3: Dc into the 1st St, work 1 V St into every Ch Sp, Dc into the last St, Ch 1 turn
- Row 4 (Inc Row): V St into the 1st St, work 1 V St into every Ch Sp, on the last St work a Dc and switch to Yellow Yarn, Ch 1 turn
- Next Row: Rep Steps 4 & 5 for a total of 12 [13/ 15/ 16/ 17] [18/ 20/ 21/ 22] rows while switching to the next yarn color on every 2 rows in this order – Red, Orange, Yellow, Green, Blue, Purple.
- Bind off and rep Steps 1 – 6 to make a second piece.
- On the last row of the 2nd piece, Ch 9 and Slst to the 1st piece on the increase side.
- Bind off and insert hook into the 1st St on that row (any side is fine), draw up a loop and Dc into the 1st St, work 1 V St into every Ch Sp, Dc into the last St, Ch 1 turn
- Next 3 rows: Dc into the 1st St, work 1 V St into every Ch Sp, Dc into the last St, Ch 1 turn. Do this for 3 more rows (All Sizes). You should have the same length and width as the front strap.
- Next Row (Inc both sides): V St into the 1st St, work 1 V St into every Ch Sp, on the last St work a V St. Ch 1 turn
- Rep Step 11 for 4 [5/ 6/ 7/ 9] [10/ 11/ 12/ 14] more rows.
- Next Rows: Stop decreasing by working a Dc into the 1st St, 1 V St into every Ch Sp across, Dc into the last St, Ch 1 turn
- Rep Step 13 for a total of 30 [28/ 31/ 28/ 31] [28/ 31/ 28/ 31] rows or until you reach you’re preferred length.
- Do not bind off yet.
PART 4: Attaching Front & Back
- Place the front and back panel together (there is no WS or RS for this project), and from your last St and same yarn, work Sc Sts through both pcs across until just before the row starts to dec. You can work 3 Sc for every 2 rows.
Tip: Use the colored rows as your guide for alignment
- Bind off and rep on the other side.
- Attach the straps with a Red yarn and by working Sc Sts along the edge. Do this on both sides.
- Bind off and weave in any loose ends.

END


