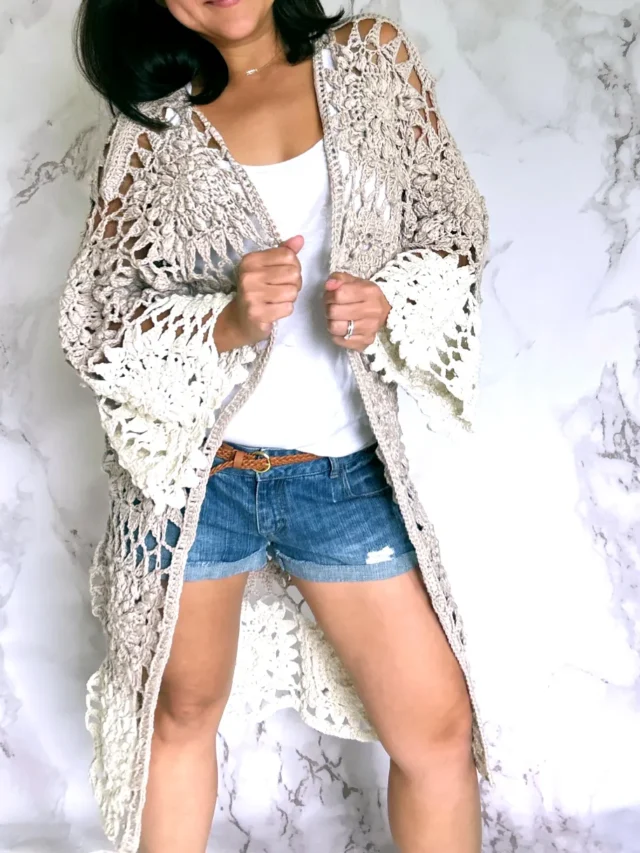
This easy lightweight crochet red white and blue cardigan is your new go-to summer layer. Its drapey, festive, and made with just one simple V stitch. It’s beginner-friendly, works up quickly, and is available in all 9 sizes from XS to 5XL.
Perfect for the 4th of July, a World Cup watch party, or just a beautiful summer staple, this free pattern has you covered.
If you’ve been looking for the perfect summer crochet cardigan that doubles as a statement piece, this design was made for long, warm days, backyard barbecues, and cheering on your team in style. It’s breezy, it’s drapey, and beginner friendly.
This lightweight crochet cardigan is a free pattern available in all 9 sizes, beginner-friendly, and comes with a step-by-step video tutorial.
The full Video tutorial is available on my YouTube channel where it is worked up in size Medium.
If you would like a printable PDF copy of this pattern with no distracting ads, and loads of guided images, it is available for purchase in my Pattern Store here and on Etsy. Or just add this to your Ravelry queue for later.
Related Post:
Crochet Lace Kimono Cardigan
Crochet American Flag Crop Top Pattern
DESIGN INSPIRATION

I came up with this design for two reasons, the 4th of July and the FIFA World Cup 2026 happening here in Seattle.
As a mom of boys who are completely obsessed with soccer, I wanted to make something that could celebrate both moments. Something I could wear proudly to the watch parties, something red, white, and blue without being kitschy, and something that actually looks good.

That idea shaped everything. I kept imagining a lightweight open cardigan you could layer over almost anything with an airy drape that moves with you. The kind of piece that photographs beautifully in the summer light and feels just as good on as it looks.
The V stitch was the obvious choice. It creates this gorgeous open lattice texture that is both breathable and visually stunning, especially in the silky smooth Alize Diva yarn. With a crisp white, a bold red, or a navy color combined makes that texture really pop.
This is also a cardigan you can wear long after summer ends. Styled with jeans and boots, it becomes a gorgeous boho layering piece for fall. Versatile, handmade, and one you’ll reach for again and again.
I also wanted to create a pattern that’s perfect for all skill levels. The video tutorial breaks it down step-by-step, making it ideal for those just getting into beginner crochet top patterns.

I also made sure this size-inclusive crochet top works for every body type. From XS to 5XL, the instructions guide you through customizing your top so it fits just right.
Check out all the other beginner-friendly free patterns here.
Why You'll Love Making This Cardigan
If you enjoy crochet garments that are wearable, versatile, and quick to work up, this one delivers. The V stitch creates a naturally open, lacy fabric that looks intricate but works up fast. It's inclusive sizing, beginner-approachable, and gives you a handmade piece with serious wow factor.
Watch The Video Tutorial Here
This post contains affiliate links designed to provide a commission on purchases made at no cost to you. As an Amazon Associate, I earn from qualifying purchases which support my work in providing new content and information on this site.
If you would like to receive free crochet patterns and video tutorials straight into your inbox, just click Subscribe to get into our mailing list
CONSTRUCTION

The cardigan is worked in flat panels from side to side, then seamed at the shoulders and sides.
The front bands and neckline are finished in the round with the same stitch in red, white and blue stripes.
The sleeves are worked open and can be left long or short, the choice is yours.
The V stitch repeat is a simple double crochet, chain 1 space, double crochet that is worked into the same stitch. This creates that beautiful open mesh as you go. It’s rhythmic, meditative, and easy to pick up even if you are relatively new to crochet.
One thing to keep in mind, because the V stitch is an open stitch, your fabric will have quite a bit of stretch. This is a feature that will give the cardigan that floaty, drapey silhouette we all love.
Just make sure to swatch first and check your gauge so your sizing stays true
Tools And Materials:
Things to Note:
- Prepare a pattern gauge to get the right size. You may need to adjust your tension or change the hook size to achieve the same gauge.
- Pattern consist of a “V” Stitch made using 2 Double Crochet stitches and a chain in between. Other stitches include the Chainless Foundation, Single Crochet and Slip Stitch.
- Video tutorial available here
- The abbreviation is available in English US format here.
Crochet Abbreviations (US term)
Ch – Chain Stitch
Ch Sp – Chain Space
Sl St – Slip Stitch
Sc – Single Crochet
V St – V Stitch
RS – Right Side
WS – Wrong Side
SM – Stitch Marker
Measurement Chart:

- Pattern consists of 9 sizes.
- Measurements above are only an estimate of the finished garment based on gauge and not body size
- Body width and length can be easily adjusted to your liking
- If you are in between sizes, size up or measure along
- Model is wearing size Small
***
Liberty Lace Crochet Cardigan Free Pattern
Instructions
PART 1: Back Panel (watch it here)
Working on the length from the side
- Chainless Foundation Row: Ch 141 [149/ 149/ 157/ 157] [165/ 165/ 173/ 173] + 1 turn.
Feel free to use the regular foundation chains if you prefer and chain any number of chains for your preferred length. It should be a multiple of 4 + 1.
- Row 1 (V Stitch Pattern): Dc into the 2nd Ch from hook, Ch 1, Dc in the same St, *(Ch 1, Sk 3. Dc, Ch 1, Dc in the same St ) Rep (*) across. Ch 1 turn
V Stitch = Dc , Ch 1, Dc all in the same Ch space
- Row 2: Dc into the 1st St, Ch 1, *(V Stitch into the Ch Sp after the V Stitch), Rep (*) across, Dc in the last St, Ch 1 turn
- Row 3: *(V Stitch into the Ch Sp), Rep (*) across) Ch 1 turn
- Next Rows: Rep Rows 2 & 3 for a total of 47 [52/ 57/ 61/ 66] [72/ 79/ 85/ 91] rows or until you’ve reached your ideal body width.
- Bind off
PART 2: Front Panel (watch it here)
- Chainless Foundation Row: Ch 141 [149/ 149/ 157/ 157] [165/ 165/ 173/ 173] (or the same as you did for the back panel), + 1 turn.
- Row 1 (V Stitch Pattern): Dc into the 2nd Ch from hook, Ch 1, Dc in the same St, *(Ch 1, Sk 3. Dc, Ch 1, Dc in the same St ) Rep (*) across. Ch 1 turn
- Row 2: Dc into the 1st St, Ch 1, Rep (*) across, Dc in the last St, Ch 1 turn
- Row 3: *(V Stitch into the Ch Sp), Rep (*) across) Ch 1 turn
- Next Rows: Rep Rows 2 & 3 for a total of 47 [52/ 57/ 61/ 66] [72/ 79/ 85/ 91] rows.
The front panels width should equal to the back W minus neckline, minus 4 inches for border, divide into 2
- Bind off and make a second piece.
PART 3: Assemble Body Panels (watch it here)
- Place the 2 front panels over the back panel, and secure stitch markers along every corner and a couple more between the secure both pieces together.
There is no right or wrong side here
- For the arm opening, place a stitch marker 6.5 [7.0/ 7.5/ 8.0/ 8.6] [9.3/ 10.0/ 10.7/ 11.4] from the top.
- Seam up all sides with your pref way. You can use single crochet to join or use a mattress stitch.
PART 4: Sleeves (watch it here)
- Chainless Foundation Row: Ch 100[109/ 117/ 125/ 134] [145/ 156/ 167/ 179] + 1 turn.
- Row 1 (V Stitch Pattern): Dc into the 2nd Ch from hook, Ch 1, Dc in the same St, *(Ch 1, Sk 3. Dc, Ch 1, Dc in the same St ) Rep (*) across. Ch 1 turn
- Row 2: Dc into the 1st St, Ch 1, Rep (*) across, Dc in the last St, Ch 1 turn
- Row 3: *(V Stitch into the Ch Sp), Rep (*) across) Ch 1 turn
- Next Rows: Rep Rows 2 & 3 for a total of 56 [57/ 57/ 58/ 56] [56/ 54/ 54/ 51] rows.
This does not include the 2 inches for the color change
- Color Change (Red): With the Red yarn, continue the pattern for 3 rows
- Color Change (White): With the White yarn, continue the pattern for 3 rows
- Color Change (Blue): With the Blue yarn, continue the pattern for 1 row
- Bind off and make a second piece.
PART 5: Assembling Sleeves (watch it here)
- Turn your sleeve WS out. You can find this by ref to the last row.
- Place SM along the sides.
- Seam to join.
- Bind off and rep on the other sleeve.
- Once completed, turn sleeves RS out with the seam side down.
- With the body panels still in seam side out, pull the end off the sleeve through the arm opening.
- Align , adjust and place SM in 4 places to secure both pieces together.
- Sc both piece in the round.
- Bind off and rep on the other sleeve.
PART 6: Border (watch it here)
- Starting from the Right front panel, insert hook at the bottom stitch and with your Red yarn, Ch 1 to secure.
Note: If the St below if a V St, you will start with a Dc St and Vice versa.
- Rnd 1 (Red): Work the V-St into each Ch Sp all the way across the front panel.
- Before reaching the neckline, you will notice that you will be working on the rows post side. You will treat the joining St and Dc St as your Ch Sp in this regards.
- Cont the V St across the neckline and back down the left front panel. Ch 1 and turn to the bottom edging
- You will be working along the rows post again. You will treat the Dc St as your Ch Sp.
- Cont to work the V St all the way across until you’ve reached the beginning of the 1st Red St. Work on that 1st V St post as your last St, Ch 1 turn
- Rnd 2 – 3: Work the V St in the round, and treat the prev 1st beginning St as your last St. Ch 1,
- Bind off
- Rnd 4 – 6 (White): Work the V St in the round, and treat the 1st beginning St as your last St. Ch 1, turn
- Bind off
- Rnd 7 (Blue): Work the V St in the round, and treat the 1st beginning St as your last St. Ch 1
- Bind off and weave in all lose ends
END