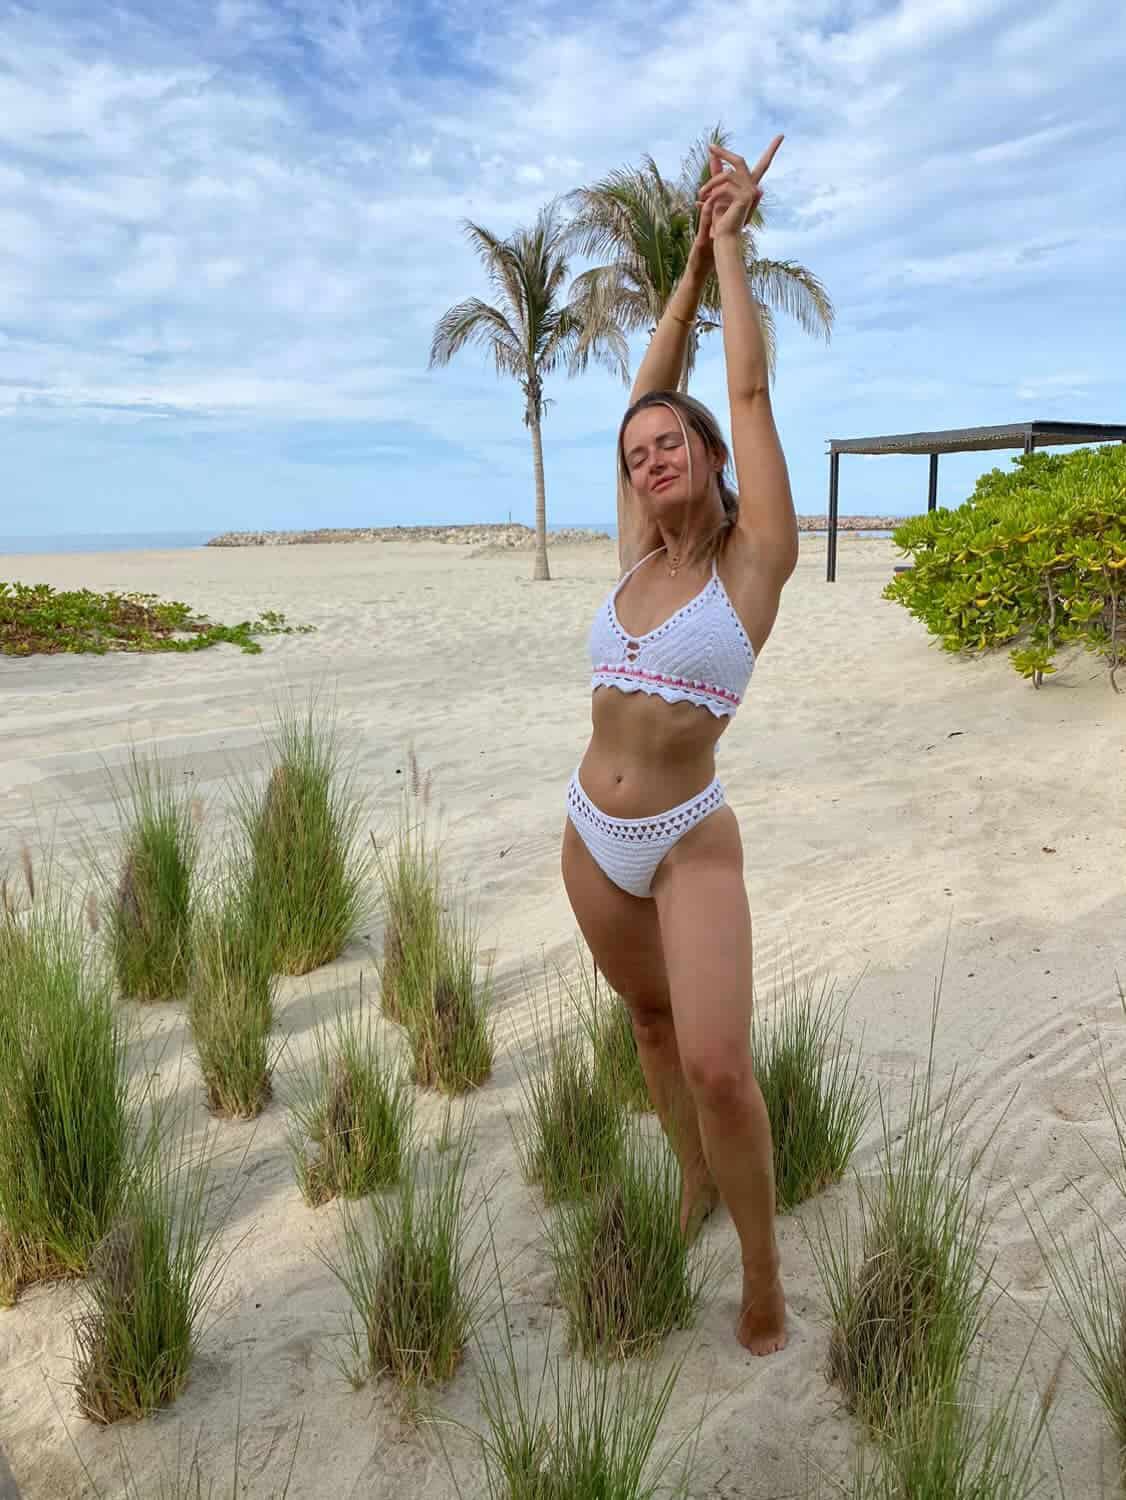

Creating beautiful crochet bralettes can be a deeply satisfying and fulfilling experience, and that was certainly the case with this beautiful pattern! One of the things that I’m most proud of with this pattern is the way that it can accommodate any body type with just simple basic stitches.
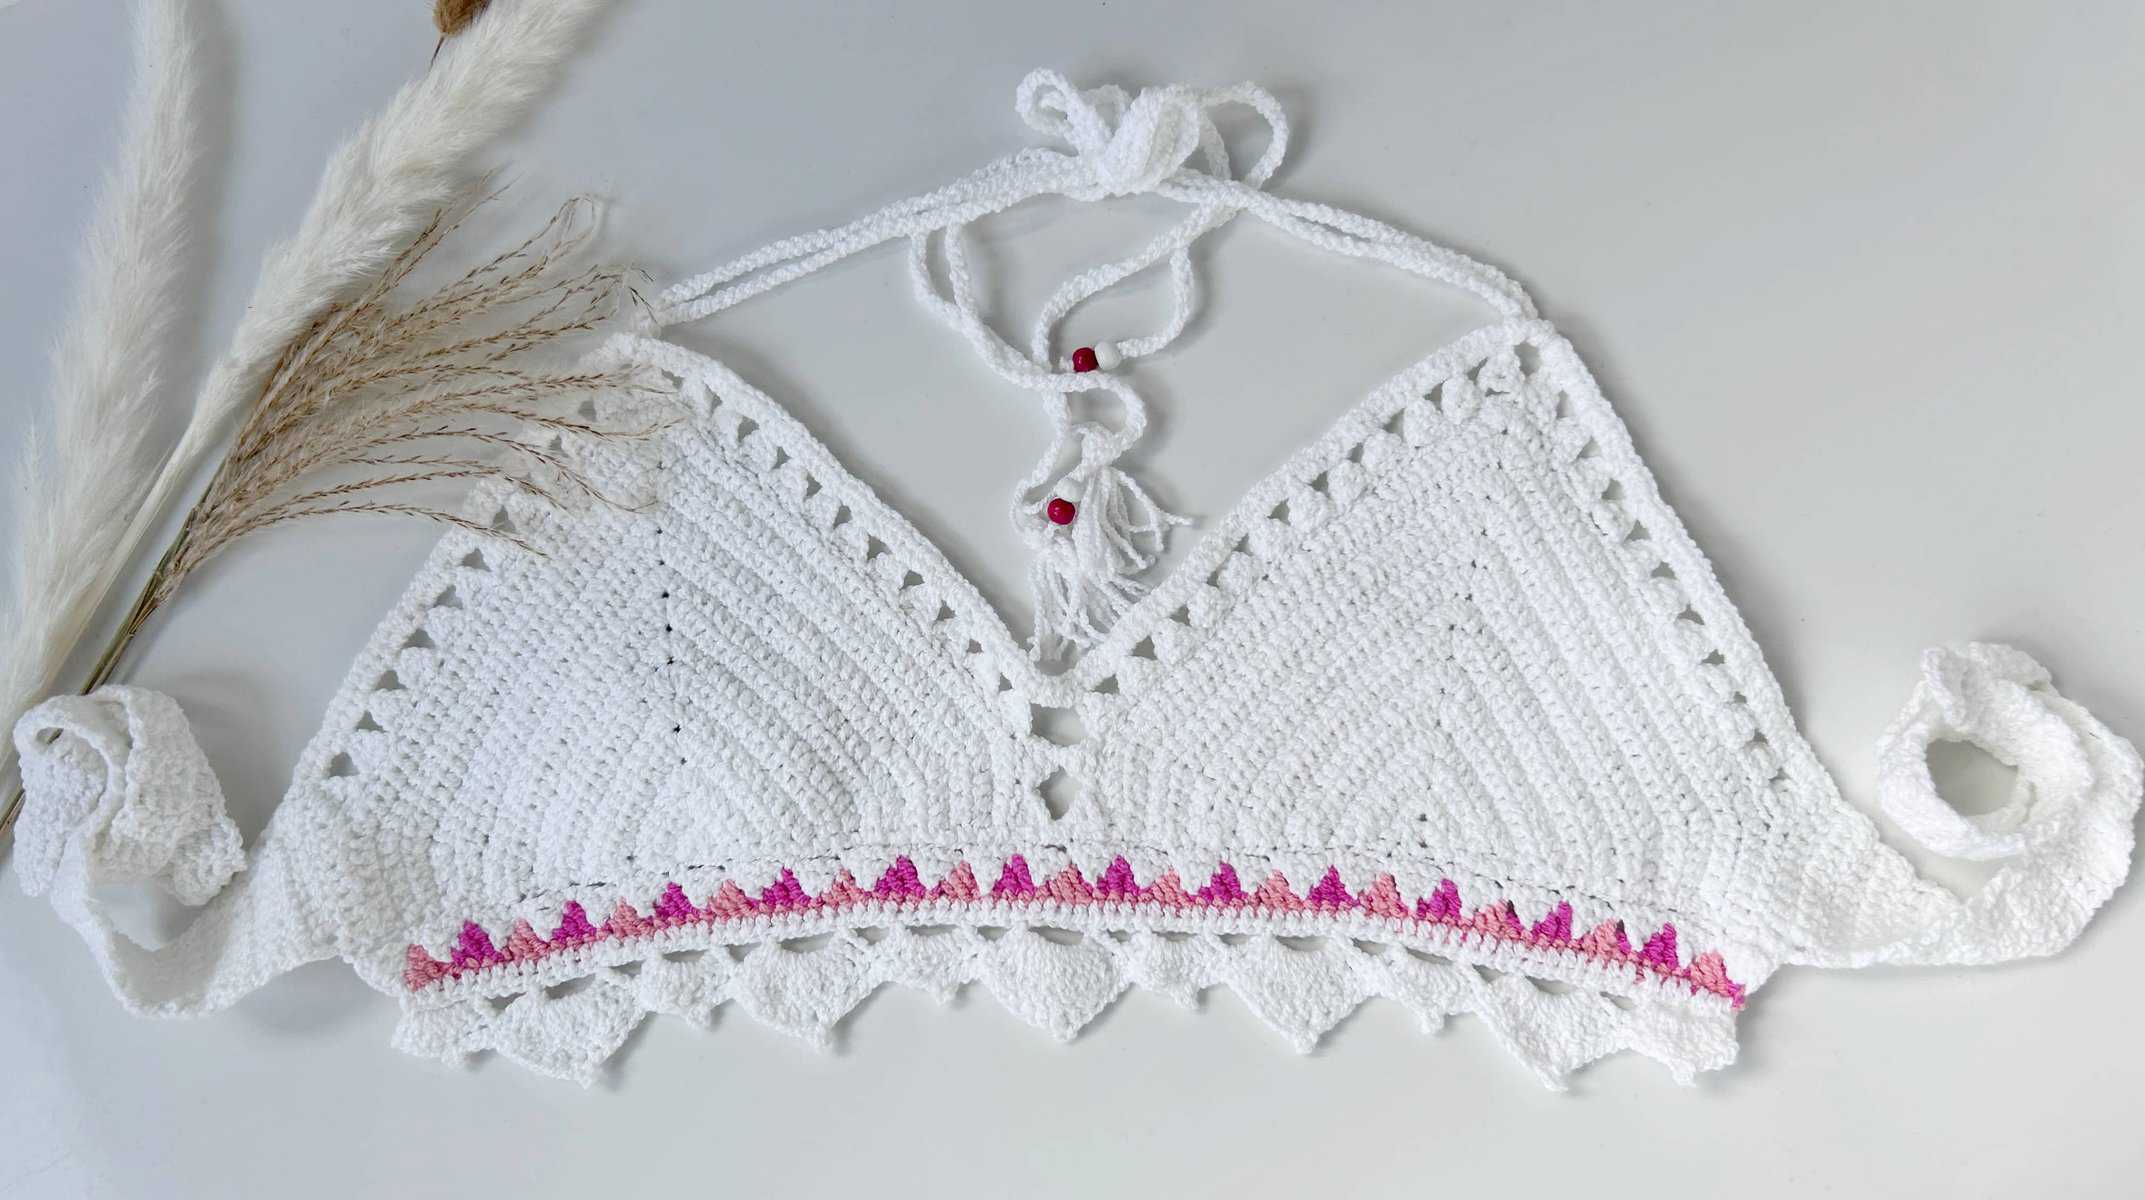
And a pop of contrast on top of a plain solid color along the bottom band gives it a unique and fun finishing touch.
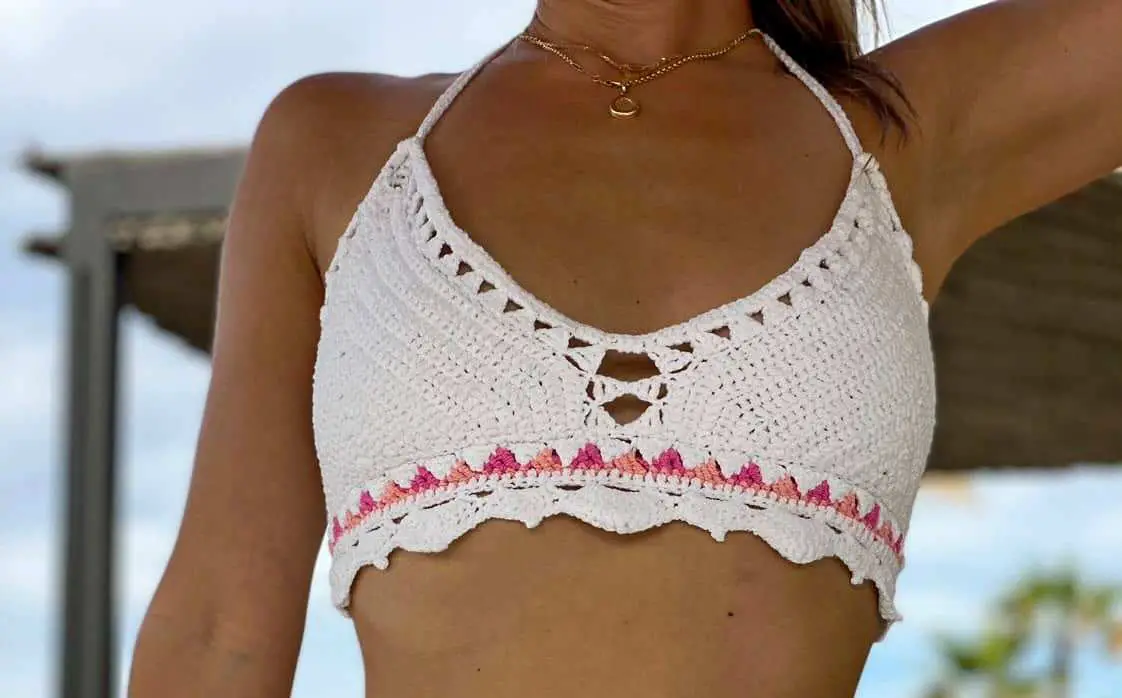
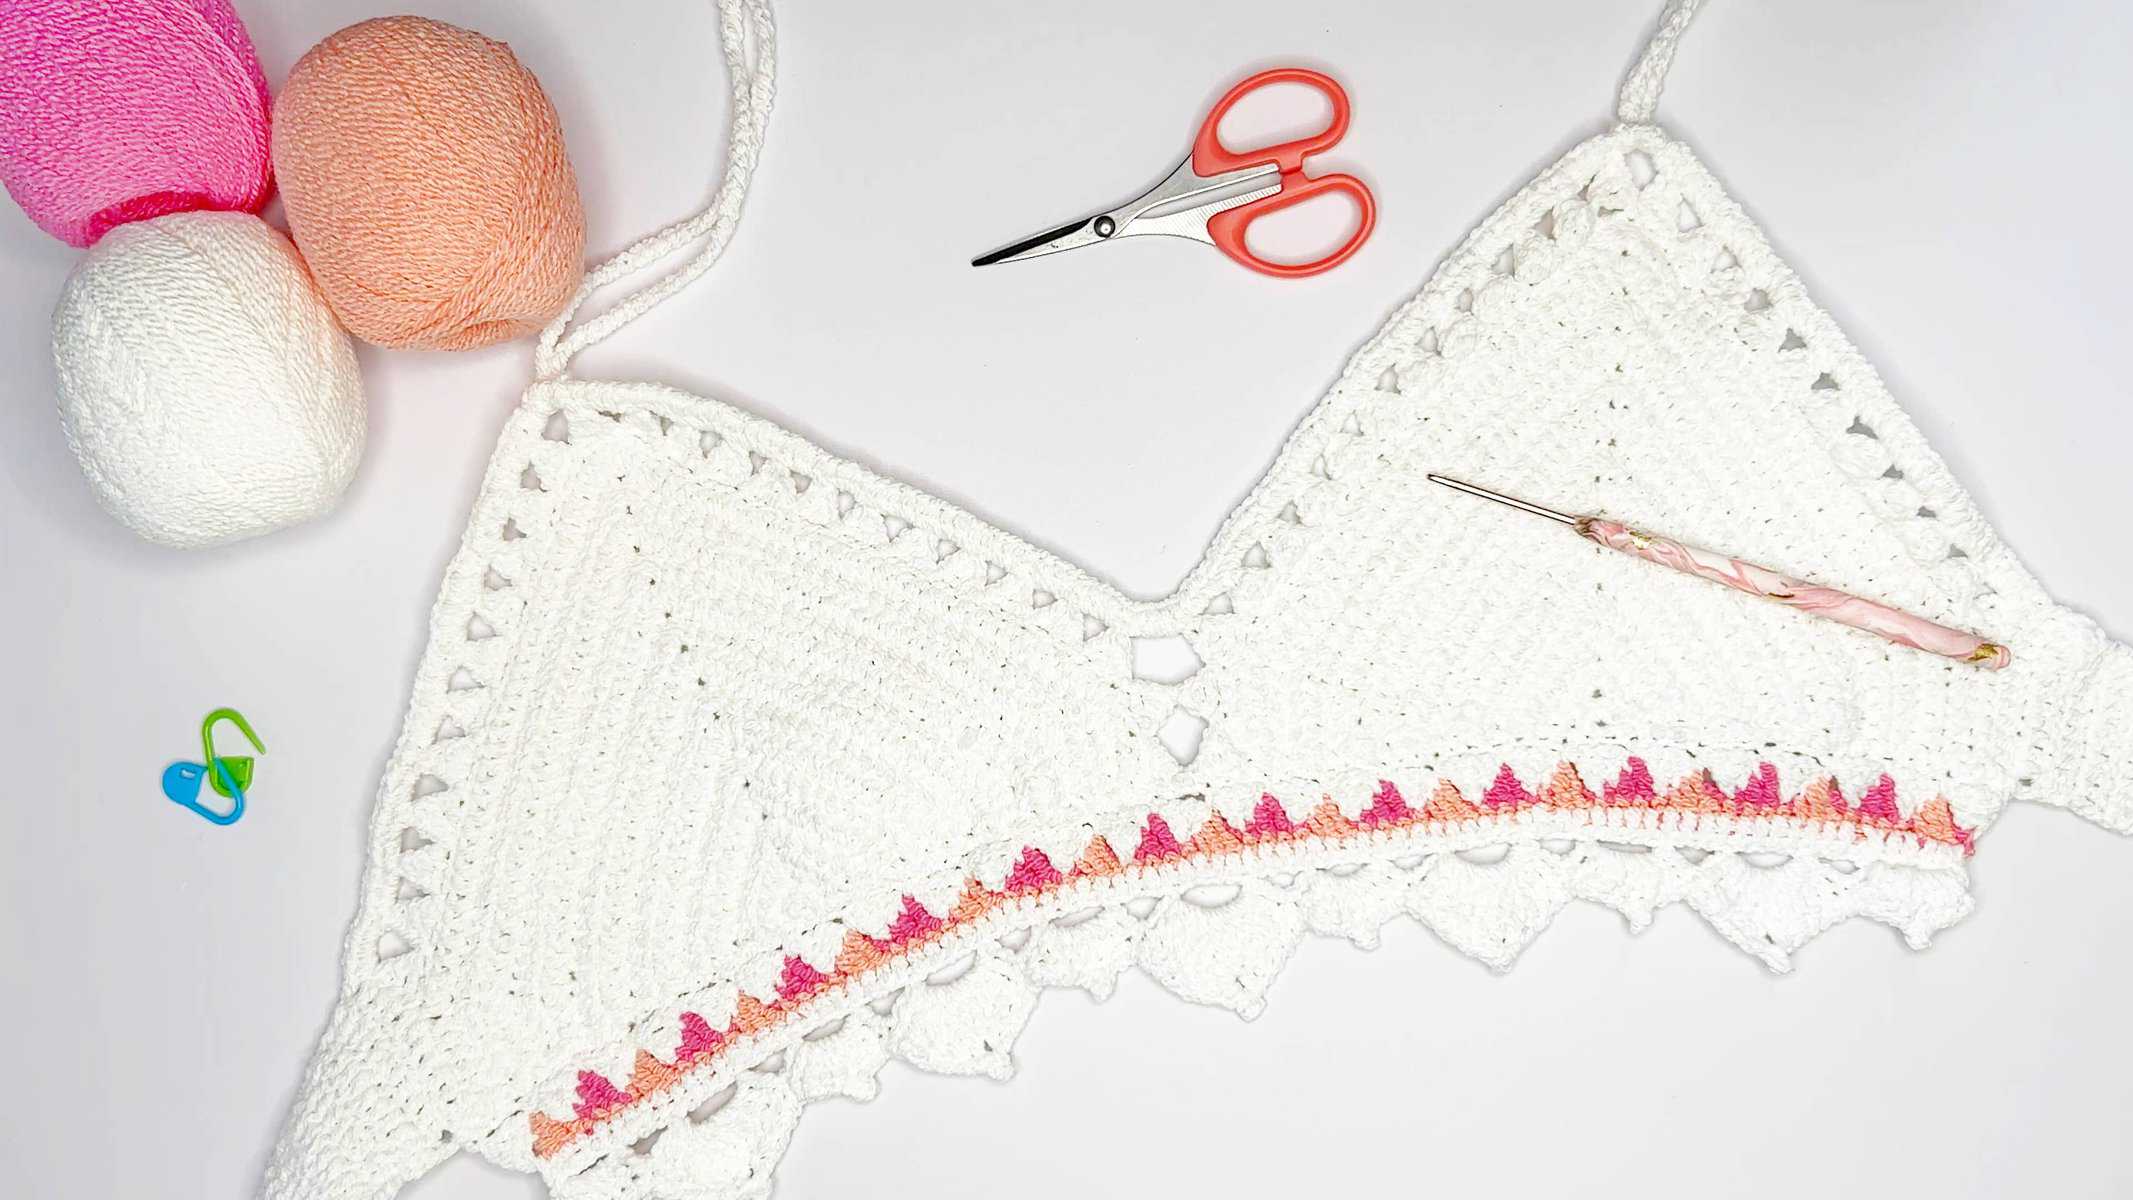
Instead of making just cups and borders, I wanted to add drops of scallops to this classic bralette for a fun and girly finish. Hence the pink and peach hue!
This crochet top also comes with a matching bottom bikini pattern that will be updated soon. So keep your eyes on this page or just subscribe to be in the know!
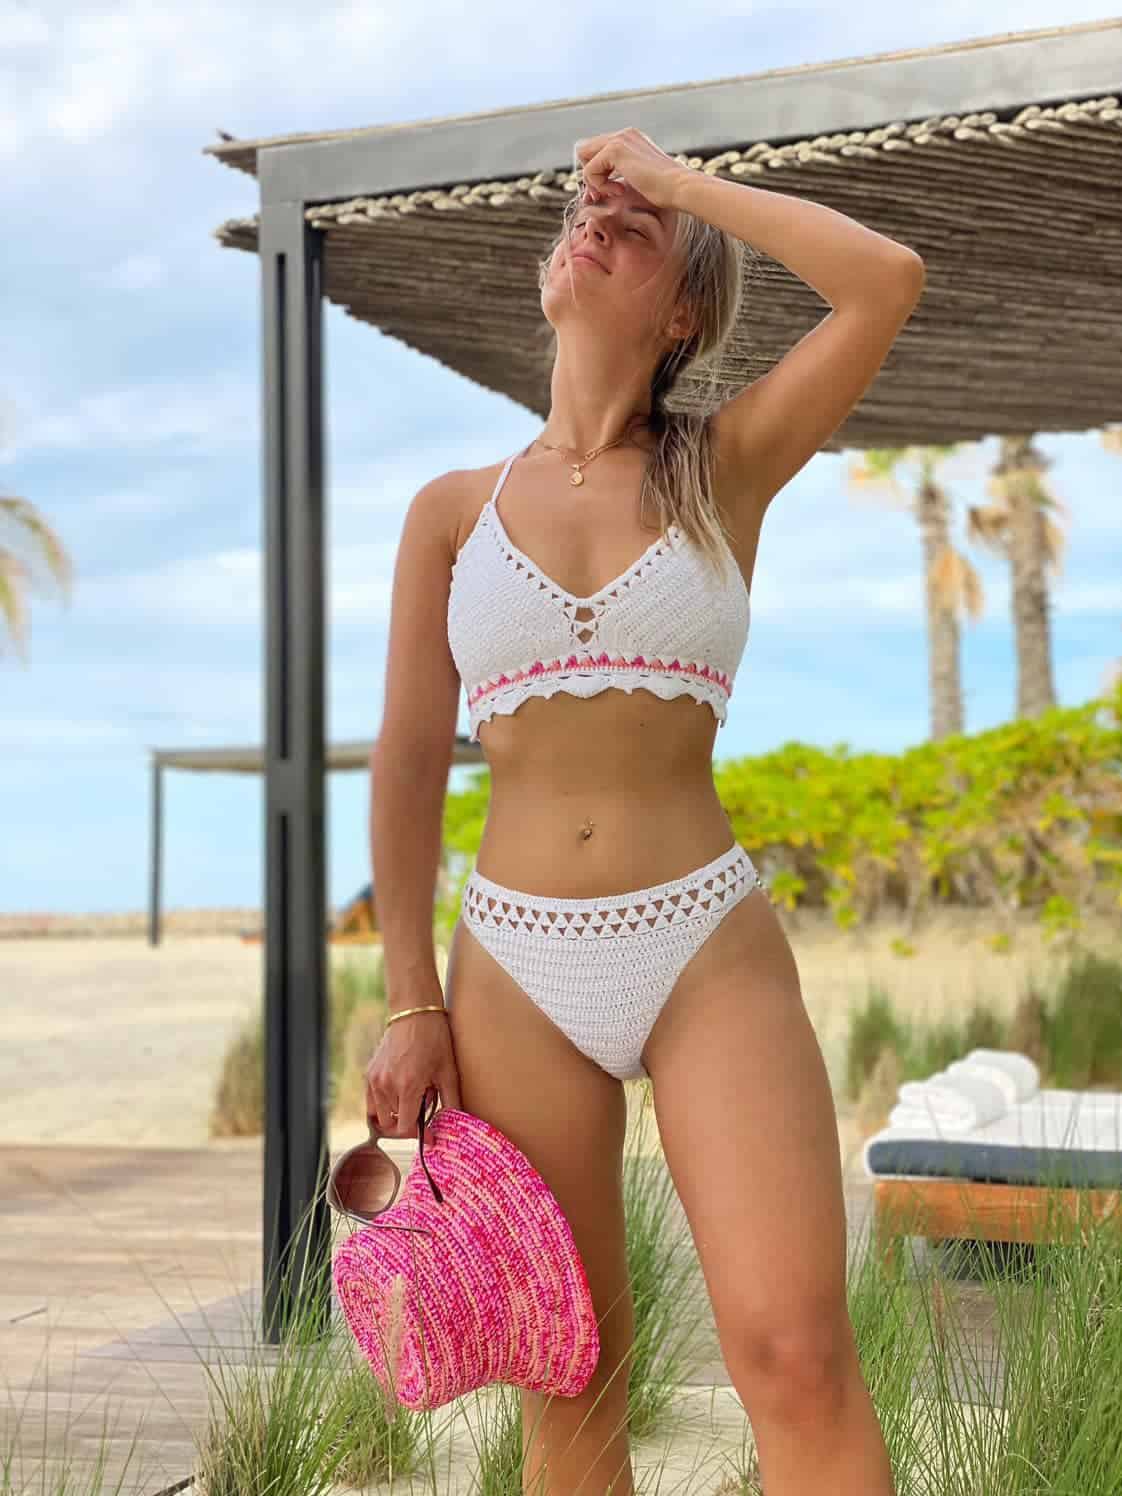
Beyond its charming design, this simple bralette is also extremely easy to wear. It is soft and huggable making it the perfect top to go swimming in or to lay on the beach with, it is sure to keep you feeling comfortable and stylish all summer long.
So if you’re looking to infuse your wardrobe with a little bit of creativity and personality, this is the perfect time to check out this free crochet pattern (below)!
And while you’re at it, browse through all the other stunning bralette patterns available here, and start creating a summer wardrobe collection you never knew you needed!
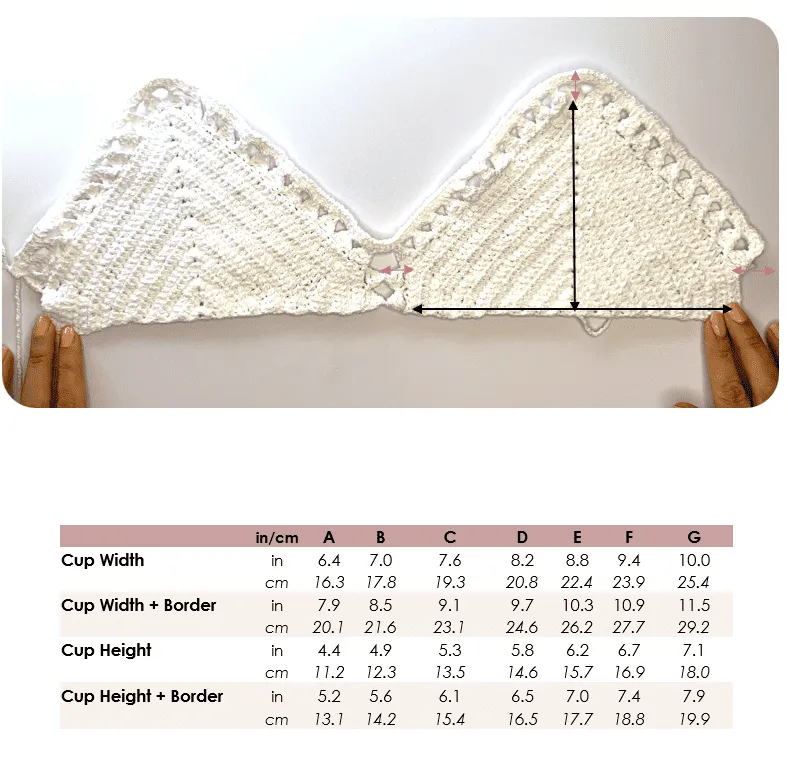
This Bralette crochet pattern is not your basic bralette with the infamous triangle cup pattern. It starts as a semi-circle and builds its way into a wide triangle with sides! It is also versatile and adjusts easily to accommodate your cup size.
Using all basic crochet stitches such as chains, single crochet, half double crochet, double crochet, and treble crochet stitch, once the bralette cups are completed, it’s just a matter of joining both cups together with the smaller triangle pattern, which is also made with 2 accent colors at the bottom edging.
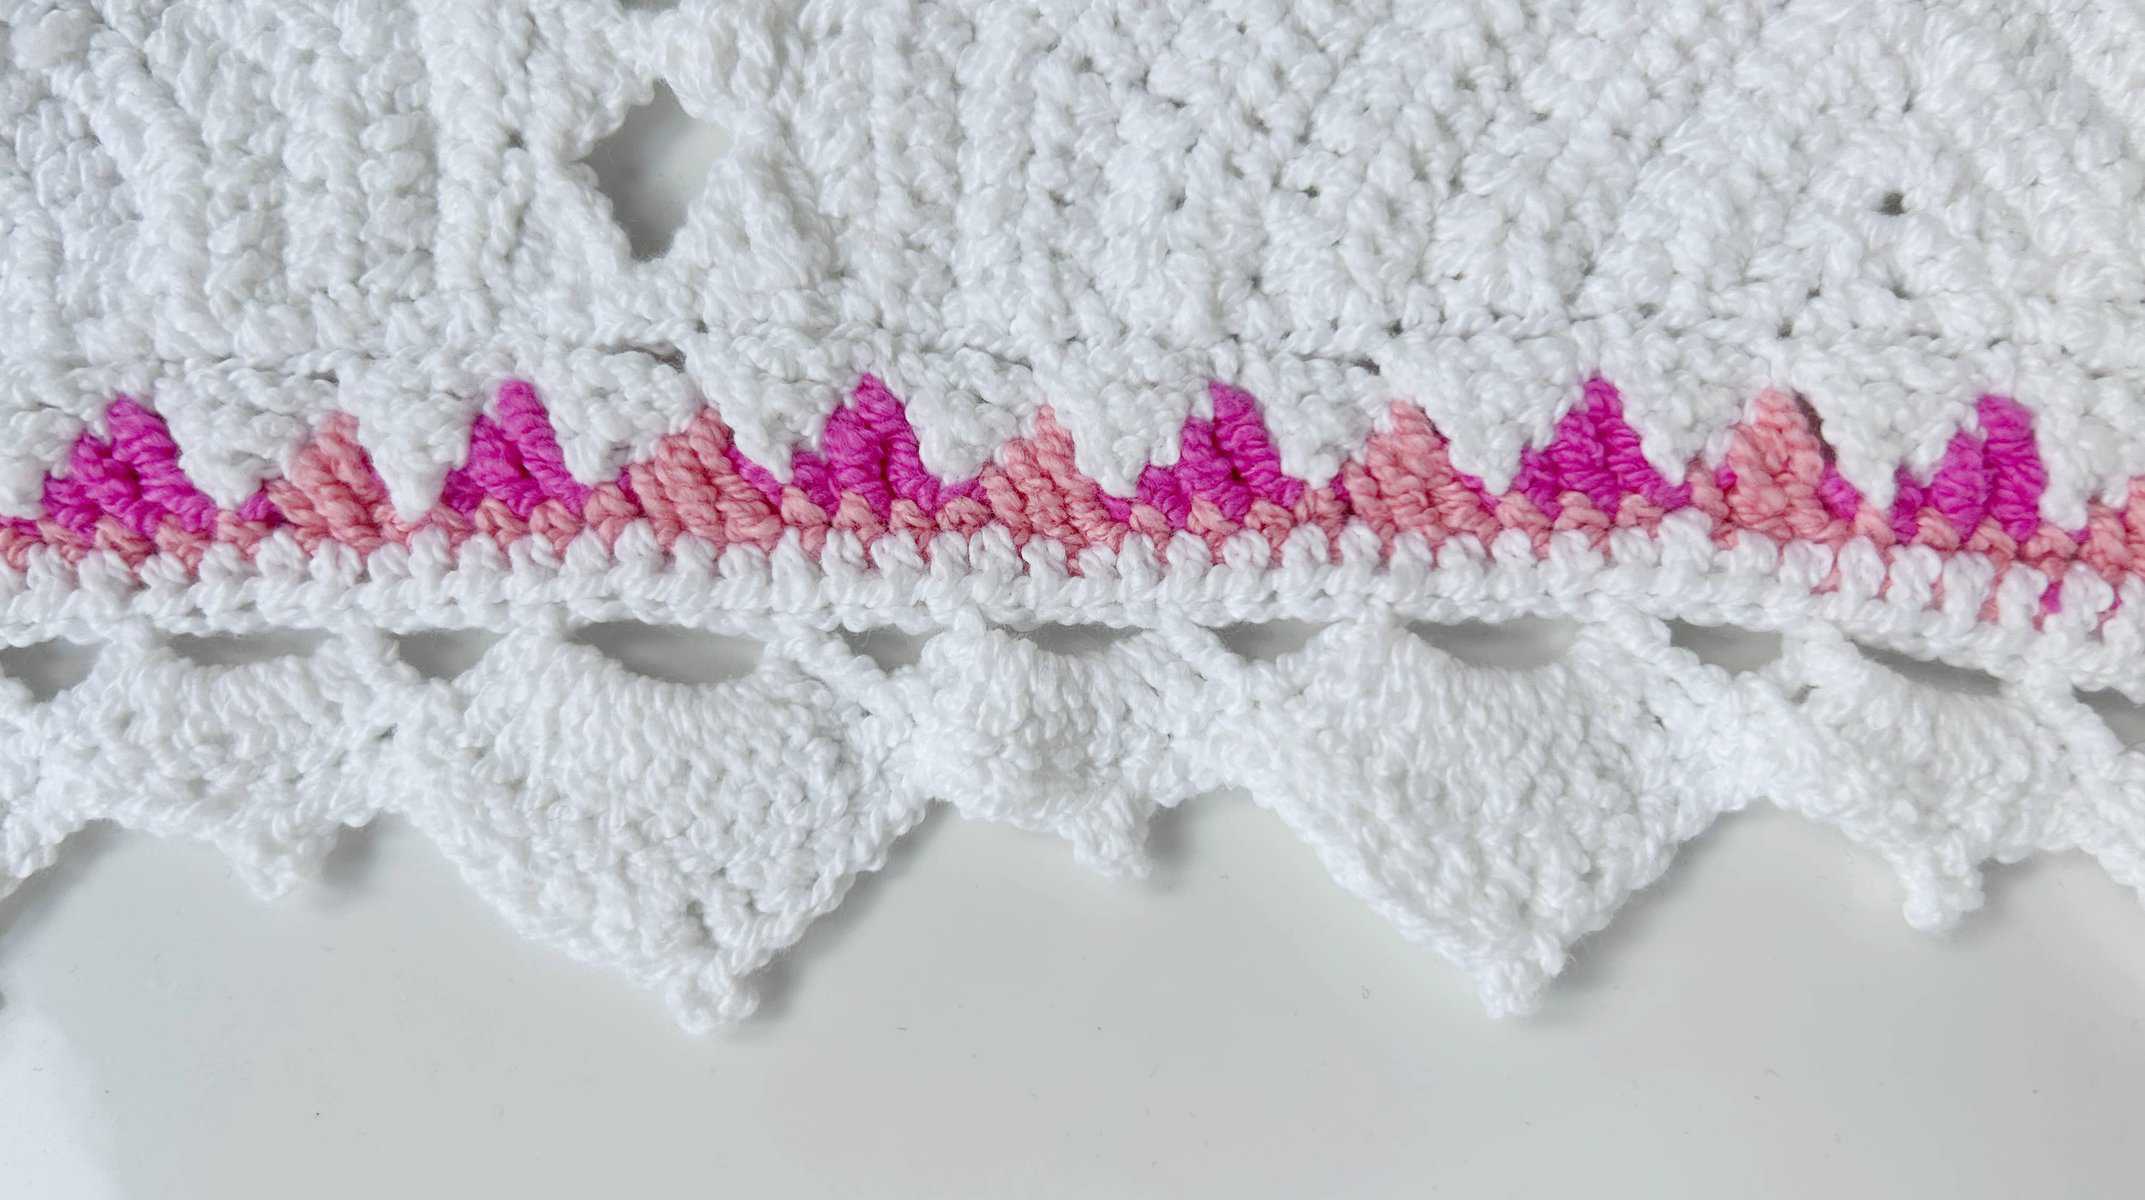
Fan stitches or scallops are added to the bottom band finished off with picot stitches. It is a great way to add some feminity to a simple top.
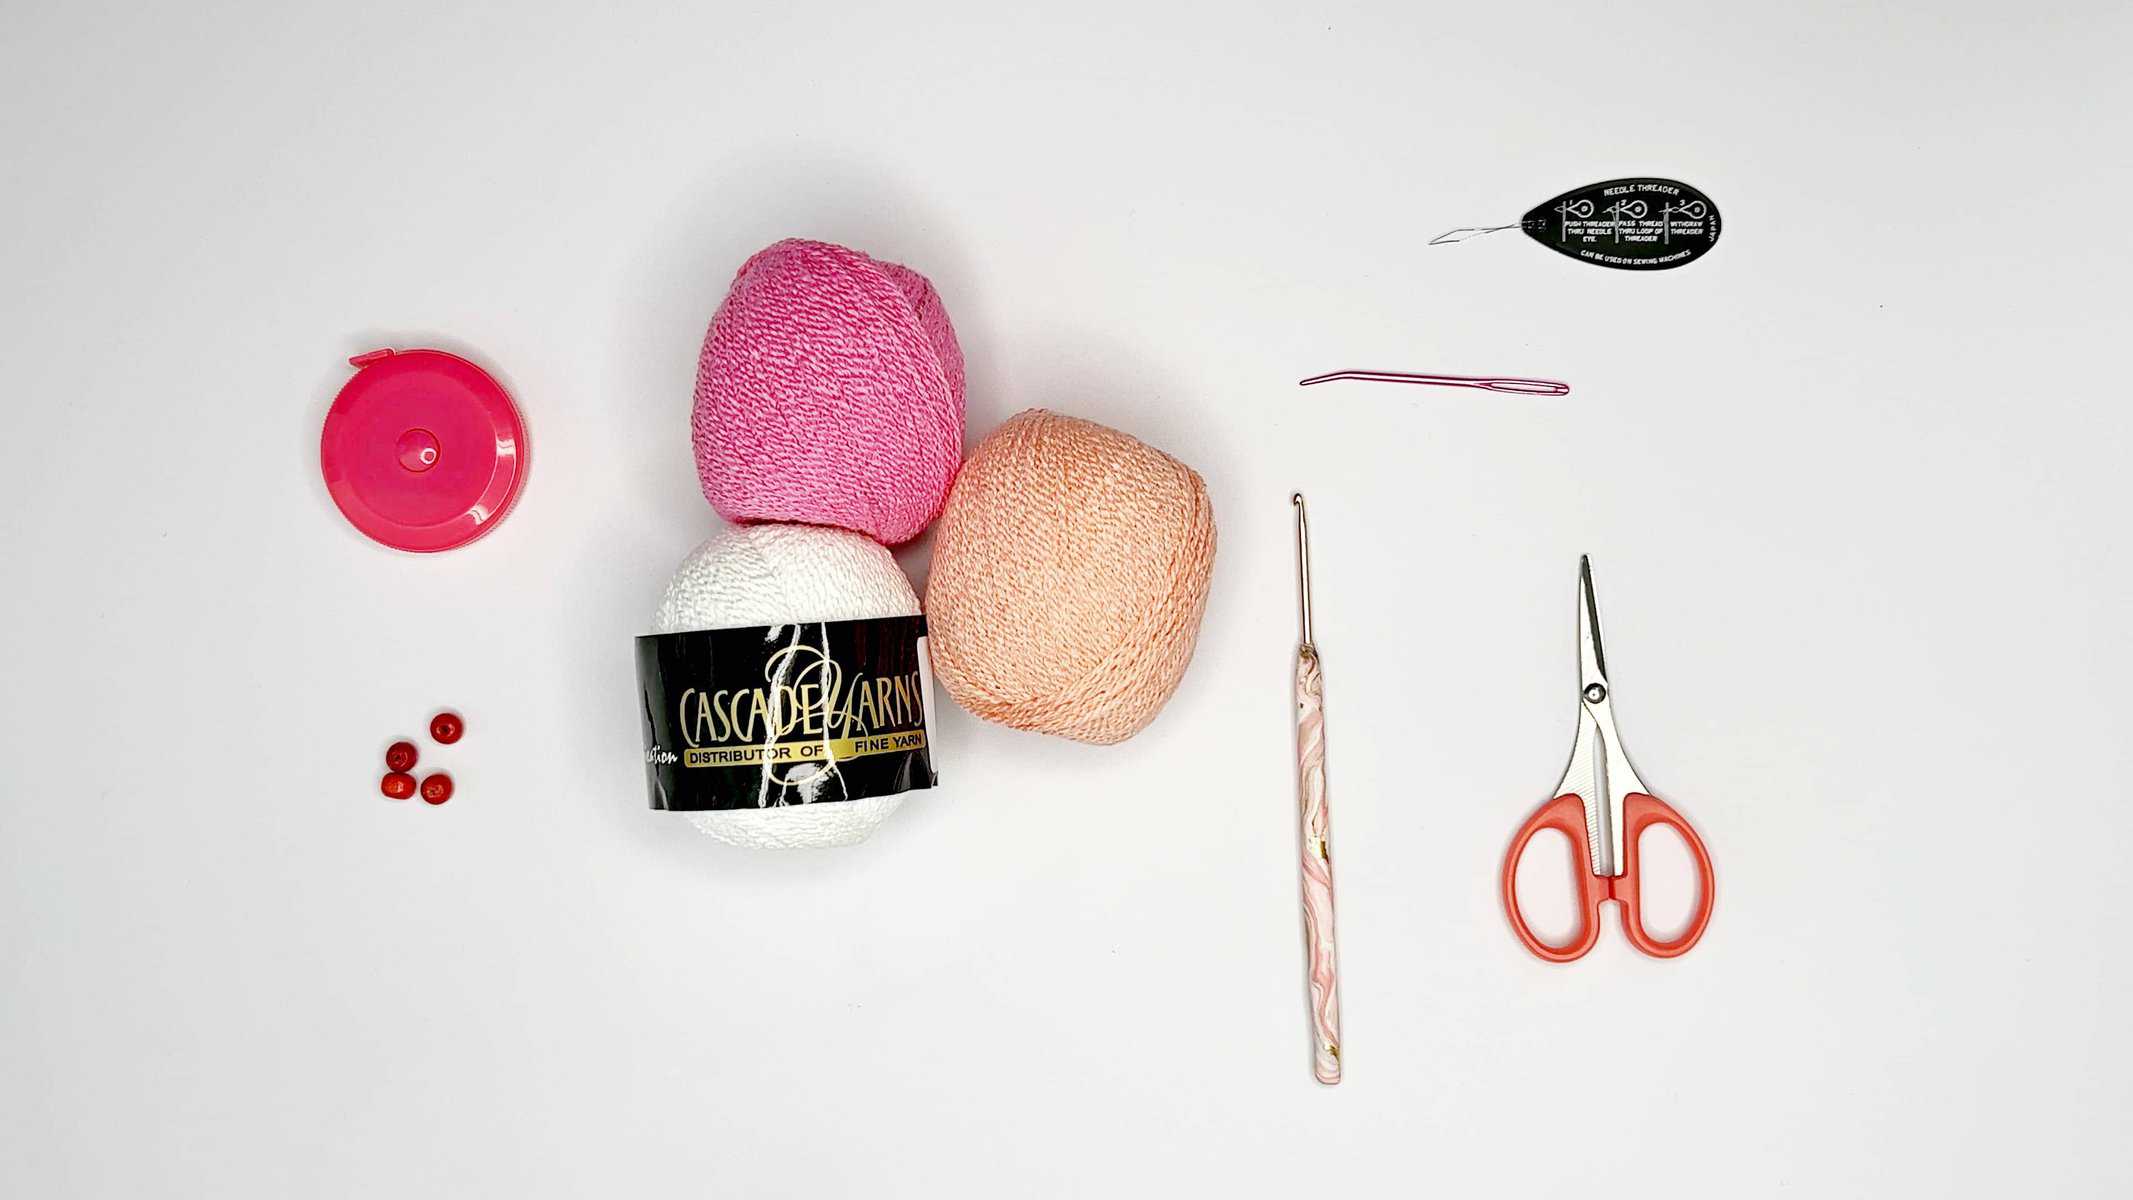
For a perfect fit, you would need to use a stretchable yarn that will not only hug your body all day but also provide comfort and breathability and I have the best yarn for that!
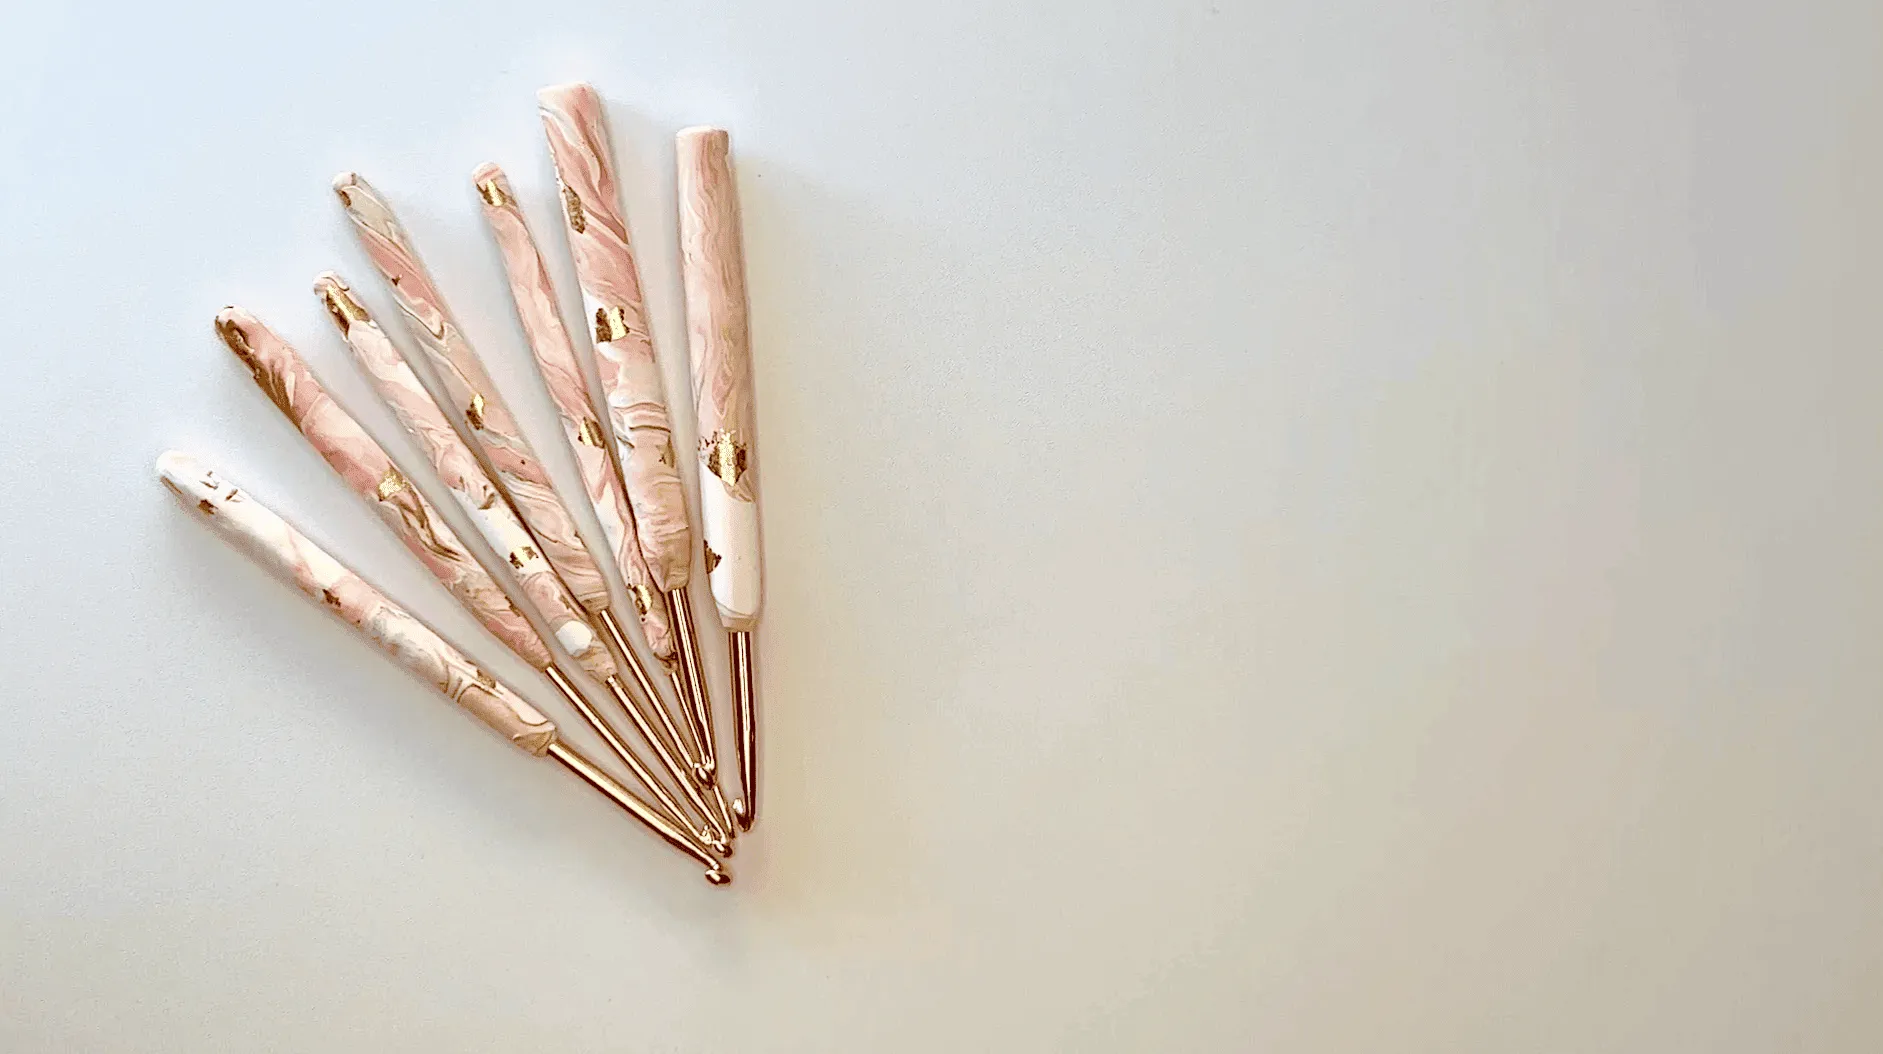
I am using a blend of spandex and cotton yarn called Cascade Fixation Yarn in White, Bubble Gum (Pink) and Camelia (Peach) which is also a DK weight yarn. This yarn is the perfect choice for long summer days under the sun. I am also using my handmade polymer clay crochet hook in size 2.5mm.
Feel free to add cup inserts like these and rubber band at the base for the extra support.
This Crochet Bralette tutorial is also available Ad Free with a fully picture-guided PDF file to guide you throughout the entire process.
And if you like this style, then you might also like to check out this list of free crochet bralette patterns here.


PART 1: Cups (Video Tutorial)
- Foundation Row: Work a Slip Knot and Ch 2 (All Sizes)
- Row 1: Into the 1st Ch, work 5 Hdc Sts, Ch 1, turn
- Row 2: 2 Hdc, Hdc, 5 Hdc, place a SM in the 3rd St of the 5 Hdc group St, Hdc, 2 Hdc
- Row 3: Ch 1, turn, 2 Hdc, Hdc until before the SM, work 5 Hdc, replace SM in the 3rd St, Hdc across, 2 Hdc into the last St
- Row 4 – 8: Rep Row 3 for 5 more rows
Place another SM in the 1st Inc on the 2nd Inc St & another SM on the 3rd Inc on the 1st Inc St
6. Row 6: Ch 1, turn, Hdc until before the 1st SM, 2 Hdc, replace SM in the 2nd Inc St, Hdc across until before the 2nd SM, work 5 Hdc, replace SM in the 3rd St, Hdc across until before the 3rd SM, 2 Hdc, replace SM in the 1st Inc St, Hdc across
7. Next Row: Rep Row 6 for a total of 12 [13/14/15] [16/17/18] Rows from Row 1.
Or adjust the cup size to your pref. Note there will be another ¾ in/ 1.8cm for the border. (Remove SM)
8. Border 1st Row: Making Triangle Pattern *(Ch 4, Work a Sc into the 2nd Ch from hook, Dc, Tr, Sk 2 on cup, Slst). Rep (*) across until you reach the 2nd Inc on the opposite side, Bind off
9. Rep Steps 1 – 7
Second Cup
1. Border 1st Row: Triangle Pattern *(Ch 3, Slst into the “Triangle” Top St on the other Cup to join, Work a Sc into the 2nd Ch from hook, Dc, Tr, Sk 2 on cup, Slst). Rep (*) 1 more time. **(Ch 4, Work a Sc into the 2nd Ch from hook, Dc, Tr, Sk 2, Slst). Rep (**) across until you reach the 2nd Inc on the opposite side, Ch 1 turn
2. Border 2nd Row: Slst 3 into each St on 1st “Triangle”, *(Ch 3, Slst into the next “Triangle” top St to join), Rep (*) across 2nd Cup until the last “Triangle”, Ch 1 turn
3. Border 3rd Row: *(Hdc in St, Hdc 3 around Ch) Rep (*) until the top of the cup, work 5 Hdc around the Ch, Rep (*) across the other cup until the top of the 2nd cup, work 5 Hdc around the Ch, Rep (*) across, don’t bind off
PART 2: Side Ties
- Row 1: From the last St, turn work to the Row side and work Hdc Sts evenly across, Ch 1 turn
- Row 2: Hdc across, Ch 1 turn
- Row 3: Hdc2tog, Hdc across, Ch 1 turn
- Next Rows: Rep Rows 2 & 3 until you have 4 Sts remaining
- Next Rows: Work 4 Hdc Sts until you have 18[19/ 20/ 21] [ 23/ 24/ 25] in or 45 [48/ 51/ 54] [57/ 60/ 64] in total length or your pref length.
- Bind off and insert your hook into last St on the other side of the cup at the top and Hdc each St evenly across, Ch1 turn.
- Rep Steps 2 – 5.
- Bind off.
Count the number of Rows & Sts under the Cups. You should have multiples of 4 + 1. ie 80 + 1 = 81 Rows/Sts. If not add more rows along the ties and place SM on both sides.
PART 3: Bottom Pattern
- Row 1: On the RS, Insert your hook at the SM, draw up a loop and work Sc Sts evenly and loosely across the bottom of the cups until the 2nd SM
- Row 2: Triangle Pattern. *(Ch 4, Work a Sc into the 2nd Ch from hook, Dc, Tr, Sk 2, Slst). Rep (*) across, Bind off
- Row 3: On the RS with Yarn B, Insert hook into the 1st triangles 1st St at the top, *(Ch 3, Sc into the next triangle top St, work a Sc into the 1st St on the white triangle, Dc, Tc, and a Sc into the next triangles top St). Rep (*) across until you reach the last triangle, Bind off
- Row 4: on the RS with Yarn C, Insert hook into the 1st triangles 1st St, Ch 1, *(work a Sc into the 1st St on the white triangle (while working around the Ch), Dc, Tr, Sc into the next triangles 1st St, Sc 3). Rep (*) across until you reach the last triangle, Bind off
- Row 5: On the RS with Yarn A, Insert hook into the 1st triangles 1st St, work a Hdc, Hdc across, Ch 5 turn
Place a SM in the center of the row making sure all numbers are even
6. Row 6: Sk 3, Sc, *(Ch 5, Sk 3, Sc) Rep (*) until the last St, Ch 1 turn
7. Row 7: Work 7 Dc around the 1st Ch Sp, *(Sc on the next Ch Sp, work 11 Tc around the following Ch Sp, Sc on the next Ch Sp, Work 7 Dc around the next Ch Sp, Sc on the next Ch Sp) Rep (*) until the last Ch Sp, Ch 1 turn
8. Row 8: Sc 4, Picot, *(Sc 6, Hdc, Dc, Tr, Picot, Dc, Hdc, Sc 7, Picot) Rep (*) across. Bind off
(Watch Video Tutorial on how to make a Picot Stitch)
9. Weave in all loose ends
PART 4: Top Ties
- Take yarn and pull 2 arms length (see image below), do this 2 more times.
- At the top of the yarn, drag another strand of yarn all the way down making it a double yarn.
- At the end of the double yarn, snip of the remaining yarn and work a slip knot with both yarn ends.
- Insert hook into the loop, hold the top yarn as your working yarn, and the bottom yarn with your thumb and middle finger
- Wrap the bottom yarn around the hook from the front to back, this will be your “Yarn Over”, then pull through the top yarn.
- Rep Step 5 until you have no more yarn left. You should have approx. 40 in/ 102 cm in length.
Tassels & Beads (Optional)
You go straight to Assembling if you do not want to add beads and a tassel.
- Tassels: Wrap the yarn around 3 fingers about 10 times. Snip off extra yarn and snip off the bottom of the yarn ring
- Next cut a piece of yarn 5 in/ 10 cm and keep for later.
- Insert hook through the loop end of the tie and pull the yarn bunch through half way
- Take the single yarn strand that we kept earlier and place the yarn under the top folded yarn loop and work 2 knots.
- Cut any uneven strands at the bottom
- Beads: On the other end of the tie, you can use a yarn threader and place some 6mm color beads through the wire end, insert the yarn end bet the wire loop and pull the beads through. Tie 2 knots to close
Assembling
- Fold the tie in half and place the loop side in front and on top of one cup.
- Pull the loop through the chain space and insert both tie ends through.
- Pull to close loop.
- Rep Part 4 on the other side.
END
***