Did you know a crocheter uses about 3.5 miles of yarn on most of their crochet project? Learning how to seamlessly join yarn is key. It makes your projects look neat and professional. This guide will show you four different methods to switch yarn without gaps.
I will show you four methods for joining yarn neatly in crochet. It can be tricky to switch yarn for new crocheters. But, with simple steps and pictures, you can master how to join yarns easily.
4 Methods To Join Yarn In Crochet
Russian Join

One popular method to join yarn seamlessly in crochet is the Russian join. This technique works well for most yarn types and is great for joining yarn of the same or similar colors.
To start, you’ll need to split the yarn strands of both yarn ends and overlap them for about an inch. Then, using a yarn needle, you’ll thread the split ends of one yarn through the split ends of the other yarn, giving the appearance of one continuous strand.
This method creates a secure join that is nearly invisible. It’s good for many yarns, especially when you change colors. The downside is that it takes a sharp eye and some time to complete this joint.
Spit Splice
The Spit Splice is a no-weave way to join yarn. To start, you will need to splice both ends of the yarn and connect them through the split. Then you will rub both ends together with some water to create friction.
This will only work with yarns made from animal fur. The water, rubbing and heat create friction turning the wool into felt making the yarn lock together tightly. Did you know in the older days, people would use their own Spit hence the name! (blah!)
Magic Knot

The Magic Knot technique is a fairly easy method and good for most yarns. This technique is ideal for joining the same color or bulky yarns that are difficult to weave in.
To use the magic knot, you’ll overlap the two yarn ends and tie a knot. Then, you’ll tie a second knot using the tails of the yarn, creating a double knot. Trim the excess yarn close to the knot, and you’ll have a virtually invisible secure knot join.
Just be sure to use this method on hidden or less visible parts of your project, as the knot may slightly bulk up the area. The joint is strong and not very visible. It’s great for loose projects or those with many textures that can hide the knot well.
Pull Through Method (My choice!)

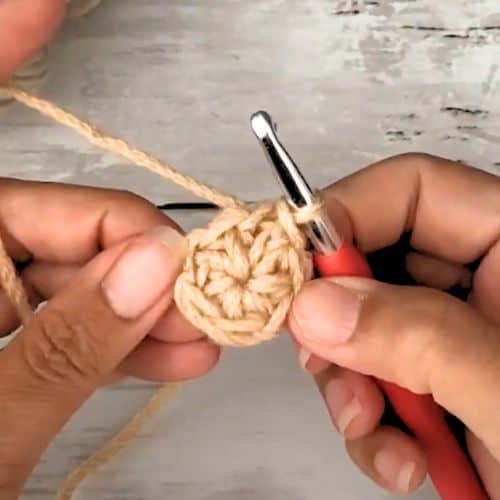
The Pull-Through method is the fastest and easiest way to join yarn in crochet. First, crochet until you have 4-6 inches left of the old yarn. Stop before finishing the current stitch. Use the new yarn to finish the stitch and keep crocheting.
This method works great at any point during a stitch whether your in the middle of the row or and the end of a row. This can be used with any basic crochet stitch such as the single crochet, half double crochet, or the double crochet stitch. This method will not work with chain stitches.
Understanding the Need to Join Yarn
When it comes to crochet projects that require multiple colors or use a lot of yarn, joining yarn becomes an essential skill. Whether you’re changing to a different color or adding a new ball of yarn, knowing how to join yarn correctly can make a big difference in the outcome of your project.
Two of the most common reasons to join yarn is when changing to different colors or to add another skein of yarn. To seamlessly join another color yarn in crochet, the most popular choice is the Pull Through method.
This method ensures a smooth transition from one color to the next.
However, when joining a new skein of yarn there are a few more options you can use. You can use the Magic Knot or the Pull Through method and depending on the type of yarn and stitch type, you can consider using the Russian join or Spit Splice to connect both new and old yarn together.
Tips on how to join yarn ends seamlessly

So how do you join yarn seamlessly in crochet? Here are a few tips to ensure a smooth transition every time.
First and foremost, it’s important to use the same yarn type and weight when joining yarn. This ensures that the texture and appearance of your project remain consistent throughout. Mixing different yarns can result in noticeable variations, which may not give you the desired outcome.
Another key factor is to maintain a consistent tension when joining yarn. This means that you should continue working the stitches with the same level of tightness or looseness as before.
Inconsistencies in tension can cause unevenness or puckering in your fabric. So, pay attention to your joined yarn tension and make adjustments if needed.
When joining yarn, make sure to leave 5 to 6 inches (12 – 15 cm) of the old yarn tail before you begin. This length will give you enough yarn to securely weave in the ends later.
Be careful not to cut the tail too short, as it may unravel easily. You want to have enough length to work with for a neat and secure finish.
By following these tips and find your preferred method to ensure that your yarn joins are smooth and right for you.
Option 1 – Pull Through New Yarn
Joining yarn ends using the “pull-through joining method” technique is a simple and effective way to continue crocheting without leaving any loose ends or knots along the row.
Whether I’m doing color changes or just attaching a new yarn ball, this method is my preferred choice.
By following these steps, you can seamlessly join yarn ends without creating any knots or loose ends that might unravel later.

- Before you reach the end of the current yarn, leave at least 5inches or 10 cm of yarn tail before starting your joint.

2. Before closing up your last stitch, (which can be at the end of the row/ round or in the middle of the row)
3. Take the new yarn or yarn color and with your hook still in the last unfinished stitch, pull through the new yarn strand through all loops. (this method would not work if you are working chains)

4. Drop the old yarn and pick up your new yarn. You should have your new working yarn on your hook

5. Your next Stitch should be with the new yarn or new color. Continue to crochet as normal while working around the yarn tails. (Less ends to weave)
Option 2 – Magic Knot
I know a lot of people may find this method impossibly amateurish, but when working with taller stitches and larger patterns, this method is a great way to join yarn ends quickly and hassle-free.
It may not work on thicker and heavier fibers, and it does not work on chain stitches, however, it does the job!

- Before the yarn ends, pick up a new set of yarn and take both ends

2. Work a knot by placing the left yarn over and under the right yarn

3. Make a second knot by doing the reverse. Place the left yarn under and over the right yarn instead.
4. Pull both ends to tighten.

5. Snip of any excess tail as close as possible to the knot.
This option is the fastest but necessarily the neatest of the lot. This method is great for any joint especially when working with chain stitches.
If you would like to receive free written patterns and video tutorials straight into your inbox, just click Subscribe to get into our mailing list.
Option 3 – Russian Twist
This method is a great way to create an invisible join. It does require an extra step of weaving in the ends, however it will produce a strong and secure joint you will enjoy!

- Thread the yarn through the needle

2. Weave the needle through the back of the yarn about 5 – 6 times.


3. Pull the needle and yarn through, while leaving a loop at the end
4. Thread the other side and insert the needle through the loop5. Weave the needle on the other end like before
6. Pull the needle through and pull both ends to tighten

7. Snip of excess yarn.
***
With so many methods out there, which one is your go-to method when it comes to joining yarn ends?
If you are interested in learning more about crochet and looking for tips and tutorial ideas, you can check out these other free crochet tutorials below:
The easiest way to do the Magic Ring/ Magic Circle
No more twisted chains in the round
Chainless Foundation Stitch
I have a bunch of other videos and tutorials on how you can gain some cool tips & tricks, great for beginners getting started and more experienced crocheters looking to improve their skills.
I hope this tutorial was helpful! Let me know if you have any other ideas you would like me to share.
Happy hooking
Shaz 🧶