Crocheting is a great hobby, but even skilled crafters can face some challenges. If you’re just starting out, don’t worry if you hit a bump or two.
This guide will show you the 21 common mistakes new crocheters often face.Here, you will find solid solutions to help you get past them. These range from not knowing certain terms to problems with the way you make your stitches.
This post is for you if you’re just beginning your crochet journey or want to improve further. So, let’s start making your crochet projects truly amazing!
In this Guide, You will:
- Discover 21 common crochet mistakes that beginners often make
- Learn practical solutions to overcome these errors and improve your crochet skills
- Gain the confidence to tackle a wide range of crochet challenges
- Understand the importance of proper yarn and hook selection
- Explore strategies to maintain consistent stitch counts
This post contains affiliate links designed to provide a commission on purchases made at no cost to you. As an Amazon Associate, I earn from qualifying purchases that support my work in providing new content and information on this site.
21 Common Crochet Mistakes Every Beginner Makes and How to Avoid Them

1. Incorrect Tension
One of the most common mistakes is incorrect tension. Tension refers to the tightness or looseness of your stitches, and inconsistent tension can lead to uneven stitches and a less-than-perfect finished product.
To avoid this mistake, it’s important to find a tension that works for you and stick with it throughout your project. One way to achieve consistent tension is to practice by crocheting swatches before starting a project. This will help you identify and adjust your tension if needed.
Another tip is to make sure you’re holding your yarn and crochet hook correctly. The way you hold them can affect the tension of your stitches. Experiment with different ways of holding your materials until you find a comfortable and consistent grip.
2. Miscounting Stitches
Whether you skip a stitch or accidentally add an extra one, it can throw off your entire pattern. This can be frustrating, especially when you’ve put in a lot of time and effort into your project. By knowing how to avoid it, you can ensure smoother and more successful crochet projects.
One of the best ways to avoid miscounting stitches is to double-check your work regularly. Counting your stitches on every row or round can help catch any mistakes early on, allowing you to fix them promptly.
Additionally, taking breaks between rows or rounds can also help prevent fatigue and, consequently, miscounting. It may seem like a simple step, but it can make a significant difference in the accuracy and overall outcome of your crochet project.
Another useful tip is to highlight the first stitch of each row or round. By placing a stitch marker or simply tying a small piece of contrasting yarn around the stitch, you can easily identify where your row or round begins.
This visual cue can help prevent skipping or adding stitches and make it easier for you to follow your pattern accurately.
3. Ignoring Gauge

Perhaps one of the most significant mistakes beginners make is ignoring gauge.
Gauge refers to the number of stitches and rows per inch in a crochet pattern. Every crocheter has their own unique tension, and failing to match the gauge specified in a pattern can lead to finished pieces that are the wrong size.
Whether it’s a too-tight gauge that results in a sweater that won’t fit over your head or a too-loose gauge that leaves you with a floppy hat, ignoring gauge can be a recipe for disappointment.
To avoid this common mistake, it’s crucial for beginners to take the time to make a gauge swatch before diving into a project. This involves crocheting a small square using the specified hook and yarn and then measuring the number of stitches and rows in that square. (Learn more here)
If the gauge in your swatch matches the pattern, fantastic! If not, you may need to adjust your hook size or tension until you achieve the correct gauge.
4. Wrong Hook Size
This seemingly small oversight can have a big impact on the overall look and feel of your project. Using a hook that is too small for your yarn can result in a tight and stiff fabric while using a hook that is too large can lead to a loose and floppy piece.

The hook size recommended for a particular yarn can usually be found on the yarn label or in a pattern. It is important to pay attention to this information and choose the right hook size accordingly.
If you are unsure, it is better to err on the side of caution and use a smaller hook rather than a larger one, as it is usually easier to add more stitches to make a piece larger than it is to remove stitches to make it smaller.
Using the appropriate hook size for your yarn ensures that your stitches are even and consistent, resulting in a project that has the correct drape and size.
So, before you dive into your next crochet project, take a moment to double-check that you are using the right hook size. It may seem like a small detail, but it can make a big difference in the outcome of your work.
5. Twisting Chains

Twisted chains can create a twisted foundation row, which can throw off the entire project especially when working in the round.
When you start crocheting a project, it’s essential to ensure that your chains are not twisted. To achieve this, lay out your chain on a flat surface and make sure it lays flat. If you notice any twisting, simply untwist the chain before proceeding with your pattern.
One helpful technique to prevent twisted chains is to start with a small number of chains ie 20, remove the loop, and then insert your hook through the first chain at the beginning of the row.
Pick up the earlier loop and continue chaining as normal. Once you’re done, just slip stitch to join in the round. This will allow your chains to move freely and prevent any twisting from occurring. (Learn more here)
6. Counting Chains as Stitches
One of the most common mistakes is counting chains as stitches, especially in turning chains or pattern starts. This mistake can throw off the entire stitch count and result in an uneven or misshapen project.
To avoid this error, it’s crucial to note what the pattern has stated if the turning chain counts as a stitch and if it is to be included in the next row or round.
To avoid this mistake, take the time to count your stitches carefully at the end of each row. This will help you identify any missing or additional stitches and allow you to fix the issue before it becomes too pronounced.
Additionally, using stitch markers can be incredibly helpful in keeping track of your stitch counts, particularly when working on complex patterns. By placing a stitch marker in the turning chain or pattern start, you can easily identify where the last stitch of the previous row should be worked.
7. Yarn Tails
One common mistake that many beginners make is not properly weaving in ends, which can lead to unraveling.
When you finish a project, it’s essential to take the time to weave in each yarn tail the right way. Failing to do so can result in your hard work literally falling apart.
To avoid this, make it a habit to leave at least 5 – 7 in / 10 – 15 cm of yarn tail and weave in the ends as you go along ideally in opposite directions. This means securing them by threading the tail under the stitches and trimming any excess.
By doing this, your finished project will be sturdier and more durable.
8. Misunderstanding US and UK Crochet Terminology
One of the most common mistakes beginners make is not understanding the difference between US and UK crochet terms. For example, in the US, a single crochet stitch is referred to as a double crochet in the UK.
This can lead to a lot of frustration and misunderstanding when following crochet patterns.

To avoid this confusion, it’s important to familiarize yourself with both US and UK crochet terminology.
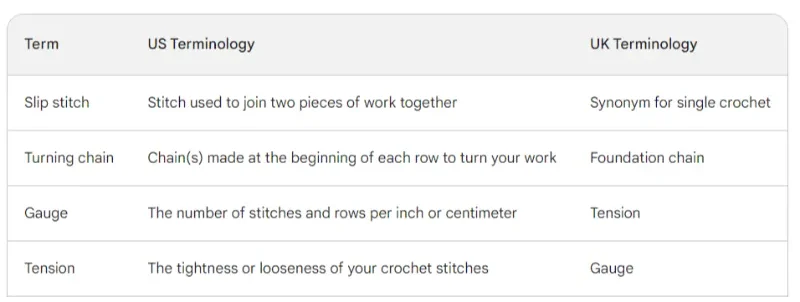
Take the time to research the differences and make a note of them for future reference. This will help you navigate through crochet patterns with ease and prevent any potential mistakes.
Another important tip is to carefully read the pattern instructions and look for any indication of which terminology is being used. Many patterns will specify whether they follow US or UK terms, so make sure to pay attention to this detail.
9. Improper Increases or Decreases
Increases and decreases are techniques used to add or subtract stitches from your project. They are essential for creating shaping and achieving the desired size and design. However, if done incorrectly, they can throw off the balance and symmetry of your work.
If you’re following a pattern, make sure to carefully read the instructions for the increase or decrease stitch. It’s important to understand the specific method recommended by the pattern designer.
This will vary depending on the type of stitch being used and the desired effect.
To avoid making mistakes with increases and decreases, always take your time and pay attention to what you’re doing. Count your stitches regularly to ensure that you’re on track.
If you notice any inconsistencies or errors, don’t hesitate to undo the stitches and start again.
10. Not Reading the Pattern Properly
As a beginner, it’s natural to make some mistakes along the way and not reading the pattern properly happens to the best of us.
When starting a new crochet project, it’s essential to carefully read through the pattern instructions. Many beginners make the mistake of rushing into the project without fully understanding the pattern. This can lead to confusion and mistakes in the stitches.
One aspect that beginners often overlook is the stitch abbreviations. Patterns use abbreviations to make the instructions shorter and easier to read.
However, if you don’t understand the abbreviations, it can be challenging to follow along. Take the time to familiarize yourself with the standard crochet abbreviations before attempting any project. This will save you from making unnecessary errors.
Another common mistake is missing crucial instructions in the pattern. Patterns often have specific notes or directions that provide important information about the stitch pattern, stitch count, or even tips for achieving the desired result.
Beginners may overlook these instructions, leading to frustration or a project that doesn’t turn out as expected. Always read the pattern in its entirety before starting to ensure that you don’t miss any essential details.
11. Ignoring Yarn Care Instructions
Another common mistake newbies usually make is ignoring yarn care instructions. It may seem like a small oversight, but using a yarn that requires special care without realizing it can result in disappointment and frustration down the line.
Many beginners are understandably excited to start their crochet projects and may neglect to read the labels on their yarn. However, this can lead to disappointment when the finished project doesn’t turn out as expected.

Certain yarns may require hand-washing or delicate machine cycles, while others can be thrown in the dryer. Some yarns may even require special treatments like blocking or air drying.
Before starting a project, take the time to read and understand the care instructions for your chosen yarn.
This simple step can save you a lot of heartache and ensure that your hard work pays off in the end.
12. Ignoring Hook Grip Comfort
It is essential to pay attention to your comfort and ergonomics to avoid strain and discomfort. One common mistake that beginners often make is ignoring the comfort of their hook grip.
Ignoring the comfort of your hook grip can lead to the development of strain and even long-term issues such as carpal tunnel syndrome. To avoid this, it is crucial to find a grip that feels natural and doesn’t cause excessive strain on your fingers and wrists.
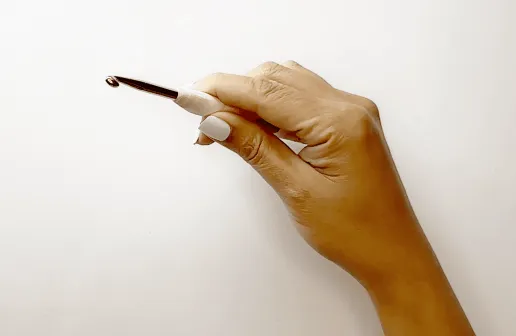
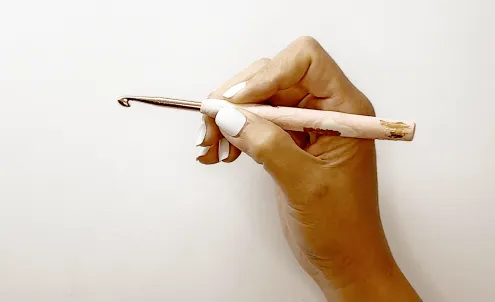
There are various hook grips to choose from, including the popular “pencil grip” and the “knife grip.” Whichever grip you choose, make sure it allows you to hold the hook firmly while keeping your hand relaxed.

Additionally, using ergonomic hooks with comfortable handles can further enhance your crocheting experience and prevent discomfort.
Remember, crocheting should be a pleasant and enjoyable activity, so take the time to experiment with different grips and find the one that feels most comfortable for you.
By prioritizing your comfort and avoiding the mistake of ignoring your hook grip, you can crochet for hours on end without experiencing unnecessary strain and discomfort.
Learn more on how to Prevent Hand & Wrist Pain when Crocheting
13. Using the wrong Yarn size for your project
It may seem like a small detail, but using the wrong yarn can greatly affect the outcome of your work. To avoid this mistake, it is important to familiarize yourself with the different yarn sizes and understand which one is suitable for your specific project.
Not all yarns are created equal, and each yarn size has its own characteristics. For example, a bulky yarn will create a heavier and bulkier finished product, while a finer yarn will create a more delicate and lightweight result.
Using the wrong yarn size can result in a project that is too large or too small, making all your efforts go to waste.
To avoid this mistake, take the time to read the label on the yarn you are planning to use. The label usually provides useful information regarding the recommended hook size and gauge.
Make sure to match both the yarn size and hook size to ensure that they complement each other. Additionally, if you are following a pattern, make sure to check if the specific yarn size is mentioned, as this will guide you in selecting the right yarn for your project.
14. Not Checking Yarn Dye Lots

One such mistake that often goes unnoticed is not checking yarn dye lots. This seemingly insignificant oversight can result in slight color variations between skeins.
When working on a crochet project, using multiple skeins of the same color is quite common. However, if you fail to check the yarn dye lots before starting, you may end up with noticeable inconsistencies in the color.
Yarn dye lots refer to the batch in which the yarn was dyed, and even within the same color, there can be slight variations.
To prevent this issue, always make sure to check the dye lots of your yarn before purchasing or using it. Look for the dye lot number on the label, and try to find skeins with the same number. This will ensure that the color remains consistent throughout your project, giving it a polished and professional finish.
15. Starting with Complicated Patterns
When you’re new to crocheting, it’s important to start with simpler projects to build your skills and confidence. Trying to tackle a complex pattern right away can lead to frustration and disappointment.
Instead, opt for basic stitches like single crochet or double crochet and practice them until you feel comfortable.
One way to avoid the mistake of starting with complicated patterns is to find beginner-friendly projects and patterns. Look for patterns labeled “beginner” or “easy” and gradually work your way up to more advanced designs.
This way, you can learn new techniques and stitches without feeling overwhelmed.
Another helpful tip is to seek guidance from experienced crocheters. Joining a crochet group or taking a beginner’s crochet class can provide you with valuable tips and tricks. Learning from others’ experiences can give you the confidence to tackle more complex patterns when you’re ready.
16. Crocheting in the Wrong Direction
One mistake that often occurs is crocheting in the wrong direction, especially with designs that have specific front (RS – Right Side) or back sides (WS – Wrong Side).
When crocheting in the wrong direction, you may end up with a piece that doesn’t look quite right or doesn’t match the intended pattern. This can be frustrating, especially when you’ve put in a lot of time and effort into your project. To avoid this mistake, it’s important to pay attention to the pattern instructions and the stitch placement.
17. Not Securing the Last Stitch
One mistake, and perhaps one of the most crucial, is not securing the last stitch.
Many beginners may become so engrossed in their crochet project that they forget to properly secure the last stitch. This seemingly small oversight can lead to disastrous consequences down the line.
Over time, the last stitch can come unravel, causing all of your hard work to come undone. To avoid this heartbreaking outcome, it’s essential to always secure the last stitch.
Luckily, securing the last stitch is a simple process. After completing your final stitch, just chain one and pull tight to secure. This creates a knot and will ensure that the stitch stays in place and your project remains intact.
By taking just a few extra seconds to secure the last stitch, you can save yourself from future frustration and disappointment.
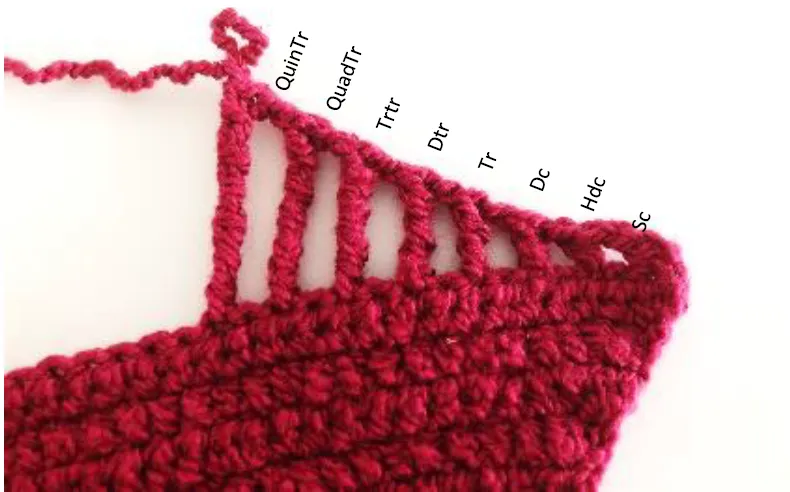
18. Not Reading Charts Correctly
Charts are an invaluable tool for crocheters, providing a visual representation of stitches, patterns, and designs. However, many beginners make the mistake of not reading charts correctly, which can lead to confusion and mistakes in their projects. It’s important to take the time to understand how to read charts properly to avoid these common pitfalls.
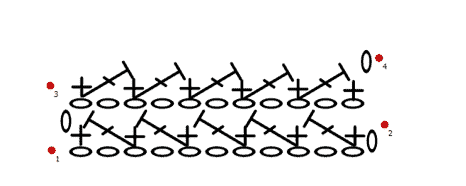
One common mistake is misinterpreting the symbols and abbreviations used in crochet charts. Each symbol represents a specific stitch or action, and it’s essential to familiarize yourself with these symbols before diving into a pattern.
Understanding the relationship between the symbols and the written instructions can help clarify any confusion.
Another mistake is not paying attention to the chart key or legend. The chart key will provide important information about the symbols used in the chart, including stitch abbreviations and any special instructions.
Neglecting to refer to the key can lead to misunderstandings and errors in your crochet work.
19. Not having enough yarn

We’ve all been there – you’re cruising along, making great progress, and suddenly you run out of yarn right in the middle of a row or round. It can be frustrating to have to stop and start weaving in new yarn, not to mention the extra ends to deal with.
To avoid this mistake, it’s important to estimate how much yarn you’ll need for your project before you start. For beginners, it can be helpful to choose a project with a simple pattern and clear instructions, so you know exactly how much yarn you’ll need to complete it. Here is a very useful yarn calculator to estimate how much yarn you would need.
Additionally, it’s a good idea to choose a yarn that has a generous amount on the label – this way, you’ll have some wiggle room if you make mistakes or need to redo a section.
Another tip to avoid running out of yarn is to plan your project in sections. Instead of crocheting until you reach the end of your yarn ball, it’s a good idea to work in small sections and periodically check how much yarn is left. This way, you can gauge whether you’ll have enough to complete your current section or if you need to start a new ball of yarn.
20. Comparing Progress with Others
We live in a world that thrives on competition and comparison. It’s human nature to want to measure our progress against others. And this tendency can often seep into our hobbies as well, including crochet. But when it comes to the art of crocheting, it’s important to remember one thing: everyone crochets at their own pace.
It’s easy to get caught up in the race to finish projects as quickly as possible, or to compare our skills to those of other crocheters. But this mindset can often lead to frustration and disappointment.
Crocheting is a personal journey, and we all have our own unique styles and abilities. Some may pick up the craft quickly and easily, while others may take a bit longer to master the techniques.
Instead of comparing ourselves to others, it’s essential to focus on our own progress and growth. Celebrate each stitch and each completed project as an achievement in itself.
Remember that every beginner makes mistakes, and that’s perfectly okay. In fact, there’s a saying that goes, “A person who never made a mistake never tried anything new.”
So, whether you’re a beginner or an experienced crocheter, embrace your own journey and enjoy the process. Take the time to learn from your mistakes and use them as stepping stones to improve your skills.
Remember that comparing yourself to others will only hinder your own progress. Crochet at your own pace, and let the joy of the craft be your guide.
21. Not Checking Finished Measurements
When we start a project, we often get excited and dive right into the pattern without considering the final size of the item. Different crocheters have different tension, and even a slight difference can affect the size of the finished piece.
To avoid this mistake, always check the measurements specified in the pattern and compare them to your own gauge.
Make a small swatch and measure it to see if it matches the recommended gauge. If your tension is looser, you may need to change to a smaller hook size, and if it’s tighter, switch to a larger hook.
By doing this, you ensure that your finished project will be the right size and fit perfectly.
Not checking the finished measurements can also lead to using the wrong amount of yarn. If your project turns out larger than expected, you may need to buy more yarn to complete it.
On the other hand, if it’s smaller, you might end up with extra yarn that you don’t need. This can be a waste of time and money, so always double-check before starting.
Why Use the Chainless Half Double Crochet Foundation?

If you’ve ever struggled with tight, uneven, or twisted starting chains, you’re not alone! The Chainless Half Double Crochet Foundation Stitch is a fantastic alternative that solves these common issues. Instead of making a separate chain and then working into it, this technique creates both the chain and the first row of stitches at the same time.
One of the biggest advantages of this method is its stretchiness and flexibility, making it ideal for projects that require a little extra give, such as hats, blankets, garments, and cuffs. Unlike traditional chains, which can sometimes feel stiff and restrictive, this foundation stitch allows your work to move naturally with the fabric, preventing tight edges and uneven tension.
Another major perk? No more counting chains! This is especially helpful for large projects where losing count can be frustrating. With this method, you simply work the stitches until you reach the desired width, saving time and reducing mistakes. Plus, the foundation row blends seamlessly with the rest of your project, creating a polished, professional look.
Whether you’re a beginner looking to make crocheting easier or an experienced crocheter wanting to refine your skills, the Chainless Half Double Crochet Foundation Stitch is a must-learn technique that will change the way you start your projects!
Related Post:
No more twisted chains in the round
How to Join Yarn Ends
The Easiest Chainless Half Double Crochet Foundation Stitch
Firstly gather 4 – 5x the amount of yarn needed for the length required for your work. For example, if you need approx 5in /12cm of sts for that row, then pull FOUR to FIVE times the required amount of yarn. This depends on the yarn weight and hook size used. Work up a small sample to see which one works best!
Work a slip knot on the working yarn, and NOT on the yarn tail
Insert your hook and hold on to the tail
Wrap the tail around the hook from the front toward the back
It should look like this. Hold on to the bottom of the 2 loops
Yarn over, and work that first single crochet! And that’s it.
Repeat each step above until you have reached your desired length. In this case, it is 5ins / 12cm.
Once you have completed the chainless foundation, make sure to insert your hook through the correct stitch loop on your next row! You can check out my video tutorial for a better idea!