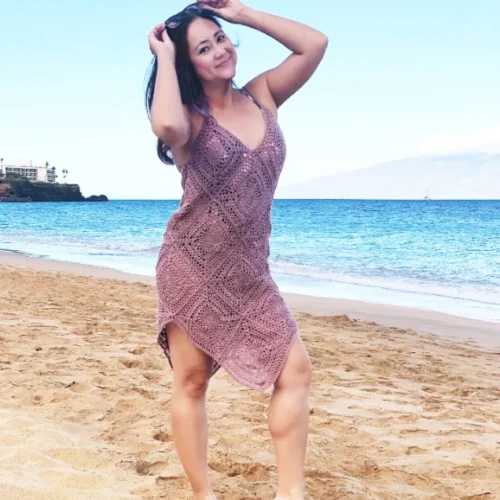
If you are looking for that fun festival and free crochet top then look no further. What better way to get festive than by getting dressed in it?
This Festival crochet crop top is fun and frilly and a great step up for any crochet beginner. Check out the free pattern below!
Or add this to your Ravelry queue. If you would like a printable ad-free PDF pattern, loaded with images and it is available for purchase in my shop.
DESIGN INSPIRATION

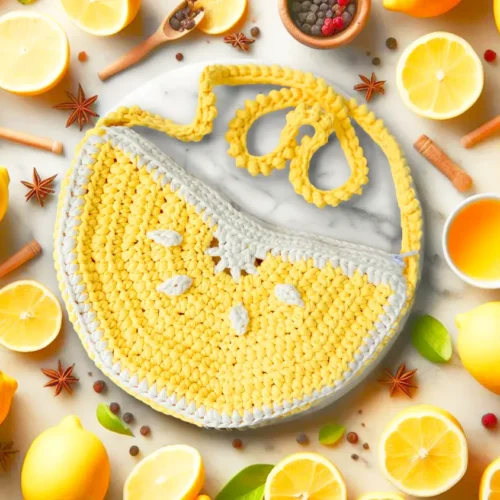
Having a fun top is something we all need in our wardrobe. Be it for parties, outdoor events, or a day at the beach! This crochet festival top was designed with coverage in mind. Not fully a bikini and not entirely a top either.
The mesh V shape panel and frilly tassels are a fun addition giving it some serious bohemian and hippie vibe.
Crochet Festival Top Construction

This festival frill crop top starts off with the basic cup shape using half-double crochet stitches. Then a gorgeous row of scallop stitches is added around the cups, followed by some fan stitches along the bottom of the cups with simple double crochet stitches.
Chains are then added along the entire bottom band. After this, you will become a master in chains. And to finish it off, just cut a couple of strands and work up a slip knot on every other chain along the bottom edge.
This top is easily adjustable to fit any cup size and body width with these string ties and stretchy yarns.


Instructions
Part 1: Making the Cups
1. Foundation Row: Chain 15 for all sizes
2. Row 1: On the 2nd Ch from hook, work a Hdc and cont to Hdc across. Ch1, turn (14 sts)
3. Row 2: Work 14 Hdc Sts, turn to the side and work 5 hdc sts on the last rows post, Hdc 14 sts on the chain side, Ch1 turn
4. Row 3: Hdc 16 Sts, work 5 Hdc in the next St, Hdc 16 Sts, Ch1, turn
5. Row 4: Hdc 18 Sts, work 5 Hdc on next St, Hdc 18 Sts, Ch1, turn
6. Row 5: Hdc 20 Sts, work 5 hdc on next St, Hdc 20 Sts, Ch1, turn
7. Row 6: Hdc 22 Sts, on the next St, work 3hdc in next St, Hdc till the end, Ch 1 turn.
8. Row 7: *(cont to Hdc until the 1st St of the 3hdc group Sts, work 3hdc on the next St, Hdc across, Ch 1 turn) Rep (*) for 4[6/ 8/ 10/ 12/ 14] more rows or until you’re preferred size.
9. Last Row: Scallop Pattern. *(Sk 2 Sts, work 5 Dc on next St , Sk2, Sc) rep (*) until the last 3 Sts before the tip/top of the cup.
10. Make tie string here. On the next step, pull two arms-length worth of yarn (see image below) or approx. 60in / 150cm of yarn 4 times. Fold in half. You should have 120in/ 300cm of double yarn.

11. Sk 2 Sts, insert hook through the next St, draw up a loop and YO double yarn and Sc. Work a double yarn chain till the end. Finished length about 28in/ 70cm.
12. Pick up yarn and Pt St, Cont scallop pattern. *(Sk2 Sts, work 5 Dc on next St , Sk2, Sc) rep(*) until last St.
13. Bind off and rep steps 1 – 12 to make a second cup.
14. At the end of the second cup, connect both cups by making 5 chains, Slst on RS corner of the other cup (ref image5)
15. Slst 3 Sts up on the scallop, Hdc 5 on Ch, Slst on 3rd St. Bind off
Side tie
1. Prepare yarn and pull two arms-length worth of yarn (see image above) 4 times, then fold in half.
2. Turn work bottom side up and insert hook through the last rows post on the corner of the right cup. Draw up loop (both yarns) and complete double yarn chain till the end.
3. Pick up yarn from the last post and Sc (loosely) on each row across through the 2nd cup.
4. Rep step 1, Pt both yarn end on the last St and complete double yarn chain till the end.
Part 2:Fan stitches
5. Row 1: Pick up yarn where was left off and insert hook through the last rows post and *(Ch 5, Sk 1 row, Sc) rep(*) until the last row, Sk middle/joining Ch (Ref image 5), cont (*) until the 2nd last row. Ch 3, Dc on the last row. Ch 5 turn
6. Row 2: A/C/F Cup only: Sc the next loop, *(work 8 Dc in the next loop, Sc the next loop, Ch 5, Sc in the next loop, Ch 5, Sc in next loop), rep(*) until 4thlast loop, work 8 Dc in the next loop, Sc the next loop, Ch 3, Dc in the last loop. Ch 5 turn.
7. Row2: B/ D/ E Cup only: Sc the next loop, *(Ch 5, Sc in the next loop, Ch 5, Sc in the next loop, work 8 Dc in the next loop, Sc in the next loop), rep(*) until 2nd last loop, Ch 3, Dc in the last loop. Ch 5 turn.
8. Row 3: A/ C/ F Cup only Ch 1, Dc in each Dc St, Ch 1, *(Sc in the next loop, Ch 5, Sc in the next loop, Ch 1, Dc in each Dc St, Ch 1), rep(*) until the last loop, Slst 3 sts, Ch 1 turn.
9. Row 3: B/ D/ E Cup only: Sc in the next loop, *(Ch 5, Sc on next loop, Ch 1, Dc in each Dc St, Ch 1, Sc in the next loop), rep(*) until 3rd last loop, Ch 5, Sc in next loop, Ch 3, Dc in the last loop. Ch 1 turn.
10. Row 4: A/ C/ F Cup only Ch 5, Sc on next loop, [Ch 1*(Dc, Ch 1) 8x in each Dc St, Sc in the next loop] rep[*] until the last St, Ch 3, Dc on the last loop, turn.
11. Row 4: B/ D/ E Cup only: [Ch 1*(Dc, Ch 1) 8x in each Dc St, Sc in the next loop] rep[*] until the last St, Ch 1, Sc the last loop, turn.
12. Row 5 (All sizes): Sc in each St, Ch 5 turn
13. Row 6: *(Sk 3 Sts, Sc in the 4th St, Ch 5) rep(*) until the 2nd last loop. Ch3, Dc in the last loop, Ch 5 turn
14. Row 7: Sc on the next loop. Cont to Ch 5 and Sc on each loop. On the 2nd last loop, Ch 3, Dc, Ch 5, turn.
15. Next Rows: Rep Row 7 until you only have 1 loop left. Bind off
If you would like to receive free written patterns and video tutorials straight into your inbox, just click Subscribe to get into our mailing list.
Part 3: Tassel
1. Cut 2 pcs of yarns approx 8 in/ 20cm each.
2. Fold in half and insert hook through the last (bottom) loop. Draw up 2 loops
3. Yo, Pt both yarns.
4. Rep step 1– 3 on every other row.
5. Lay flat and trim edges to get a straight cut
6. Weave in all loose ends.