6 Basic Ways to Seam Crochet
Here are some of the most commonly used crochet seams used to join 2 pieces together in various projects:
- Whip Stitch seam: This is a common stitch used by many to join pieces together quickly but I find them to be not very study if not done correctly.
- Single Crochet seam: This is a simple and sturdy seam that is well-suited for joining pieces of any shape or size, especially great for uneven edges.
- Slip stitch seam: This is also another easy and sturdy seam that is well-suited for joining a smaller piece on top of a larger piece.
- Mattress stitch: This is a great and tidy seam that is invisible and often used to create a seamless finish.
- Join-as-You-Go (JAYG) Method: This method is a technique for joining crochet pieces as you crochet along, especially popular for joining motifs.
- Surface Chain Seam: This slip stitch creates a beautiful flat chain stitch between 2 pieces of fabric or crochet squares.
Basic Whip Stitch Seam

The whipstitch seam is a simple and versatile crochet seam that is commonly used to join pieces of any shape or size. However, it may not be the most sturdiest of the lot if not done correctly.
Step-by-step instructions for Whip Stitching:
- Thread your yarn through a tapestry needle and ensure to have enough yarn length for the entire seaming.
- Place the two pieces sandwiched together wrong side up, with the edges aligned evenly.
- Insert the needle under the first front stitch or row (depending on which sides you are working on) through both pieces and pull through the back.
- Repeat step 3 into each stitch until you reach the end of the seam.
- Finish the seam by weaving in the ends.

Pro Tip:
- Yarn Length: Best to triple the length from the actual seam length
- Maintain consistent tension: When whipstitching, it is important to maintain consistent tension throughout the seam. This will help to create a tight and secure seam.
- Check alignment frequently: As you are whipstitching, be sure to check the alignment of the pieces frequently. This will help to ensure that the seam is straight and even.
- Weaving ends: Finish the seam by weaving in the ends through the wrong side of your work.
Single Crochet Seam

This single crochet seam is a great alternative to a quick and sturdy seam for those who dislike using a needle. This method is perfect for joining pieces with uneven edges.
How to do a single crochet seam:
- Place two pieces of crochet together, with the right sides sandwiched together and the edges lined up evenly.
- Insert your crochet hook into the first stitch or row (depending on which sides you are working on) through both pieces, draw up a loop, yarn over and pull through both loops
- Insert your hook into the next stitch or row through both pieces and work a single crochet stitch.
- Repeat step 3 until you reach the end of the seam.
- To close the seam, chain 1 to secure on that last stitch and bind off.
- Weave in the access tail through the wrong side of your work (with a yarn needle).

Advantages of the single crochet seam:
- Simple and easy: The single crochet seam is a very simple and easy stitch to do for those who do not like using a yarn needle, making it a great choice for beginners.
- Sturdy and durable: It is a very sturdy and durable seam, making it ideal for crochet garments that will get a lot of wear and tear.
Pro tips:
- Use the same hook and yarn size: When seaming sides using this method, it is best to use the same yarn and hook size as your project.
- Uneven Edges: If you have uneven edges, using the single crochet seam method will be able to “hide” and create a more even edge.
- Hide yarn tails discreetly: If you have access yarn tail along the seam, this method is a great way to hide and tidy up all those loose ends.
Slip Stitch Seam
The surface slip stitch join is another simple and versatile crochet seam that is well-suited for joining different pieces of any shape or size. Similar to its sister stitch the Single crochet seam, it also uses a crochet hook but not necessarily only along the edges.
Step-by-step instructions for slip-stitch seaming:
- Place two pieces of crochet together, with the right sides sandwiched together and the edges lined up evenly.
- Insert your crochet hook into the first stitch or row (depending on which sides you are working on) through both pieces, draw up a loop
- Insert your hook into the next stitch or row through both pieces, draw up a loop, and slip stitch into the loop on hook
- Repeat step 3 until you reach the end of the seam.
- To close the seam, chain 1 to secure on that last stitch and bind off.
- Weave in the access tail through the wrong side of your work (with a yarn needle).
Slip Stitch

The slip stitch join is a simple and versatile crochet seam that is well-suited for joining different pieces of any shape or size. Similar to its sister stitch the Single crochet seam, it also uses a crochet hook but not necessarily only along the edges.
- Place the smaller piece of crochet (like a pocket for example) on top of the larger piece (like the body panel)
- Insert your crochet hook through the first stitch or post stitch and draw up a loop
- Insert your crochet hook through the next stitch or post, draw up a loop, and slip stitch into the loop on hook creating a chain-like stitch pattern.
- Continue step 3 until the end of the seam
- Weave in the access tail through the wrong side of your work (with a yarn needle).

Advantages of using the surface slip stitch seam:
- Flat seam: The flat slip stitch seam is tight and perfect for joining any pieces of any shape or size.
- Sturdy and durable: It is a very sturdy and gap-free seam, making it ideal for projects that require a stronger joint.
Pro Tip:
- Decorative Edge: The layered slip stitch seam method can also be used as a decorative stitch if using a contrasting color or, you can use a thicker yarn to create a more raised seam.
Mattress Stitch Seam

The mattress stitch, also known as the vertical mattress stitch, is an invisible seam that is often used on the stitch row where a neat finish is required. It is also a very strong seam perfect for seaming edgings, collars, or crochet squares.
Step-by-step instructions for mattress stitching:
- Thread your yarn through a tapestry needle and ensure to have enough yarn length for the entire seaming.
- Place the two pieces side by side with the right side facing up, and the edges aligned evenly.
- Insert the needle through the first back loop and again through the second back loop on the first pieces and pull through.
- Insert the needle through the first back loop and through the second back loop on the second piece and pull through.
- Repeat steps 3 and 4 into each back loops stitch continuing from the last pull-through stitch until you reach the end of the seam.
- Finish the seam by weaving in the ends through the wrong side of your work.

Benefits of the mattress stitch seam:
- Invisible seam: The mattress stitch seam is an invisible stitch making it the best choice for projects where a perfect finish is essential.
- Strong seam: The mattress stitch seam is also very sturdy and durable.
Pro tip:
- Match stitch patterns carefully: When seaming pieces together, be sure to match the stitches carefully so that the seam is invisible and there are enough stitches aligned on both sides.
- Practice: Practice on larger stitches for a better understanding and feel for the stitch. This will also help on how to maintain a consistent tension.
Join-as-You-Go (JAYG) Method

The Join-as-You-Go (JAYG) method is a technique for joining crochet pieces as you go on with the remaining pattern. This method is usually used for joining motifs or when adding another piece to your project like a sleeve, collar, or edgings.
Step-by-step instructions for JAYG:
- Planning: Before you start crocheting, decide how you want to join your pieces. Whether you are joining motifs or adding a new piece, you will need to have a layout or a plan mapped out.
- Marking: Mark the beginning and end of each seam with stitch markers. Once you are ready to JAYG;
- Joining by motifs : For motifs, join the next motif by crocheting into the corresponding stitch on the motif. You can use chains, a slip stitch, a single crochet stitch, or a double crochet stitch or whatever the pattern calls for to join the next motif.
- Joining by adding: If you are adding another sectional piece, start with the pattern stitch and build along between the stitch markers.

The benefits of the Join-as-You-Go (JAYG) method include:
- Reduces sewing time: The JAYG method eliminates the need to sew your pieces together at the end, which can save a lot of time.
- Creates a seamless look: The JAYG method creates a seamless look, which is perfect for projects such as blankets, sweaters, and lace patterns.
Pro Tip:
- Do not use this method if you do not have a pattern or a plan mapped out.
Surface Chain Stitch

The Surface slip stitch creates a flat join with a prominent chain stitch making it a great choice for joining granny squares or creating any decorative join stitch together. Similar to the slip stitch seam, this join is used along the edge of the stitch side and is ideal for the same size pieces.
How to do a Surface Chain stitch:
- Place the two crochet pieces next to each other right side up, with the edges joined and lined up evenly.
- Insert your crochet hook into the back loop of the first stitch on the right piece and through the back loop on the left piece
- Draw up a loop
- Repeat by inserting your hook into the back loop of the next stitch on the right piece and through the back loop on the left piece
- Draw up a loop and slip stitch through the loop on hook
- Repeat steps 4 and 5 all the way until the end of the seam
- When you reach the last chain space, chain 1 and bind off. Weave in loose ends through the back side of the work.

Advantages of the Surface slip stitch:
- Creates a flat joining seam: The surface slip stitch creates a flat and decorative seam, making it a great choice for joining granny squares together or any joint you want with the visible chain.
Pro tips:
- Decorative Edge: The layered slip stitch seam method can also be used as a decorative stitch if using a contrasting color or, you can use a thicker yarn to create a more raised seam.
***
Preparing your crochet pieces for seaming
Appropriate Yarn And Hook Size For Seaming

It is important to use the same yarn and hook size for seaming as you used for crocheting the pieces. This will help to create a more seamless finish.
If you are seaming pieces of different thicknesses, you may want to use a slightly larger hook size for the seaming. This will help to prevent the seam from puckering.
Blocking Your Crochet Project
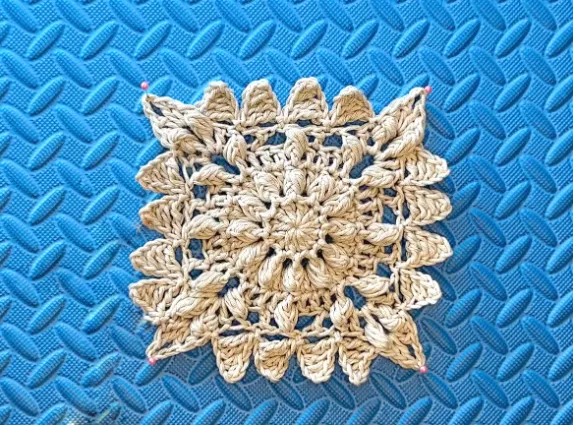
Blocking is the process of shaping and setting your crochet project using moisture and heat. Blocking can help to improve the drape, stitch definition, and overall look of your project.
To block your project, you will need a blocking board or foam board, blocking pins, and a spray bottle filled with water. You may also want to use a steam iron.
First, lay your project flat on the blocking board. Pin the edges of the project to the board, stretching it out to the desired shape and size. Be careful not to overstretch the fabric, as this can cause it to lose its shape.
Once the project is pinned in place, spray it with water until it is damp. If you are using a steam iron, (double-check the fiber that you are using – it could melt) and steam the project lightly. Be careful not to overheat the iron, as this can damage the yarn.
Allow the project to dry completely before removing the pins.


