
Adding a burst of vibrant yellow, a hint of whimsy, and a whole lot of style – that’s the fun of our crochet fruit-shaped bag.
In a world where fashion often takes itself too seriously, we believe it’s time to inject a little zest, a pinch of playfulness, and a lot of bright colors into our everyday accessories. Introducing the Sweetest Slice of Style: The Crochet Lemon Wedge Crossbody Bag.
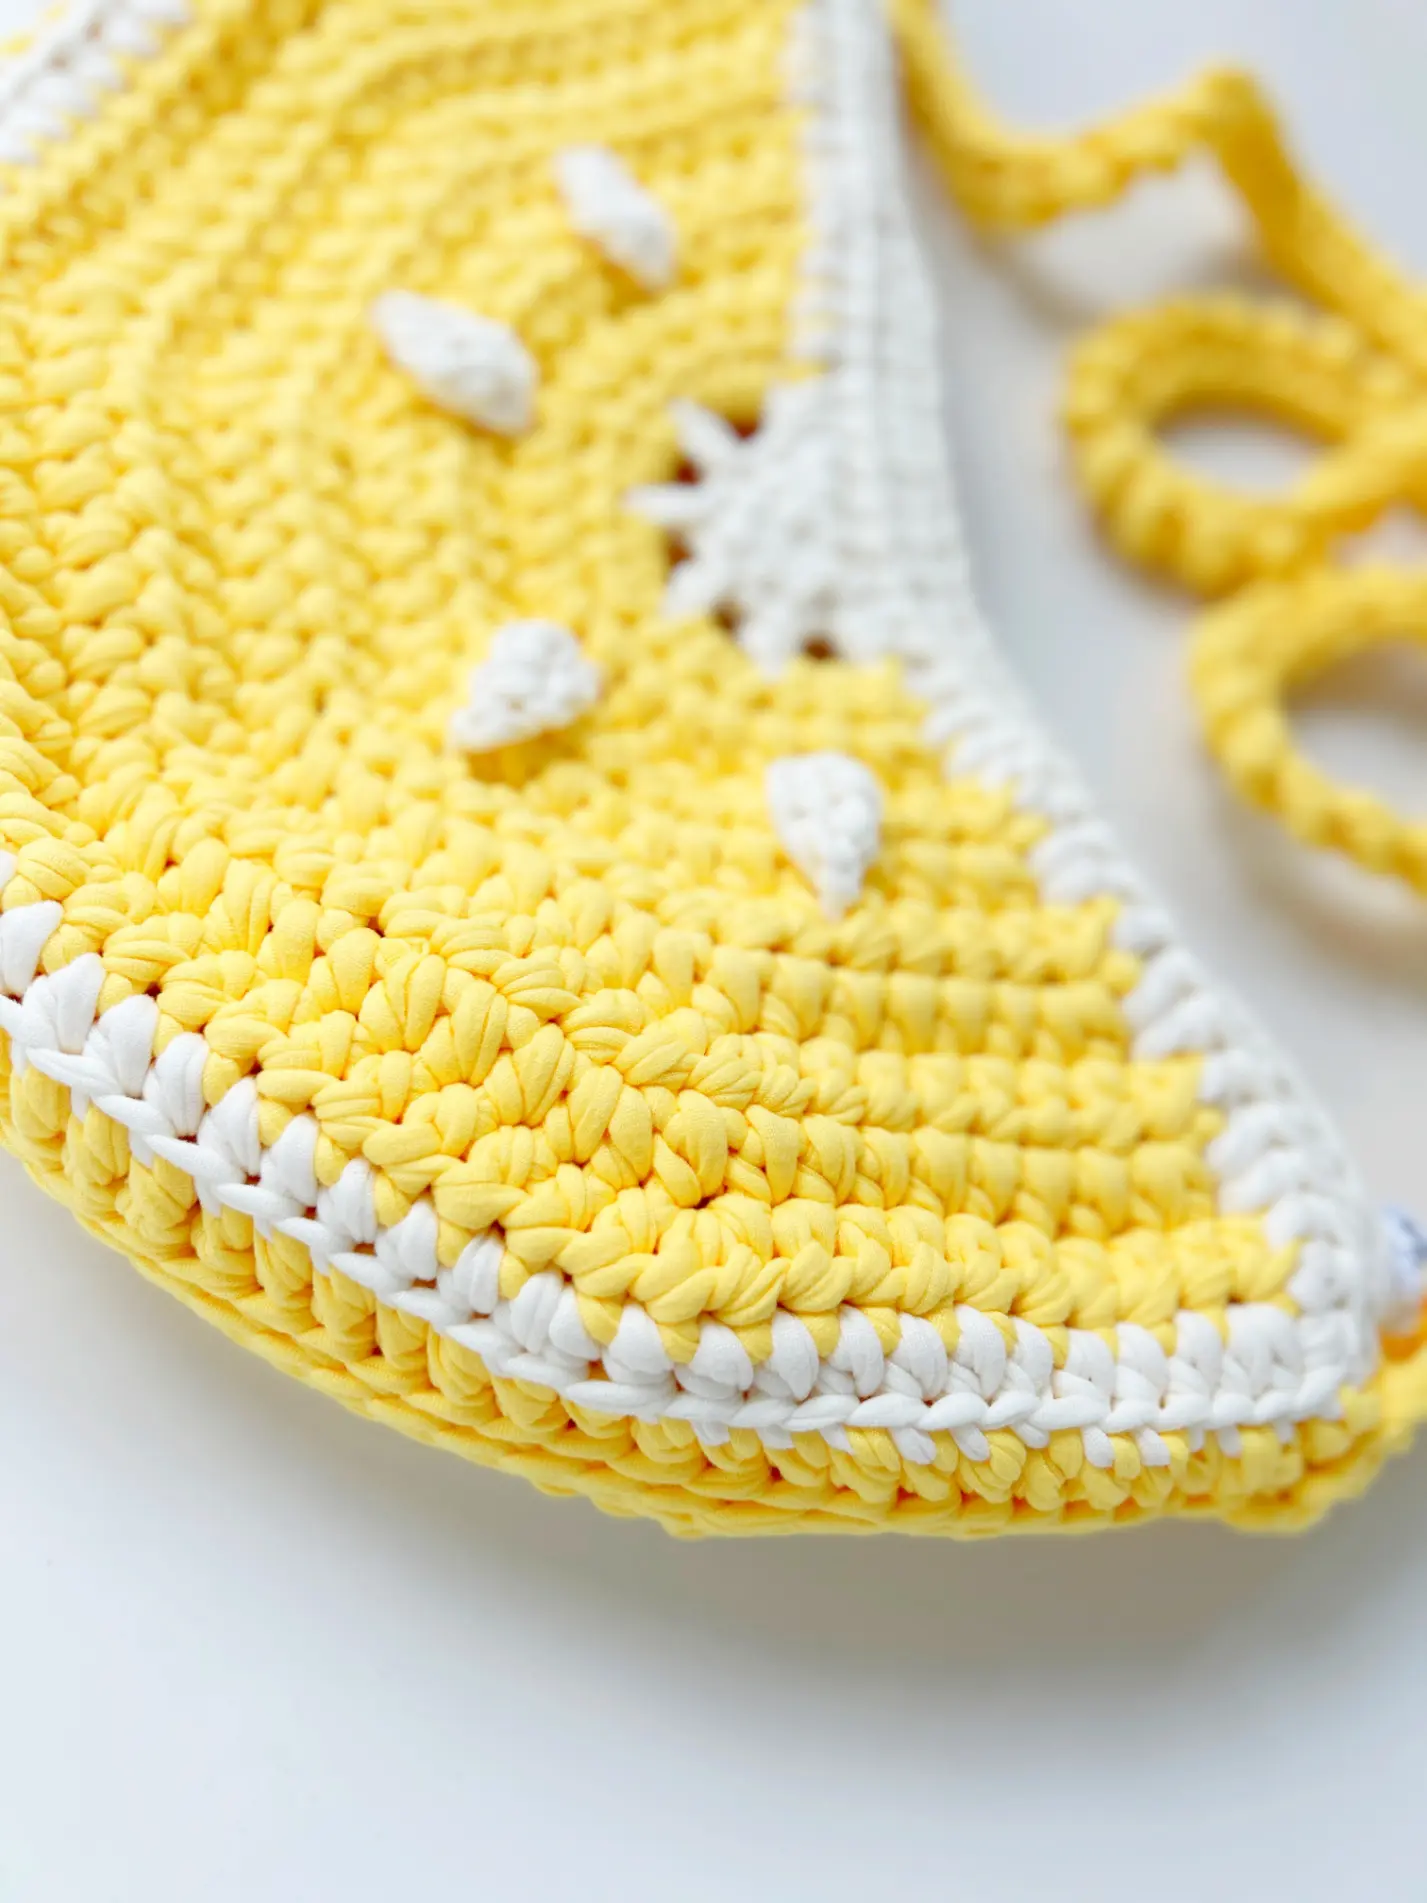
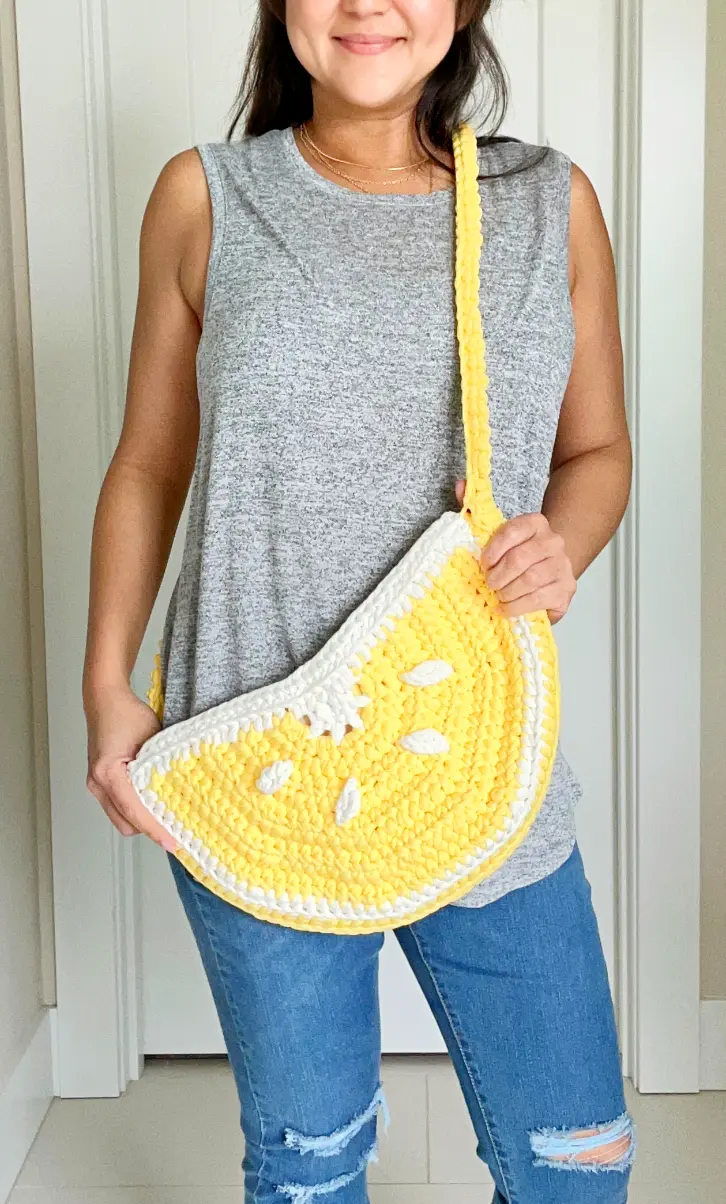
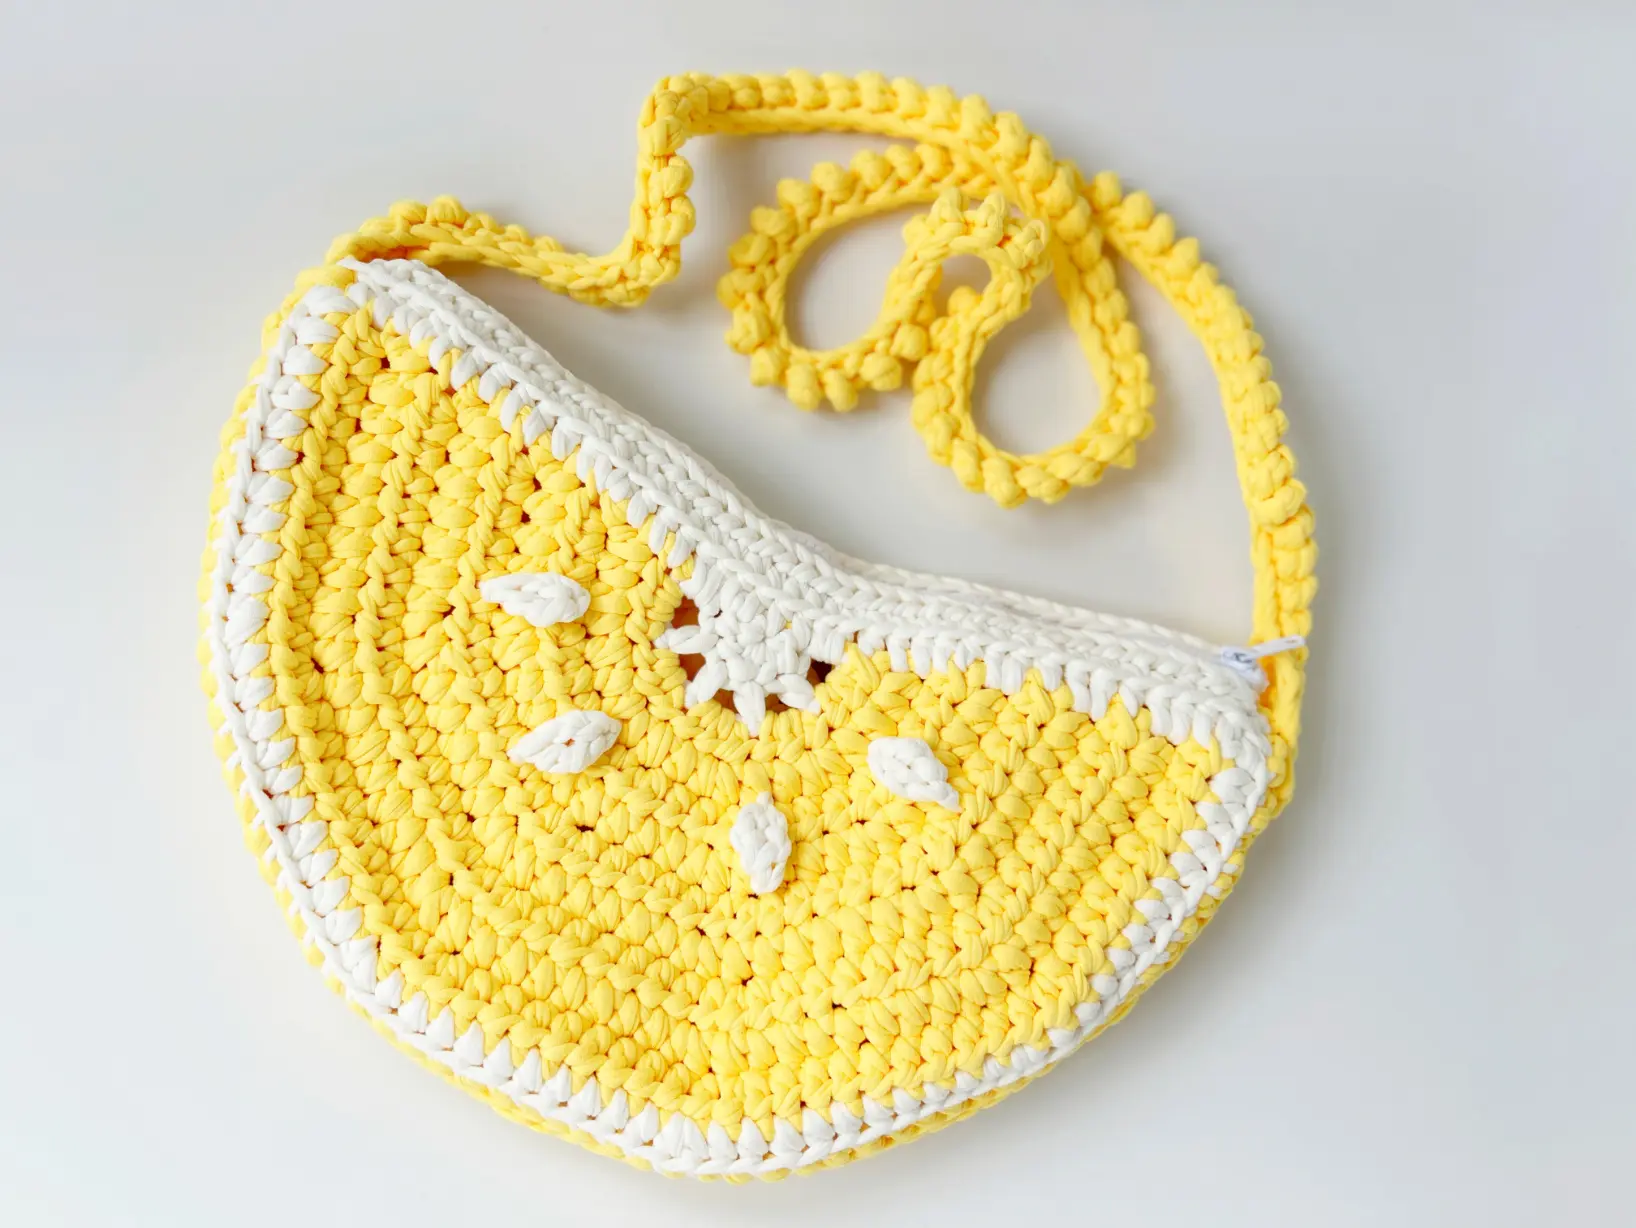
It’s hard to miss the unmistakable silhouette of our lemon wedge crochet bag. A Slice of Sunshine. Its unique shape, inspired by the cheerful form of a lemon slice, instantly transports you to lazy summer afternoons and carefree picnics in the park. But this isn’t just any ordinary bag – it’s a statement piece that dares to stand out from the crowd.
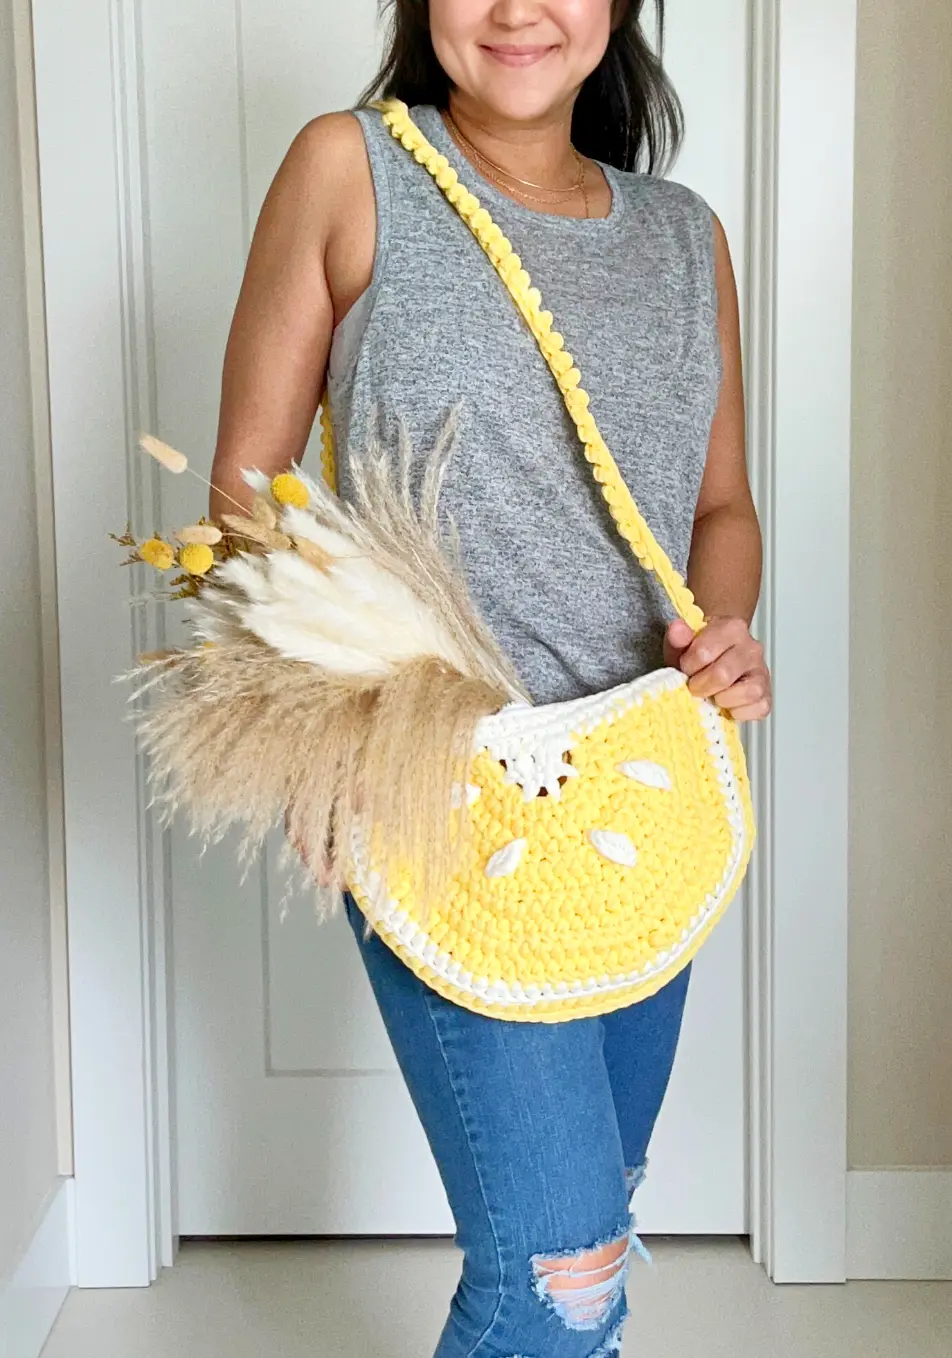
Crafted with meticulous attention to detail, our crochet lemon wedge bag captures the essence of sunny days and laid-back charm. With its curved edges, subtle ridges, and playful proportions, it’s a slice of sunshine that’s sure to brighten up even the dreariest of days.
This free crochet crossbody bag pattern is made in one size but can be easily adjustable to your preferred size. If you’re more of a visual person, then check out the video tutorial on this pattern on my YouTube channel. And for those who prefer a hassle-free, ad-free experience, grab the printable PDF format with photo tutorials included available in my shop for purchase or just add this to your Ravelry queue.
Related Post:
Now, let’s talk about what sets our lemon wedge bag apart from the rest – the choice of material. Say goodbye to traditional yarn and hello to fabric yarn, the secret ingredient that gives our bag its softness and durability.
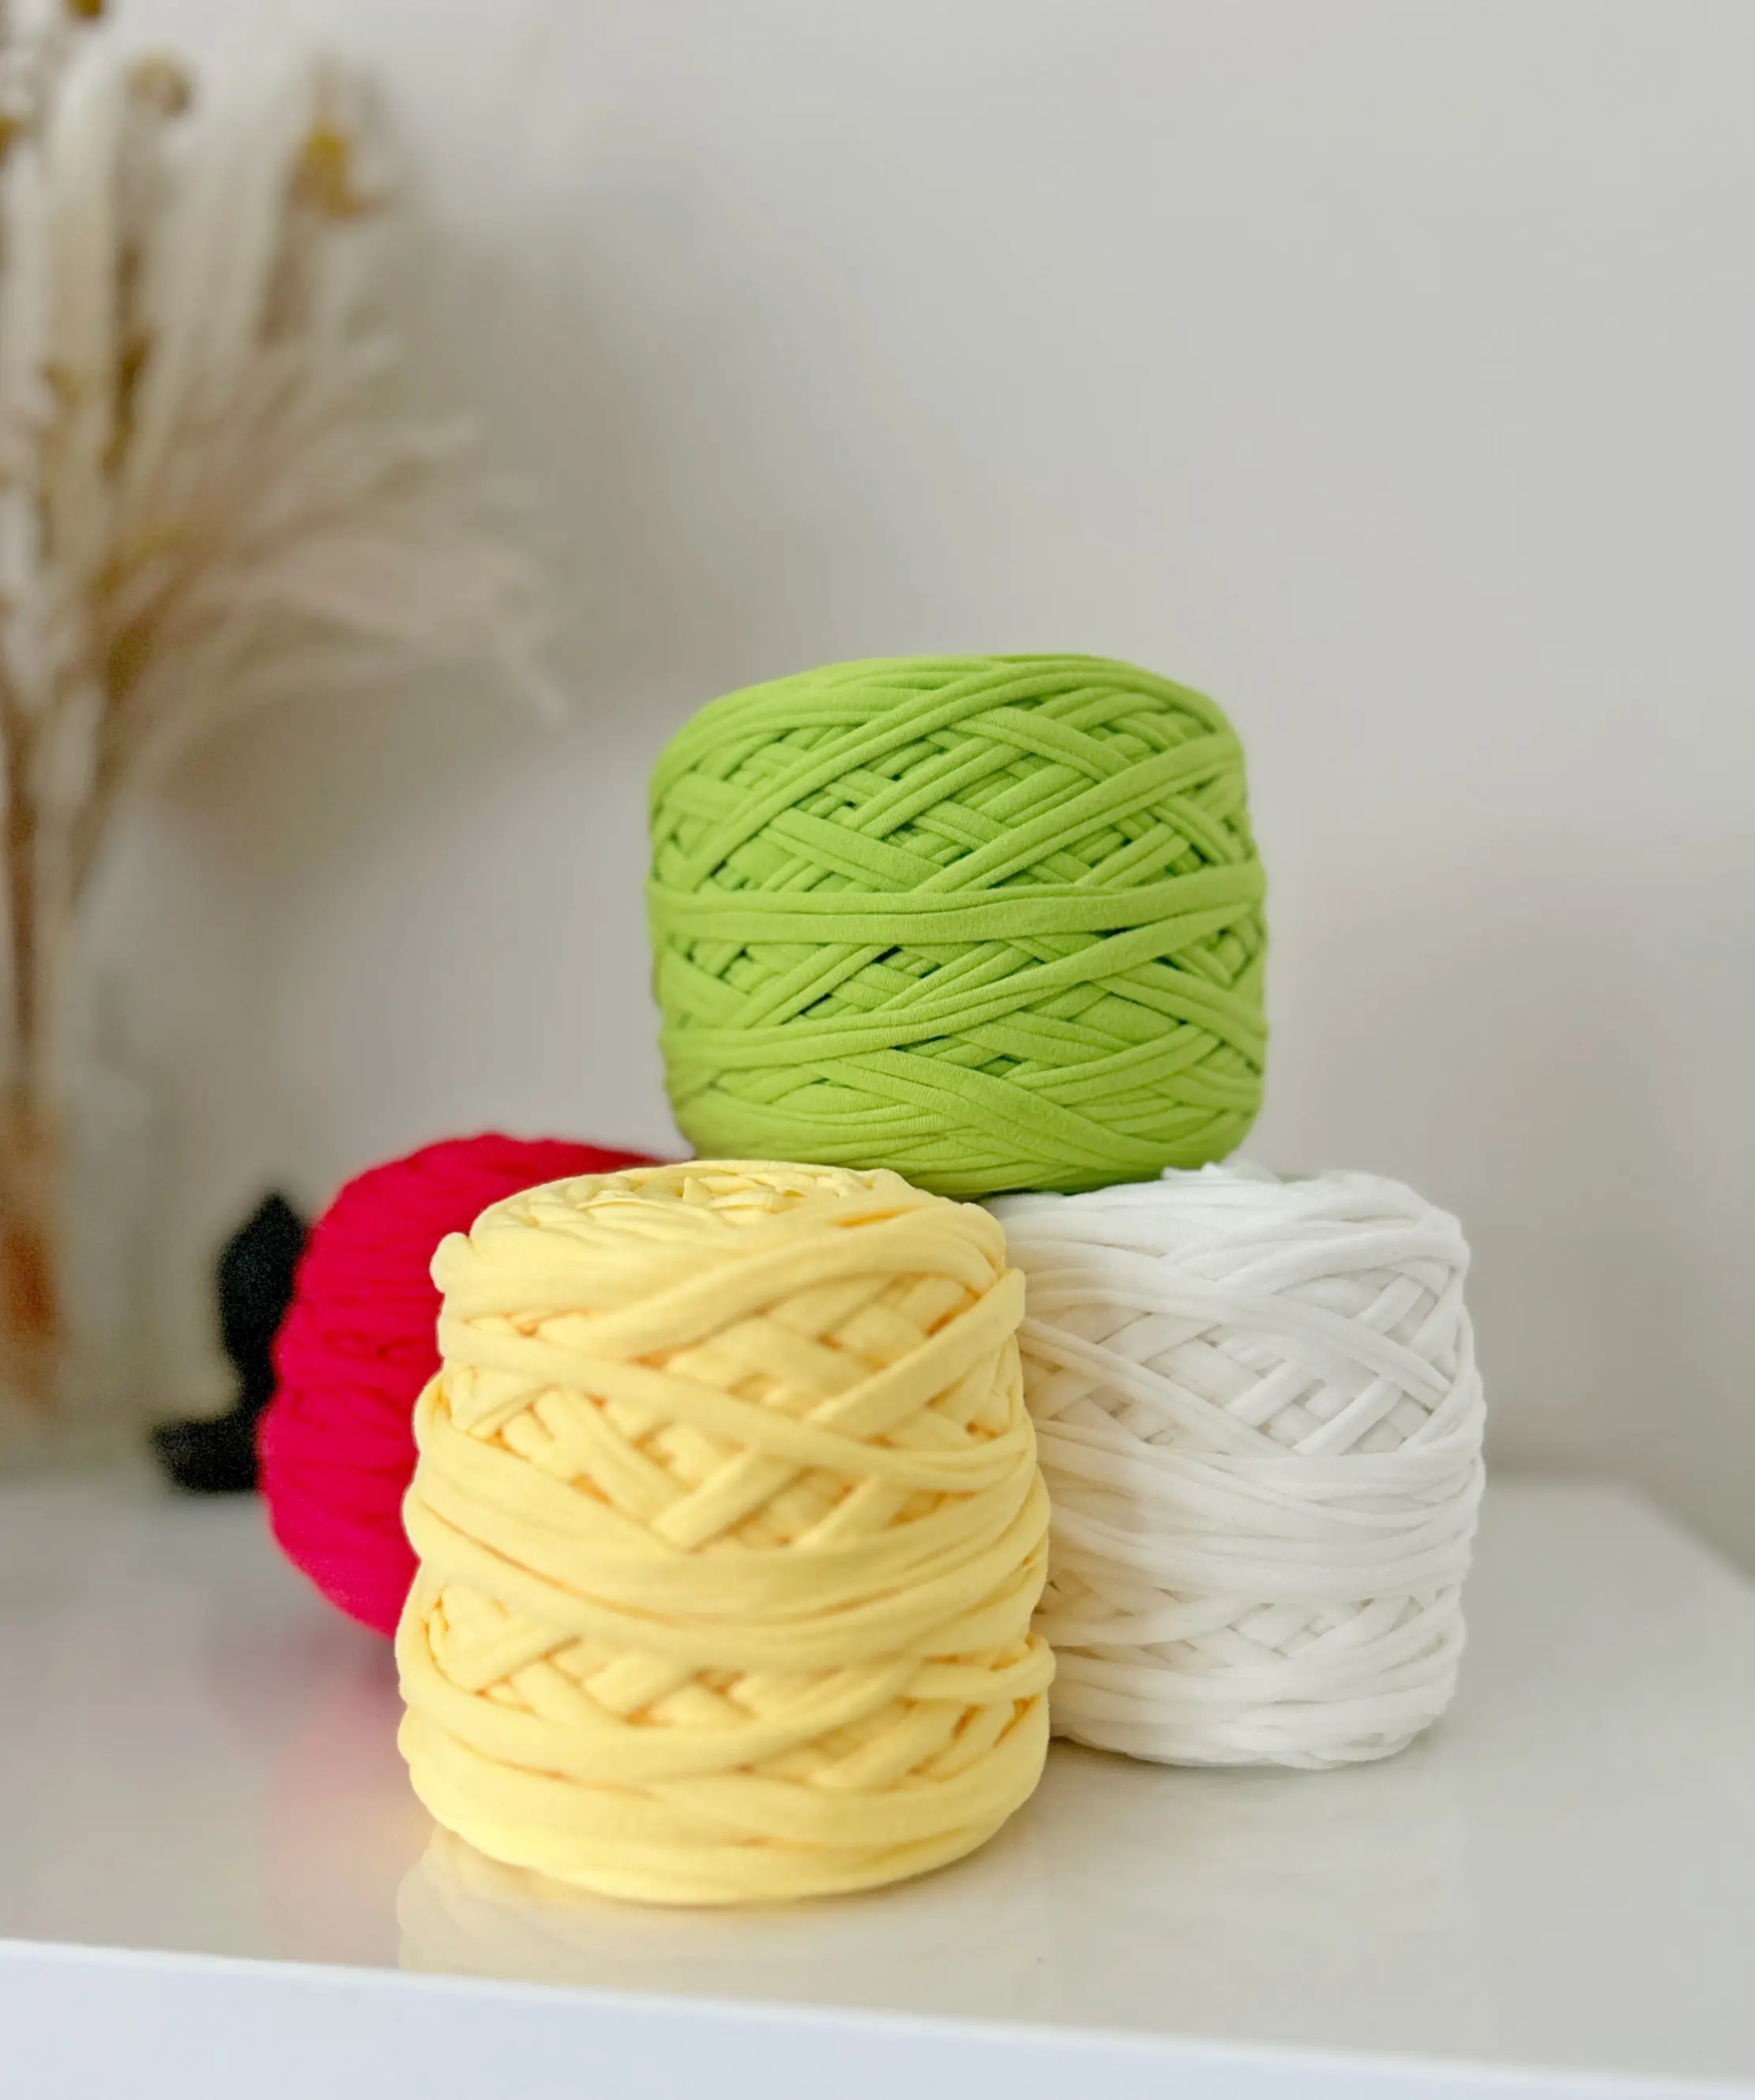
Made from polyester fiber, this category 5 weight yarn is not only a great choice but also a versatile one. It allows us to create our own bag that’s as sturdy as it is stylish, with a texture that’s soft to the touch and a color that’s as vibrant as freshly squeezed lemonade. The fabric yarn is super soft, stretchy , has a smooth glide to it and won’t fade or shrink after washing.
But it’s not just about looking good – it’s about feeling good too. With fabric yarn, you can carry your essentials in your bag without worrying about pilling or stretching. So go ahead, squeeze the day and make a statement with our crochet lemon wedge bag.
Check out our other free accessories pattern below:

But don’t let its playful appearance fool you – our lemon wedge bag is as practical as it is pretty. Ideal for advanced beginners to intermediate crocheters, this easy crochet bag can be completed within a day!
With a spacious interior, a secure zipper closure, and a fun shoulder strap, it’s the perfect bag for everything from shopping trips to beach days and beyond.
With its sunny silhouette and playful shape, this small bag is not just a functional bag but is a statement piece that’s sure to turn heads and spark conversation wherever you go.
Every great crochet project begins with the right tools. For our lemon wedge bag, you’ll need an 8 mm hook, the perfect size for working with fabric yarn as well as a 16-inch molded plastic zipper to add a touch of functionality. And feel free to add some lining fabric to give your bag extra durability.
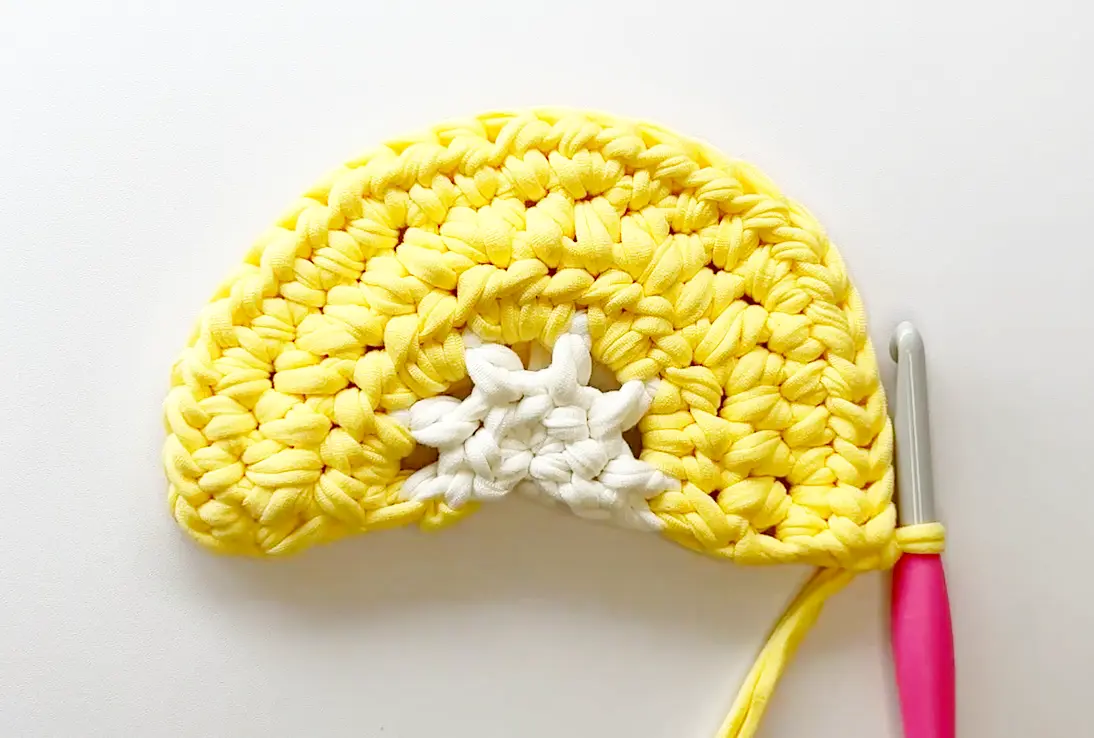
This pattern begins with the Magic Ring or Magic Circle which allows us to create a tight and seamless foundation for our bag.
If you’ve always shied away from the magic ring, well now is the time to learn. This easy tutorial will guide you every step of the way and you’ll soon be making rings in no time!
Once you have your Magic Circle in place, it’s time to get down to business and start stitching. The entire bag only uses basic stitches, the half double crochet, double crochet, and treble crochet stitches are all that there is.
Adding “seeds” to the main body of the bag just completed the look and with easily adjustable straps, you can customize the length to suit your style – whether you prefer to wear it as a crossbody bag or over the shoulder.
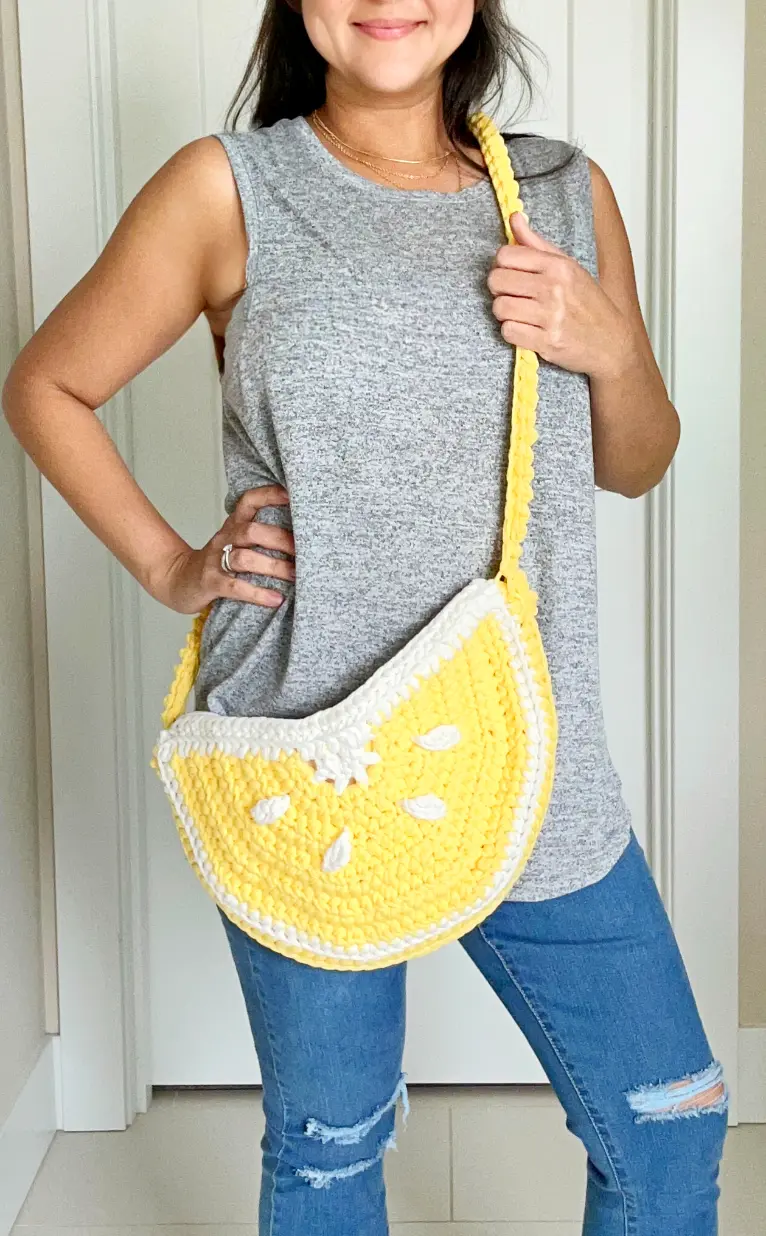
And there you have it, the perfect summer tote, your very own Crochet Lemon Wedge Bag that is ready to accompany you this summer. With its sunny style, playful shape, and impeccable construction.
So go ahead and let your style shine bright like a lemon! 🍋🍋🍋
If you like this crochet bag and want in on more free crochet bag patterns, then you will love all our upcoming summer crochet bags in the works. So don’t forget to save this page for later!
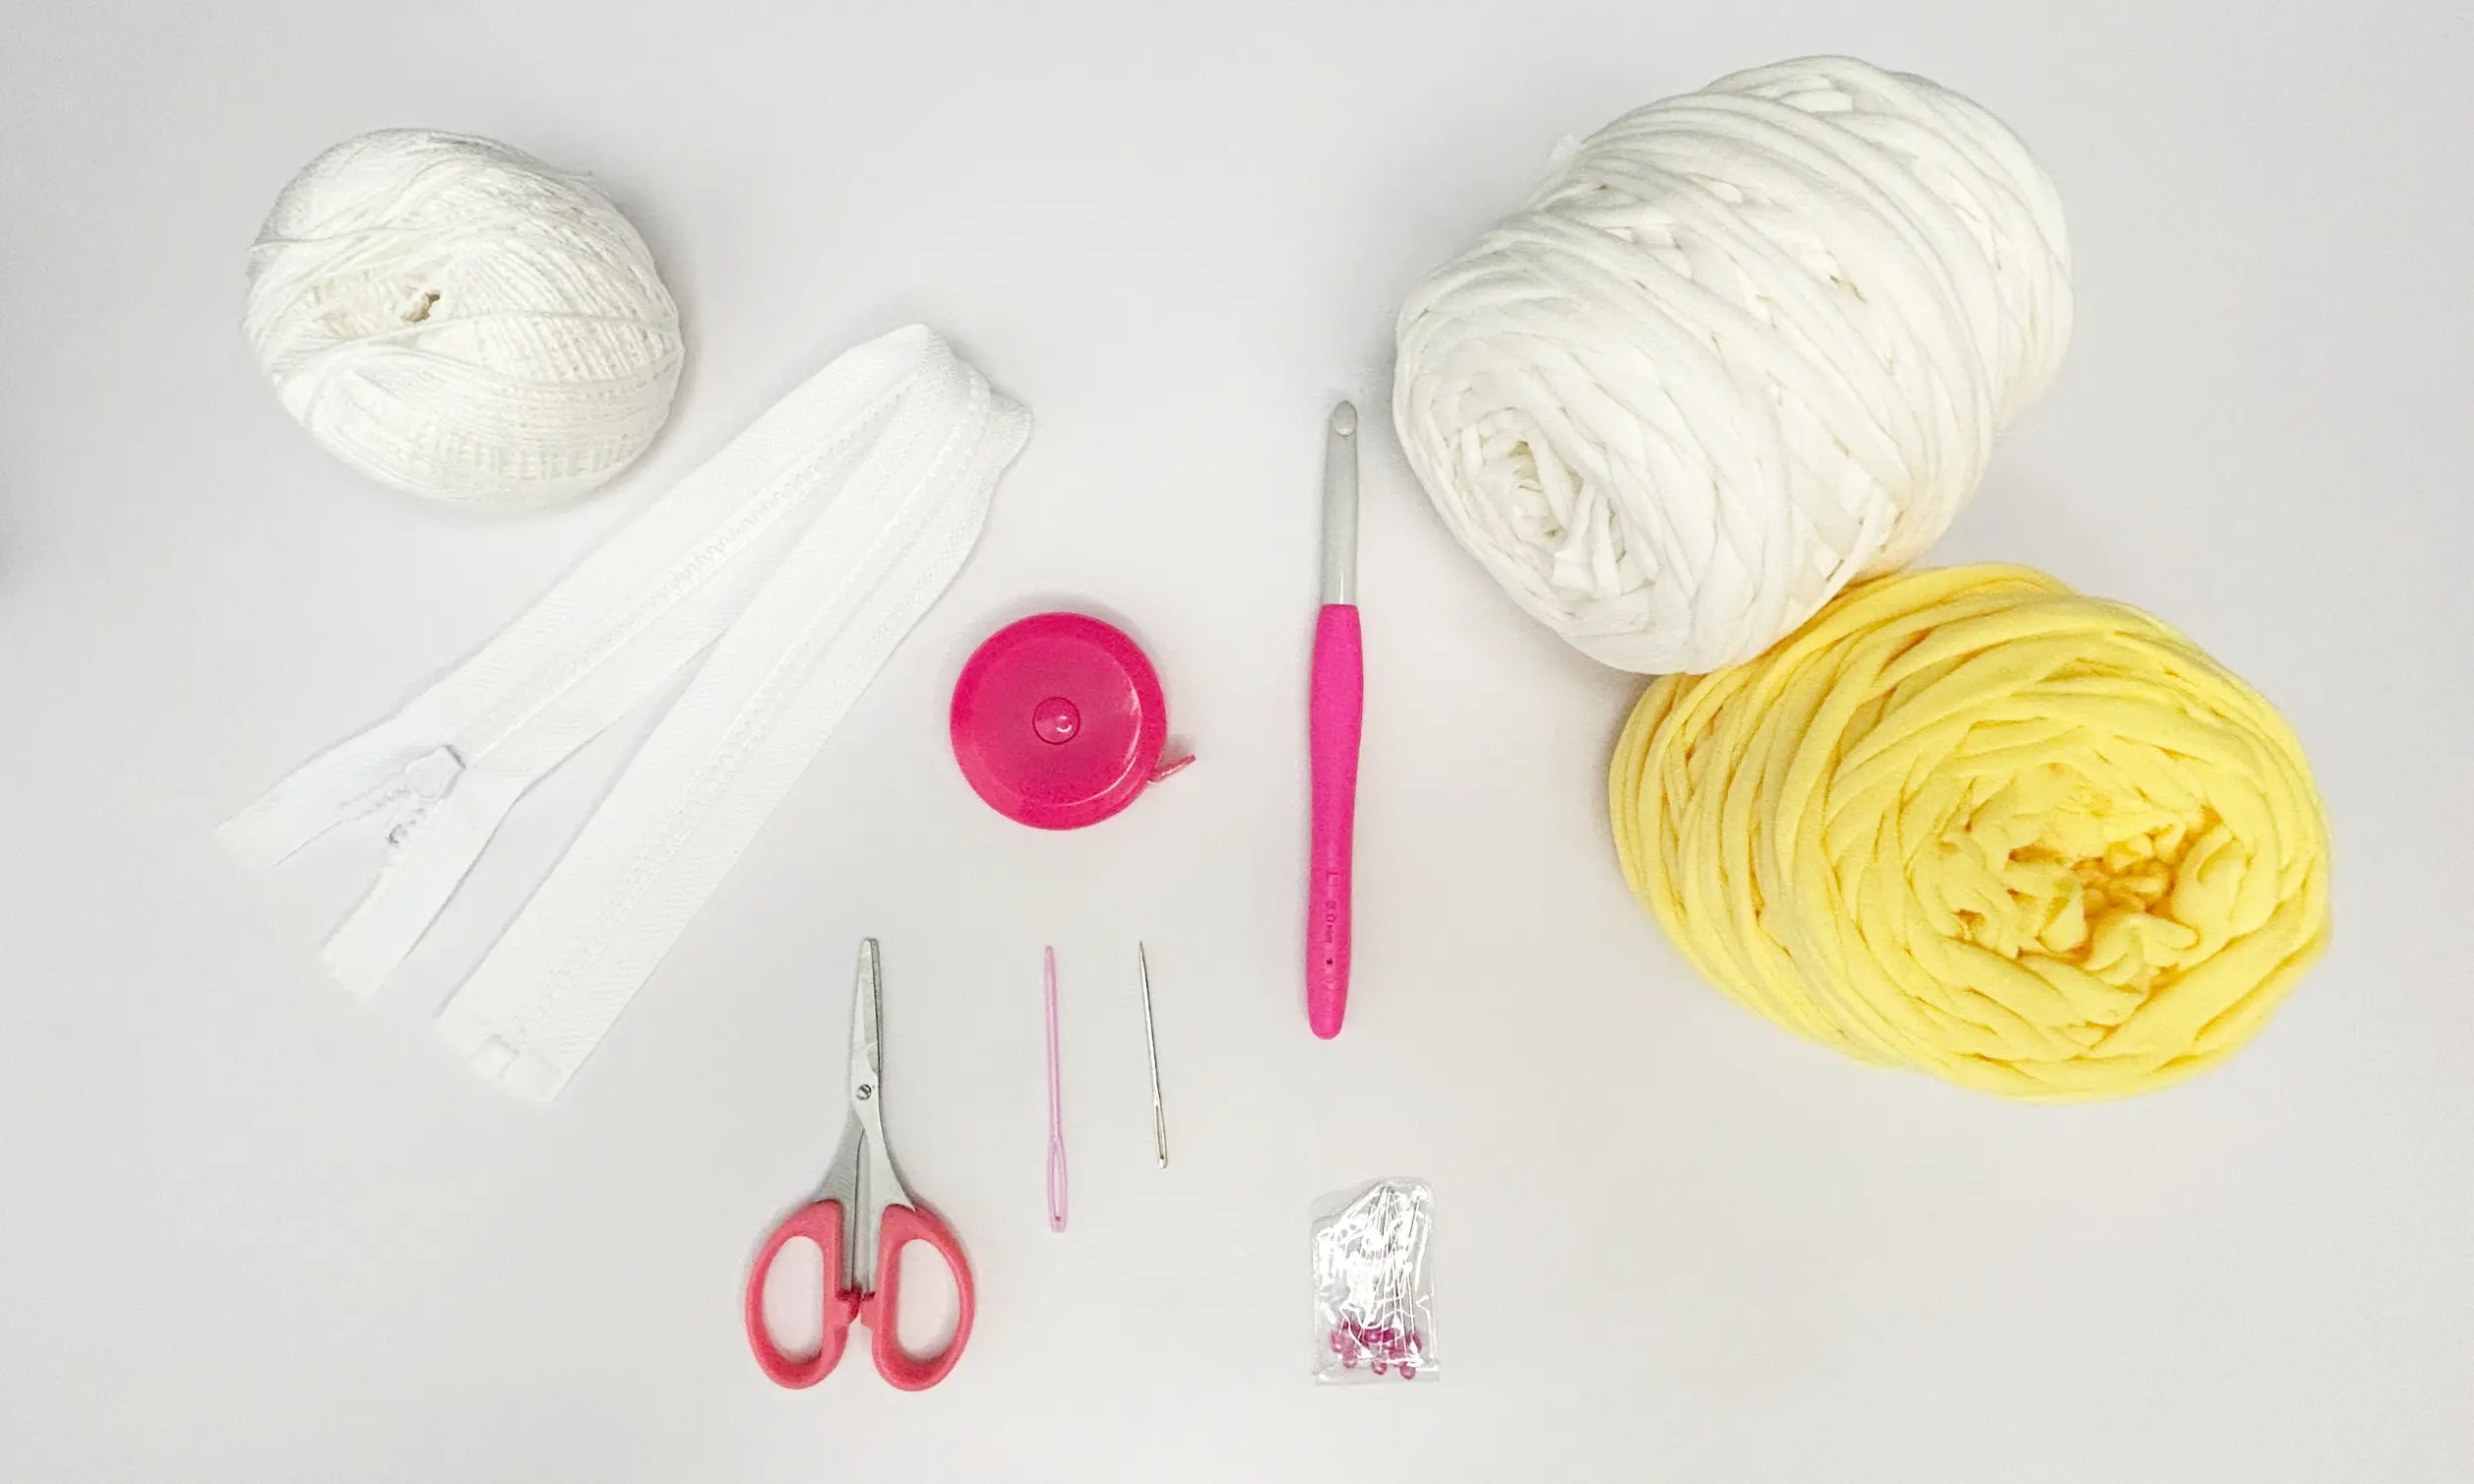
Yarn weight: Category 5
Brand: Fabric Yarn ➡️ Find a Yarn Substitute here
Color: Yellow and White
Hook: 8.0 mm crochet hook
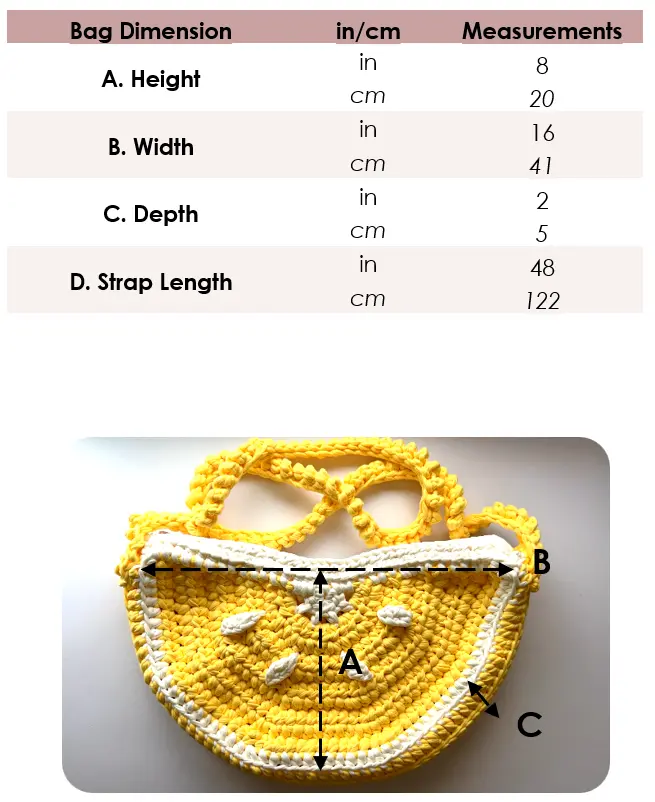
Pattern Gauge: = 11 Hdc Sts x 7.5 Rows = 4 x 4 in/ 10 x 10 cm
No. yarns (skeins): 2 Yellow & 1 White
Total Yardage (approx.): 150 yds Yellow & 40 yrds White
Tools: Blunt tapestry needle or yarn needle, measuring tape, Scissors, Sewing Needle, Mercerized Thread, sewing pins, 16 “ Molded Plastic zipper
Skill: Easy – Intermediate
Things to Note:
- Yarn A represents the White Yarn and Yarn B for the Yellow Yarn.
- Prepare a pattern gauge to get the same size. You may need to adjust your tension or change the hook size to achieve the same gauge.
- Pattern consists of basic crochet stitches, Chains, Slip Stitch, Half Double Crochet, Double Crochet and Trebel Crochet stitches.
- Abbreviation available in English US format
- Video Tutorial available here
- Pattern consists of 1 size.
- Measurements above is based on the yarn size
- Length can easily be adjusted to your liking
Crochet Abbreviations (US term)
BLO – Back loop
Ch – Chain Stitch
Ch Sp – Chain Space
RS – Right Side
inc – Increase
Sl St – Slip Stitch
Sc – Single Crochet
SM – Stitch Marker
Hdc – Half Double Crochet
Dc – Double Crochet
Tr – Treble / Triple Crochet
**
PART 1: Bag Panel
- Magic Ring: With Yarn A, work a MG, Ch 1 to secure and work 6 Hdc in the MG, Ch 1 turn
Learn how to do the Magic Ring here
- Row 1: Into the 1st St, *(Hdc, Ch 1), Rep (*) 4 more times, Hdc into the last St. Switch to Yarn B on the last St
Learn how to switch yarn colors here
- Row 2: Hdc in the 1st St, *(2 Hdc in Ch Sp, Hdc), Rep (*) across, Ch 1 turn
- Row 3: Hdc in the 1st and 2nd St, 2 Hdc increase, *(Hdc 2, 2 Hdc increase), Rep (*) across, Hdc on the last St, Ch 1 turn
- Row 4: *(Hdc 3, 2 Hdc increase), Rep (*) across, Hdc on the last St, Ch 1 turn
- Row 5: *(Hdc 4, 2 Hdc increase), Rep (*) across, Hdc on the last St, Ch 1 turn
- Row 6: *(Hdc 5, 2 Hdc increase), Rep (*) across, Hdc on the last St, Ch 1 turn
- Row 7: *(Hdc 6, 2 Hdc increase), Rep (*) across, Hdc on the last St, Ch 1 turn
- Row 8: *(Hdc 7, 2 Hdc increase), Rep (*) across, Hdc on the last St, Ch 1 turn
- Row 9: *(Hdc 8, 2 Hdc increase), Rep (*) across, Hdc on the last St, Ch 1 turn
- Row 10: *(Hdc 9, 2 Hdc increase), Rep (*) across, Hdc on the last St, Switch to Yarn A on the last St Ch 1 turn
- Row 11: *(Hdc 10, 2 Hdc increase), Rep (*) across, Ch 1 turn to the top side
- Row 12: Work Hdc Sts evenly across the row. Ch 1 turn
- Next Row: Work Hdc Sts through the front loop and 3rd loop on each St across. Ch1 to secure and bind off.
- Rep Steps 1 – 14 to make a second piece.
PART 2: Seeds
- Chain 3 and work a Tc Stitch into the 1st St, Ch 1 , leave a long tail (approx. 5in / 10cm) and bind off
- Make 7 more pcs.
- Place 4 pcs of “seeds” evenly across the 5th and 6th Row on the bag panel.
- Using your crochet hook, pull through both tail ends and tie a knot at the back.
- Rep on all pcs and on the second bag panel.
- Using your crochet hook, pull through both tail ends and tie a knot at the back.
- Rep on all pcs and on the second bag panel.
Part 3: Joining Panels
- Turn to the corner side, where the top folds and with Yarn B, insert your hook at the corner St
- Sk the bottom St and only through the back loop (BLO), work a Dc St. Cont to Dc each BLO St across
- Bind off
- Rep Steps 1 – 2 on the other bag panel, do not bind off
- Place both panel together right side out and insert hook through the back loop in the 1st St on the other panel and pull through the loop
- Next insert your hook through the Right BLO and into the Left BLO, Yo and PT all loops
- Cont to Sl st through the BLO of each St through both panels all the way across.
- Bind off
Part 4: Zipper
- Secure your zipper along the side of the bag opening with sewing pins ensuring the sides are align on each end.
- With a sharp tapestry needle, thread a thick thread and sew between the loops, going in and back out the same loop moving across the row.
- At the end of the row, move the needle to the other side and sew along the opposite side.
- Secure the ends with a few knots and snip off.
Part 5: Straps
- Chain 80 + 1, turn and Tc each Ch across
- Leave a long tail for sewing, bind off and thread through a blunt tapestry needle.
- Weave your needle approx 4 Sts up along the side of the strap and place the bottom end along the side of the bag. Sew along all 3 sides. Weave up 3 Sts along the side of the strap.
- Next fold the strap in half, and sew through the Ch and “V” St. Work in a zig-zag motion by going into the next St diagonally across the other side until the last 7th St.
- Attach the bottom strap to the other end and sew all 3 sides like the other side.
Make sure the straps are not twisted
- Secure the loop with a few knots and snip off.
- Weave in all loose ends.
END


2 Responses
What an awesome crochet bag pattern! Big thanks for sharing this gem with us for free. I wanted to drop a quick message to let you know that I’ve featured your tutorial on Crafts on Display, hope you enjoy it! https://craftsondisplay.com/crochet/free-lemon-wedge-crossbody-bag-pattern-105656/
Thank you 🥰💕