Cute Crochet Lime Handbag Free Pattern + Video

crochet lime purse handbag

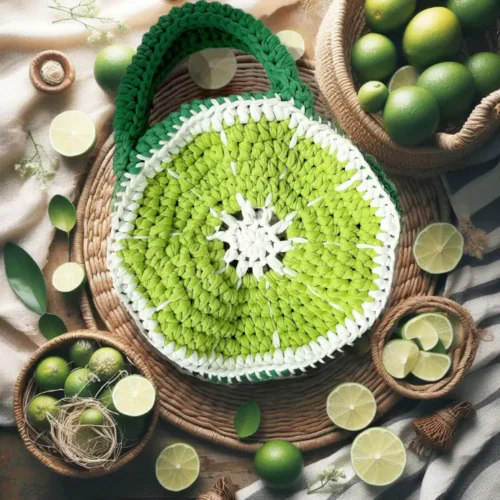
Add zest to your style with our Lime Crochet handbag! This vibrant accessory, shaped like a lime, is perfect for carrying essentials with a twist of fun. Get creative with our free pattern and crochet your way to fruity fashion.

Spring and summer are the perfect seasons to showcase your creativity and start exciting new crochet projects.

If you’re searching for a unique look and fun accessory to complement your wardrobe or perhaps a great gift, look no further than this cute crochet purse that is fruity and fun.

With its refreshing design and practical functionality, this crochet bag is bound to become your go-to accessory for all your sunny adventures.

Crochet lime handbag purse pattern

This free lime bag crochet pattern is made in one size but can be easily adjustable to your preferred size.

If you’re more of a visual person, then check out the video tutorial on this great pattern on my YouTube channel.

And for those who prefer a hassle-free, ad-free experience, grab the printable PDF format with photo tutorials included available in my shop for purchase, or just add this to your Ravelry queue

Related Post:

Crochet “Plarn” bag made with plastic bags / Grocery bag
Crochet Lemon Wedge Bag

BEST YARN TO USE

Let’s dive into what makes our lime handbag stand out – the type of yarn that we’ve chosen. Instead of traditional options like acrylic yarn or cotton yarn, we’ve opted for fabric yarn made from polyester fiber.

This special yarn isn’t just any yarn; it’s strong and durable, able to withstand everyday use.  And with a variety of colors available, you can pick the perfect shade to match your personality. But that’s not all – this fabric yarn feels incredibly soft to the touch and maintains its shape even after washing.

Fabric Yarn

Now, here’s the best part about our crochet lime purse – it’s not just about looking good; it’s about feeling good too. Thanks to the fabric yarn, you can tote around all your essentials worry-free. No need to fret about the bag getting fuzzy or losing its shape over time.

So, whether you’re running errands or enjoying a day out with friends, carry your belongings with confidence and style with our crochet lime bag.

Check out our other free accessories patterns and different styles below:

Watch The Video Tutorial Here

If you would like to see more video tutorials like this you can check them out here on the blog or Subscribe to my Video Channel on YouTube.

This post contains affiliate links designed to provide a commission on purchases made at no cost to you. As an Amazon Associate, I earn from qualifying purchases which support my work in providing new content and information on this site.

Join Our Mailing List

 If you would like to receive free crochet patterns and video tutorials straight into your inbox, just click Subscribe to get into our mailing list

CONSTRUCTION

Crochet lime handbag purse pattern

But don’t be fooled by its fun look – our lime wedge bag is both cute and useful. It’s great for beginners who are learning to crochet or already know a bit about it. You can also finish making this cute bag in just one day!

This cute crochet bag has lots of room inside, a strong zipper to keep your things safe, and a strap you can wear over your shoulder. It’s the perfect accompaniment for a sunny day out as a shoulder bag or a handbag.

With its fun shape and playful style, this little bag isn’t just for carrying stuff – it’s a fashion statement that will catch everyone’s eye and start conversations wherever you go.

To make this awesome crochet bag, you’ll need an 8 mm hook and a 16-inch plastic zipper. You can also add some lining inside to make the bag even stronger.

To start,  we used the Magic Ring technique, which helps us make the bottom of the bag tight and smooth. Don’t worry if you’ve never done it before – we’ll show you how step by step!

Crochet lime handbag purse pattern

Once you’ve got the Magic Ring done, it’s time to start crocheting. We’ll only use basic stitches like half double crochet and double crochet. The size of the bag and the shoulder strap length can easily be adjusted to your liking. 

And there you have it – your own lime bag, ready to go with you wherever you go this summer. With its fun style and strong construction, it’s the perfect accessory for any sunny day.

If you love this bag and want more crochet purse patterns, keep an eye out for our new summer bags. Don’t forget to save this page so you can find them later!

Crochet Stitches and Techniques:

  • Single Crochet (sc): The single crochet stitch forms a dense and sturdy fabric, perfect for the body of your handbag.
  • Double Crochet (dc): The double crochet stitch creates a slightly looser texture, ideal for adding depth and dimension to your project.
  • Chain Stitches: Chain stitches are the foundation of crochet and are used to create the initial loops for your project.

Why Choose a Fruity Lime Handbag?

  • Unique Design: Stand out from the crowd with this one-of-a-kind gorgeous bag shaped like a fruity lime. Its round shape and bright colors make it a fun and playful accessory for any outfit.
  • Versatile Functionality: Whether you’re heading to the beach, running errands, or enjoying a day out with friends, this handbag is the ideal companion for all your adventures. Its sturdy construction and shoulder strap make it perfect for everyday use. A timeless classic everyday crochet bag.
  • Perfect Gift Idea: Looking for the perfect gift for a loved one? Surprise them with a handmade crochet purse that reflects their vibrant personality and unique style. It’s the perfect size for a practical gift that they’ll cherish for years to come.

Tools And Materials:

Crochet lime handbag purse pattern

Yarn weight: Category 5
Brand: Fabric Yarn
Color: Lime Green, Dark Green and White
Hook: 8.0 mm
Pattern Gauge: = 8 Hdc Sts x 5.7 Rows = 4 x 4 in/ 10 x 10 cm
No. yarns (skeins): 1 skein for each color
Total Yardage (approx.): 75 yds Lime Green, 77 yds Dark Green & 30 yrds White
Tools: Blunt tapestry needle, Stitch Markers, measuring tape, Scissors, Sewing Needle, Mercerized Thread, sewing pins, 16 “ Molded Plastic zipper

Skill: Easy – Intermediate

Crochet lime handbag purse measurements

Things to Note:

  • Yarn A represents the White and Yarn B for the Lime Green, Yarn C represents Dark Green.
  • Prepare a pattern gauge to get the same size. You may need to adjust your tension or change the hook size to achieve the same gauge.
  • Pattern consists of basic Chains, Slip Stitch, Half Double Crochet, Double Crochet stitches.
  • Abbreviation available in English US format 
  • Video Tutorial available here
  • Pattern consists of 1 size. 
  • Measurements above is based on the yarn size
  • Length can easily be adjusted to your liking


Crochet Abbreviations (US term) 

BLO – Back loop
Ch – Chain Stitch
Ch Sp – Chain Space
RS – Right Side
inc – Increase
MR – Magic RIng
Sl St – Slip Stitch
Sc – Single Crochet
SM – Stitch Marker
Hdc – Half Double Crochet
Dc – Double Crochet

**

Lime Crochet Purse Free Pattern

Crochet lime handbag purse pattern

Instructions

PART 1: Bag Panel

  1. Magic Ring: With Yarn A, work a MR, Ch 1 to secure and work 10 Hdc in the MG, Ch 1 turn – Learn how to do the Magic Ring here
  2. Row 1: Into the 1st St, *(Hdc, Ch 1), Rep (*) 9 more times, Switch to Yarn B on the last St, Slst into the first St to join. – Learn how to switch yarn colors here
  3. Row 2: Hdc in the 1st St, *(2 Hdc in Ch Sp, Hdc), Rep (*) in the round, Slst to join.
  4. Row 3: Hdc in the 1st and 2nd St, 2 Hdc increase, *(Hdc 2, 2 Hdc increase), Rep (*) in the round, Slst to join.
  5. Row 4: *(Hdc 3, 2 Hdc increase), Rep (*) in the round, Slst to join.
  6. Row 5: *(Hdc 4, 2 Hdc increase), Rep (*) in the round, Slst to join.
  7. Row 6: *(Hdc 5, 2 Hdc increase), Rep (*) in the round, Switch to Yarn B on the last St, Slst into the first St to join.
  8. Row 7: *(Hdc 6, 2 Hdc increase), Rep (*) in the round, Switch to Yarn C on the last St, Slst into the first BLO St to join.
  9. Row 10: BLO Dc into the 1st St evenly in the round, Slst to join
  10. Row 12: Work Dc Sts evenly across in the round.
  11. Bind off.

PART 1a: Lime Lines

  1. With your blunt tapestry needle, thread 2 arms length of Yarn A
  2. Insert needle through the top St from the back on Row 2, weave up and under each 5 rows up in a straight line.
  3. From the back, weave the needle through 7 white Sts
  4. Insert needle under the 7th St, and weave up and under each 5 rows down in a straight line towards the next St on Row 2.
  5. Weave the needle through 2 green Sts and back out through the next white St.
  6. Rep Steps 3 – 5 evenly across.
  7. Bind off and rep Part 1 to make a second piece.- Do not bind off the 2nd piece


Part 2: Joining Panels

  1. Measure the length of your zipper and place a SM on each end.
  2. Place both panel together RS out and insert your hook through the back loop in the 1st St on the other panel and pull through the loop
  3. Next insert your hook through the Right BLO and into the Left BLO, Yo and PT all loops.
  4. Cont to Slst through the BLO of each St through both panels all the way across until the second SM. Ch 1 to secure and bind off.


Part 3: Zipper

  1. Secure your zipper along the side of the bag opening with sewing pins ensuring the sides are align on each end.
  2. With a sharp tapestry needle, thread a thick thread and sew between the loops, going in and back out the same loop moving across the row.- Make sure to pull tight, this will make the thread hide behind the fabric yarn
  3. At the end of the row, move the needle to the other side and sew along the opposite side.
  4. Secure the ends with a few knots and snip off.


Part 4: Straps

  1. Foundation Row: Chain 30 + 1, turn – Feel free to adjust the length to your liking.
  2. Row 1: Hdc each Ch across through the bump side, Ch 1 turn
  3. Row 2: Hdc across and leave a long tail for sewing, bind off and thread through a blunt tapestry needle.
  4. Weave your needle approx 3 Sts up along the side of the strap
  5. Place a SM on the 10th St from the end of the zipper on both sides
  6. Place the bottom end along the side of the bag. Sew along all 3 sides. Weave up 3 Sts along the side of the strap.
  7. Next fold the strap in half, and sew through the Ch and “V” St. Work in a zig-zag motion by going into the next St diagonally across the other side until the last 4th
  8. Attach the other end of the strap to the 2nd SM and sew all 3 sides like before.- Make sure the straps are not twisted
  9. Secure the loop with a few knots and snip off.
  10. Make a second strap and attach it to the other side the same way.
  11. Weave in all loose ends.

END

If you are looking for the tools used to make this Crochet Lime Handbag pattern, I’ve listed them all right here:

8.0 mm Clover crochet hook
Fabric Yarn in Lime Green, Dark Green and White 
16 “ Molded Plastic zipper
Lime Crochet Bag Pattern (Ad Free & Picture guided!)
♥ Video Tutorial

Lime Crochet Purse Handbag

Add zest to your style with our Lime Crochetn purse handbag! This vibrant purse, shaped like a lime, is perfect for carrying essentials with a twist of fun. Get creative...

$4.50

Crocheting your own fruity lime handbag is not only a fun and rewarding crochet project but also a practical way to add a pop of color to your spring and summer wardrobe.

With a free crochet pattern and video tutorial at your fingertips, you’ll have everything you need to create your own unique accessory.

*** 

Great job if you made it this far! If you have any questions about this pattern, do check out the video tutorial or get in touch with me by dropping a comment below.

And don’t forget to tag me on Instagram and Facebook  @theknottylace, I would love to see your work!

By the way, If you would like to receive free written patterns and video tutorials straight into your inbox, you can join our mailing list now.

Happy hooking,
Shaz 🌸

Follow me on:

Instagram | Pinterest Facebook | YouTube
Subscribe and get all the new patterns and updates in your inbox

This pattern and images are copyrighted
by The Knotty Lace and are free for your personal use. I ask that you do not
copy, share, adjust, alter or resell my Pattern(s) and picture(s). If you wish
to sell ready-made products using my pattern(s), please do give credit mention
to The Knotty Lace. Thank you.

HI THERE, IM 

shaz

Thanks for stopping by. If you’re here, that means you’re looking for some fun crochet patterns, tutorials or maybe browsing for some Q&A. Great! coz I’ve got you covered. 

LETS BE FRIENDS

label-your-wips-with-smart-tag-2

Get this free downloadable file and start labeling your Work In Progress (WIPs)Read more

You will automatically be on our mailing list by submitting your email address. Unsubscribe at any time.

Latest Video

Subscribe to my YouTube Channel

Browse by Category

🎉 We have been chosen as one of the top 100 Crochet Blogs on FeedSpot

Recent Post

Leave a Reply

Your email address will not be published. Required fields are marked *