
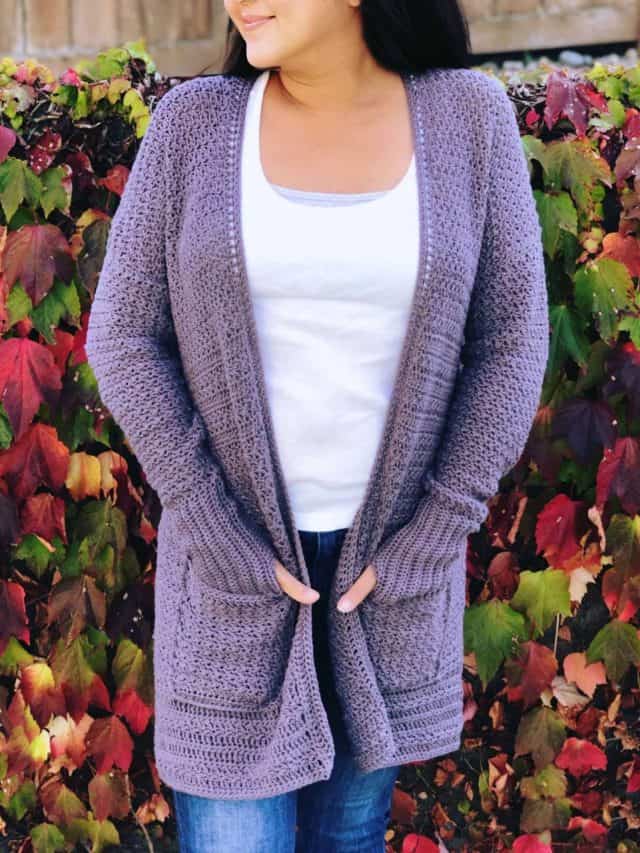
As the saying goes “We wear Pink in October” And true to this saying, I am honoring it by sharing with you this free soft and drapey Pink button-up crochet cardigan pattern with inner pockets.
This pattern comes in 9 sizes and you can also find the Video tutorial on my YouTube channel where it is worked up in size Medium.
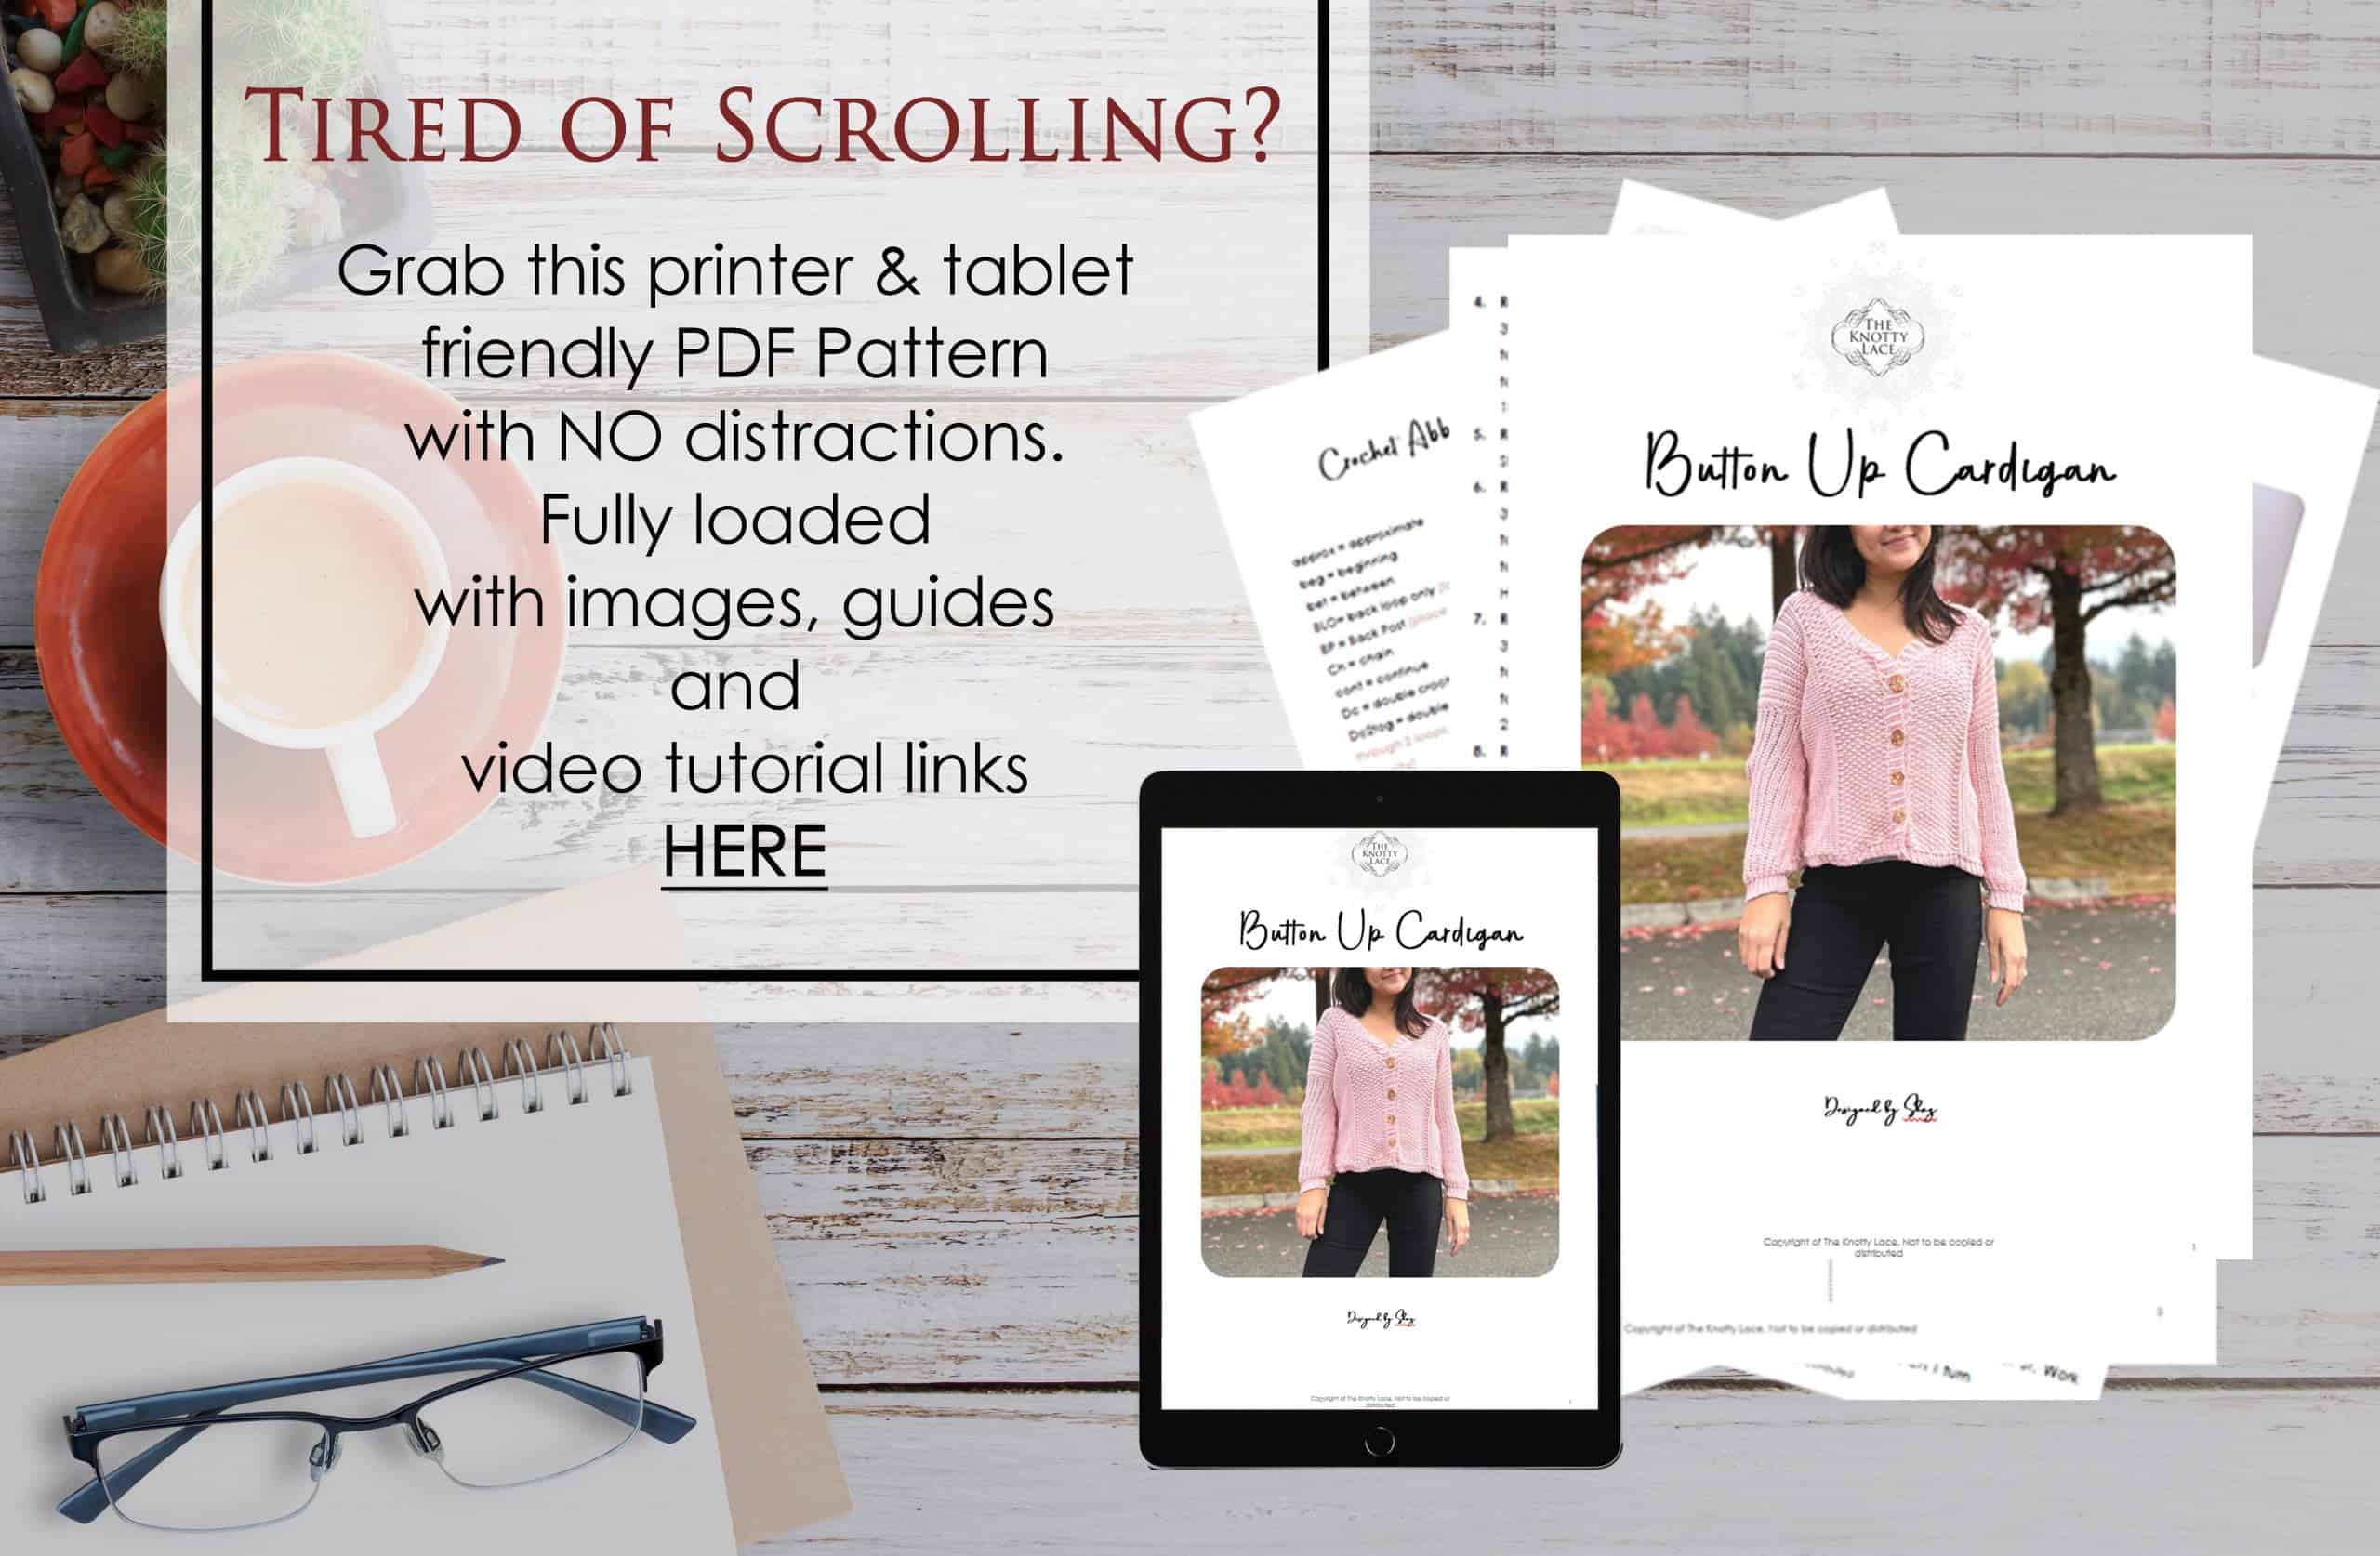
If you would like a printable PDF copy of this pattern with no distracting ads, and loads of guided images, it is available for purchase on my pattern store here. Or just add this to your Ravelry queue for later.
DESIGN INSPIRATION

This cardigan design was inspired by the need for front-opening tops for breast cancer survivors post-surgery. I also wanted to include some inner pockets to hold temporary drains post-surgery. Otherwise, they also work great for keys, cards, and your phone too. So it’s a Win-Win!
This button-up cardigan can be worn almost anywhere whether it’s for days resting at home or nights out for a walk.
Check out my Pinktober page for all the fun pink crochet patterns, inspirational stories, and music, as well as my very own journey.
Watch The Video Tutorial Here
CONSTRUCTION
This pattern uses the Build As You Go method (BAYG). What exactly is BAYG? Well, this is basically a pattern worked in one piece and added as you go instead of working in separate pieces and seaming them later.
This may seem a little daunting at first, but the idea behind this method is to see your project grow in front of you and know how to add another section seamlessly to the other.
This pattern is size inclusive from XS – 5XL, however, the length can be adjusted to your liking. Just add as many stitches to your length and continue on with the pattern.
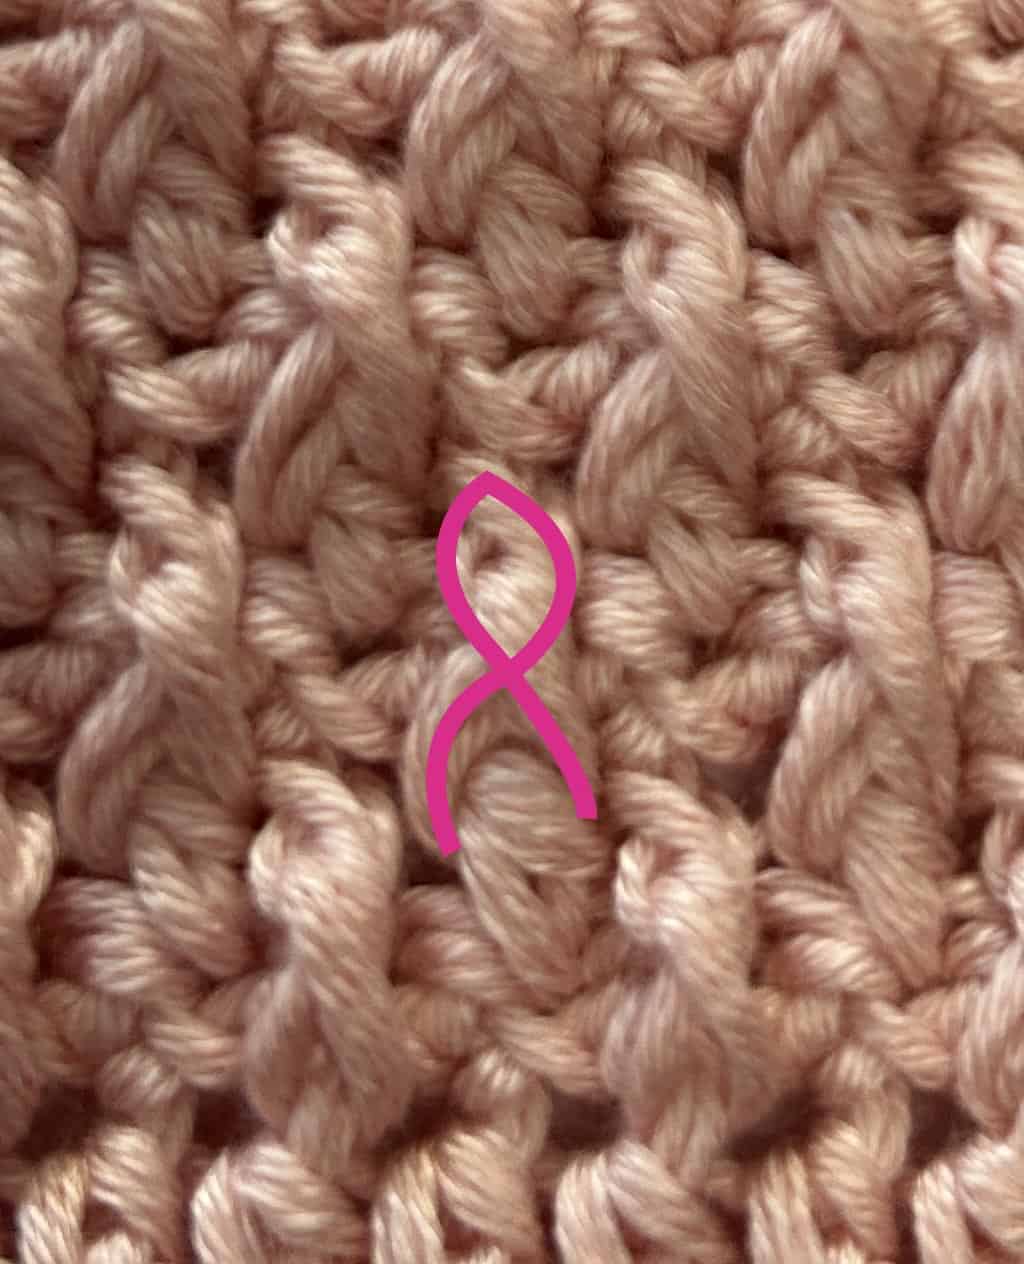
So I don’t know if it’s just me but I felt like the Alpine Stitches was giving me some Pink vibes. If you look closely enough, you’ll be able to see within the twists of the front post double crochet stitches looking a lot like a Ribbon 🎗️! I immediately knew this was the perfect stitch for this pattern.

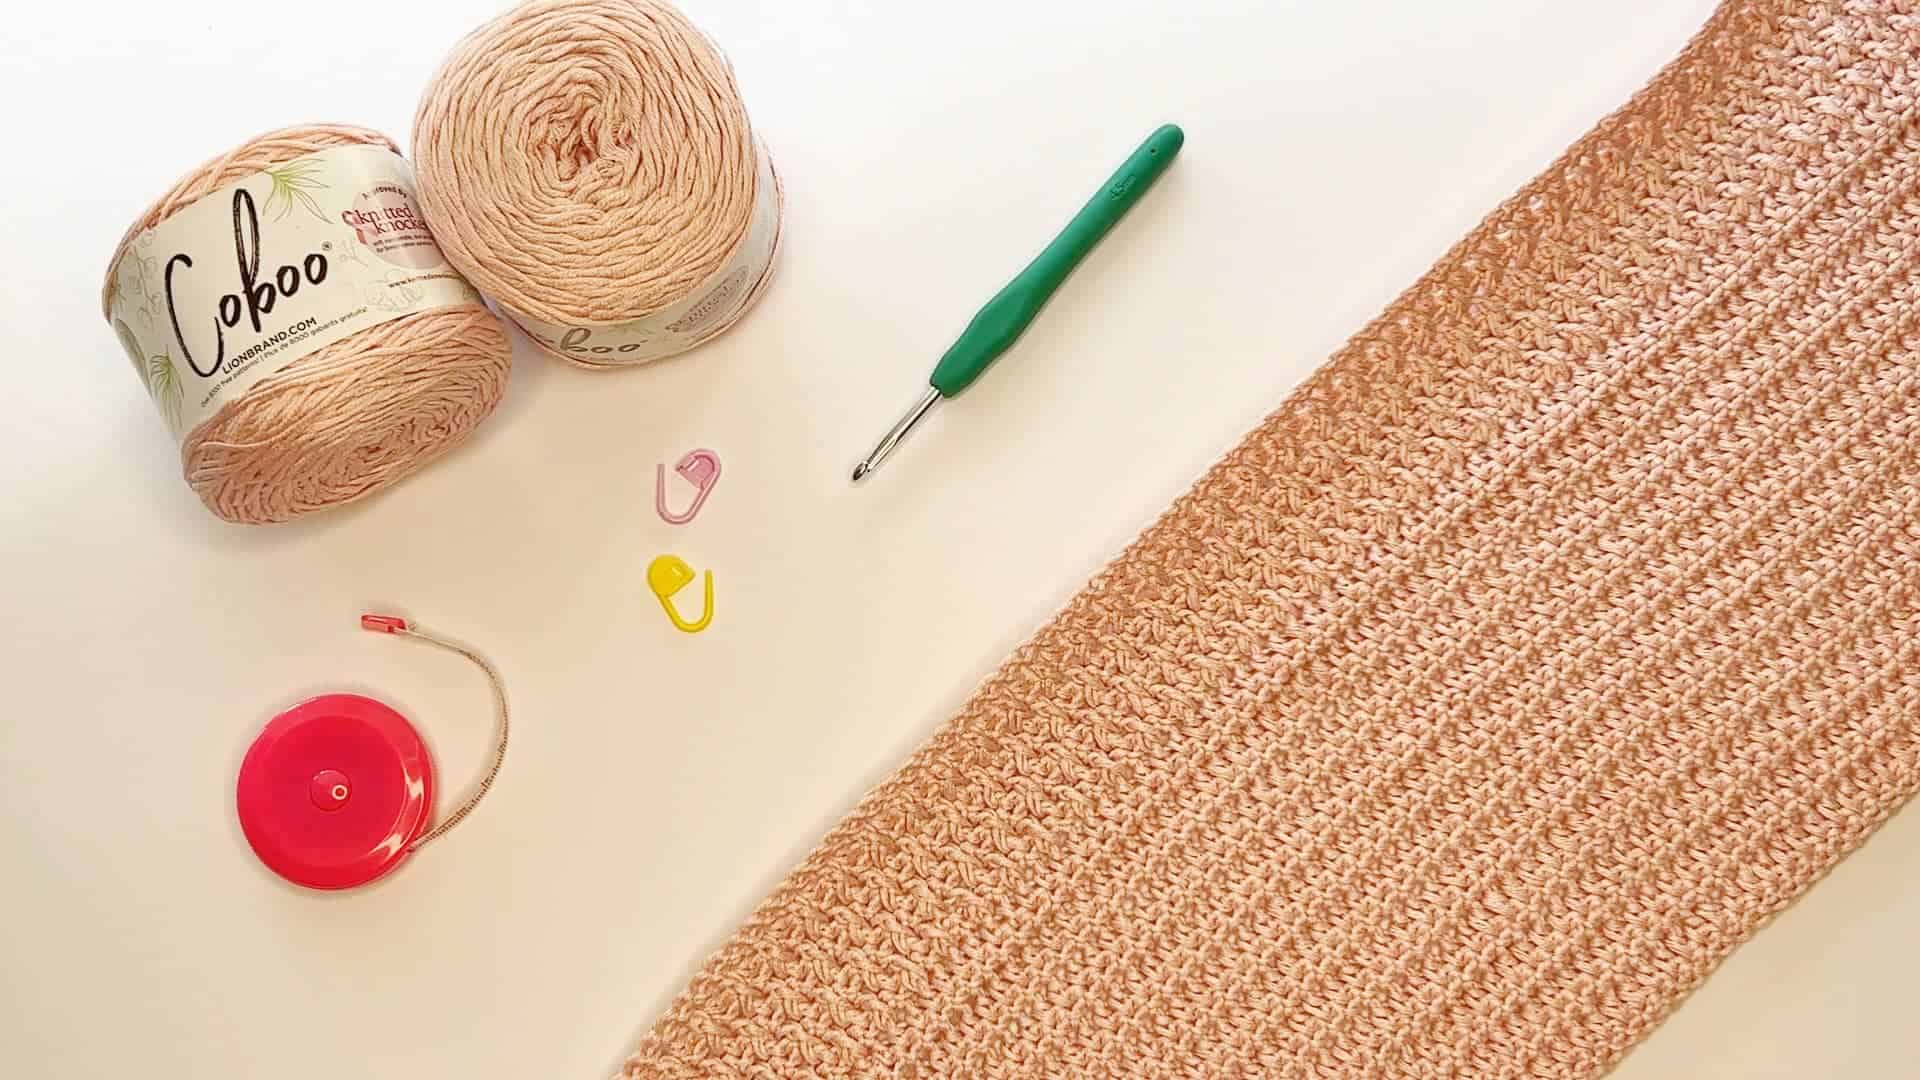
For the yarn, I am using Coboo yarn by Lion brand. They are the approved brand used by the Knitted Knockers Organization which is a nonprofit group that supports, teaches, and donates crochet and knitted knockers to anyone who needs them. These yarns are made from a blend of cotton and bamboo which will give you a soft and drapey finish.
I am also using a 4.5mm crochet hook, which is a much larger hook size than what is recommended by the weight of the yarn, as it gives this cardigan a light and soft finish.

This Crochet Cardigan also comes Ad Free with a full step-by-step picture-guided PDF file and video tutorial to guide you throughout the entire process.
And if you like this style, then you might also like to check out these other free Crochet top patterns here:


If you would like to receive free written patterns and video tutorials straight into your inbox, just click Subscribe to get into our mailing list
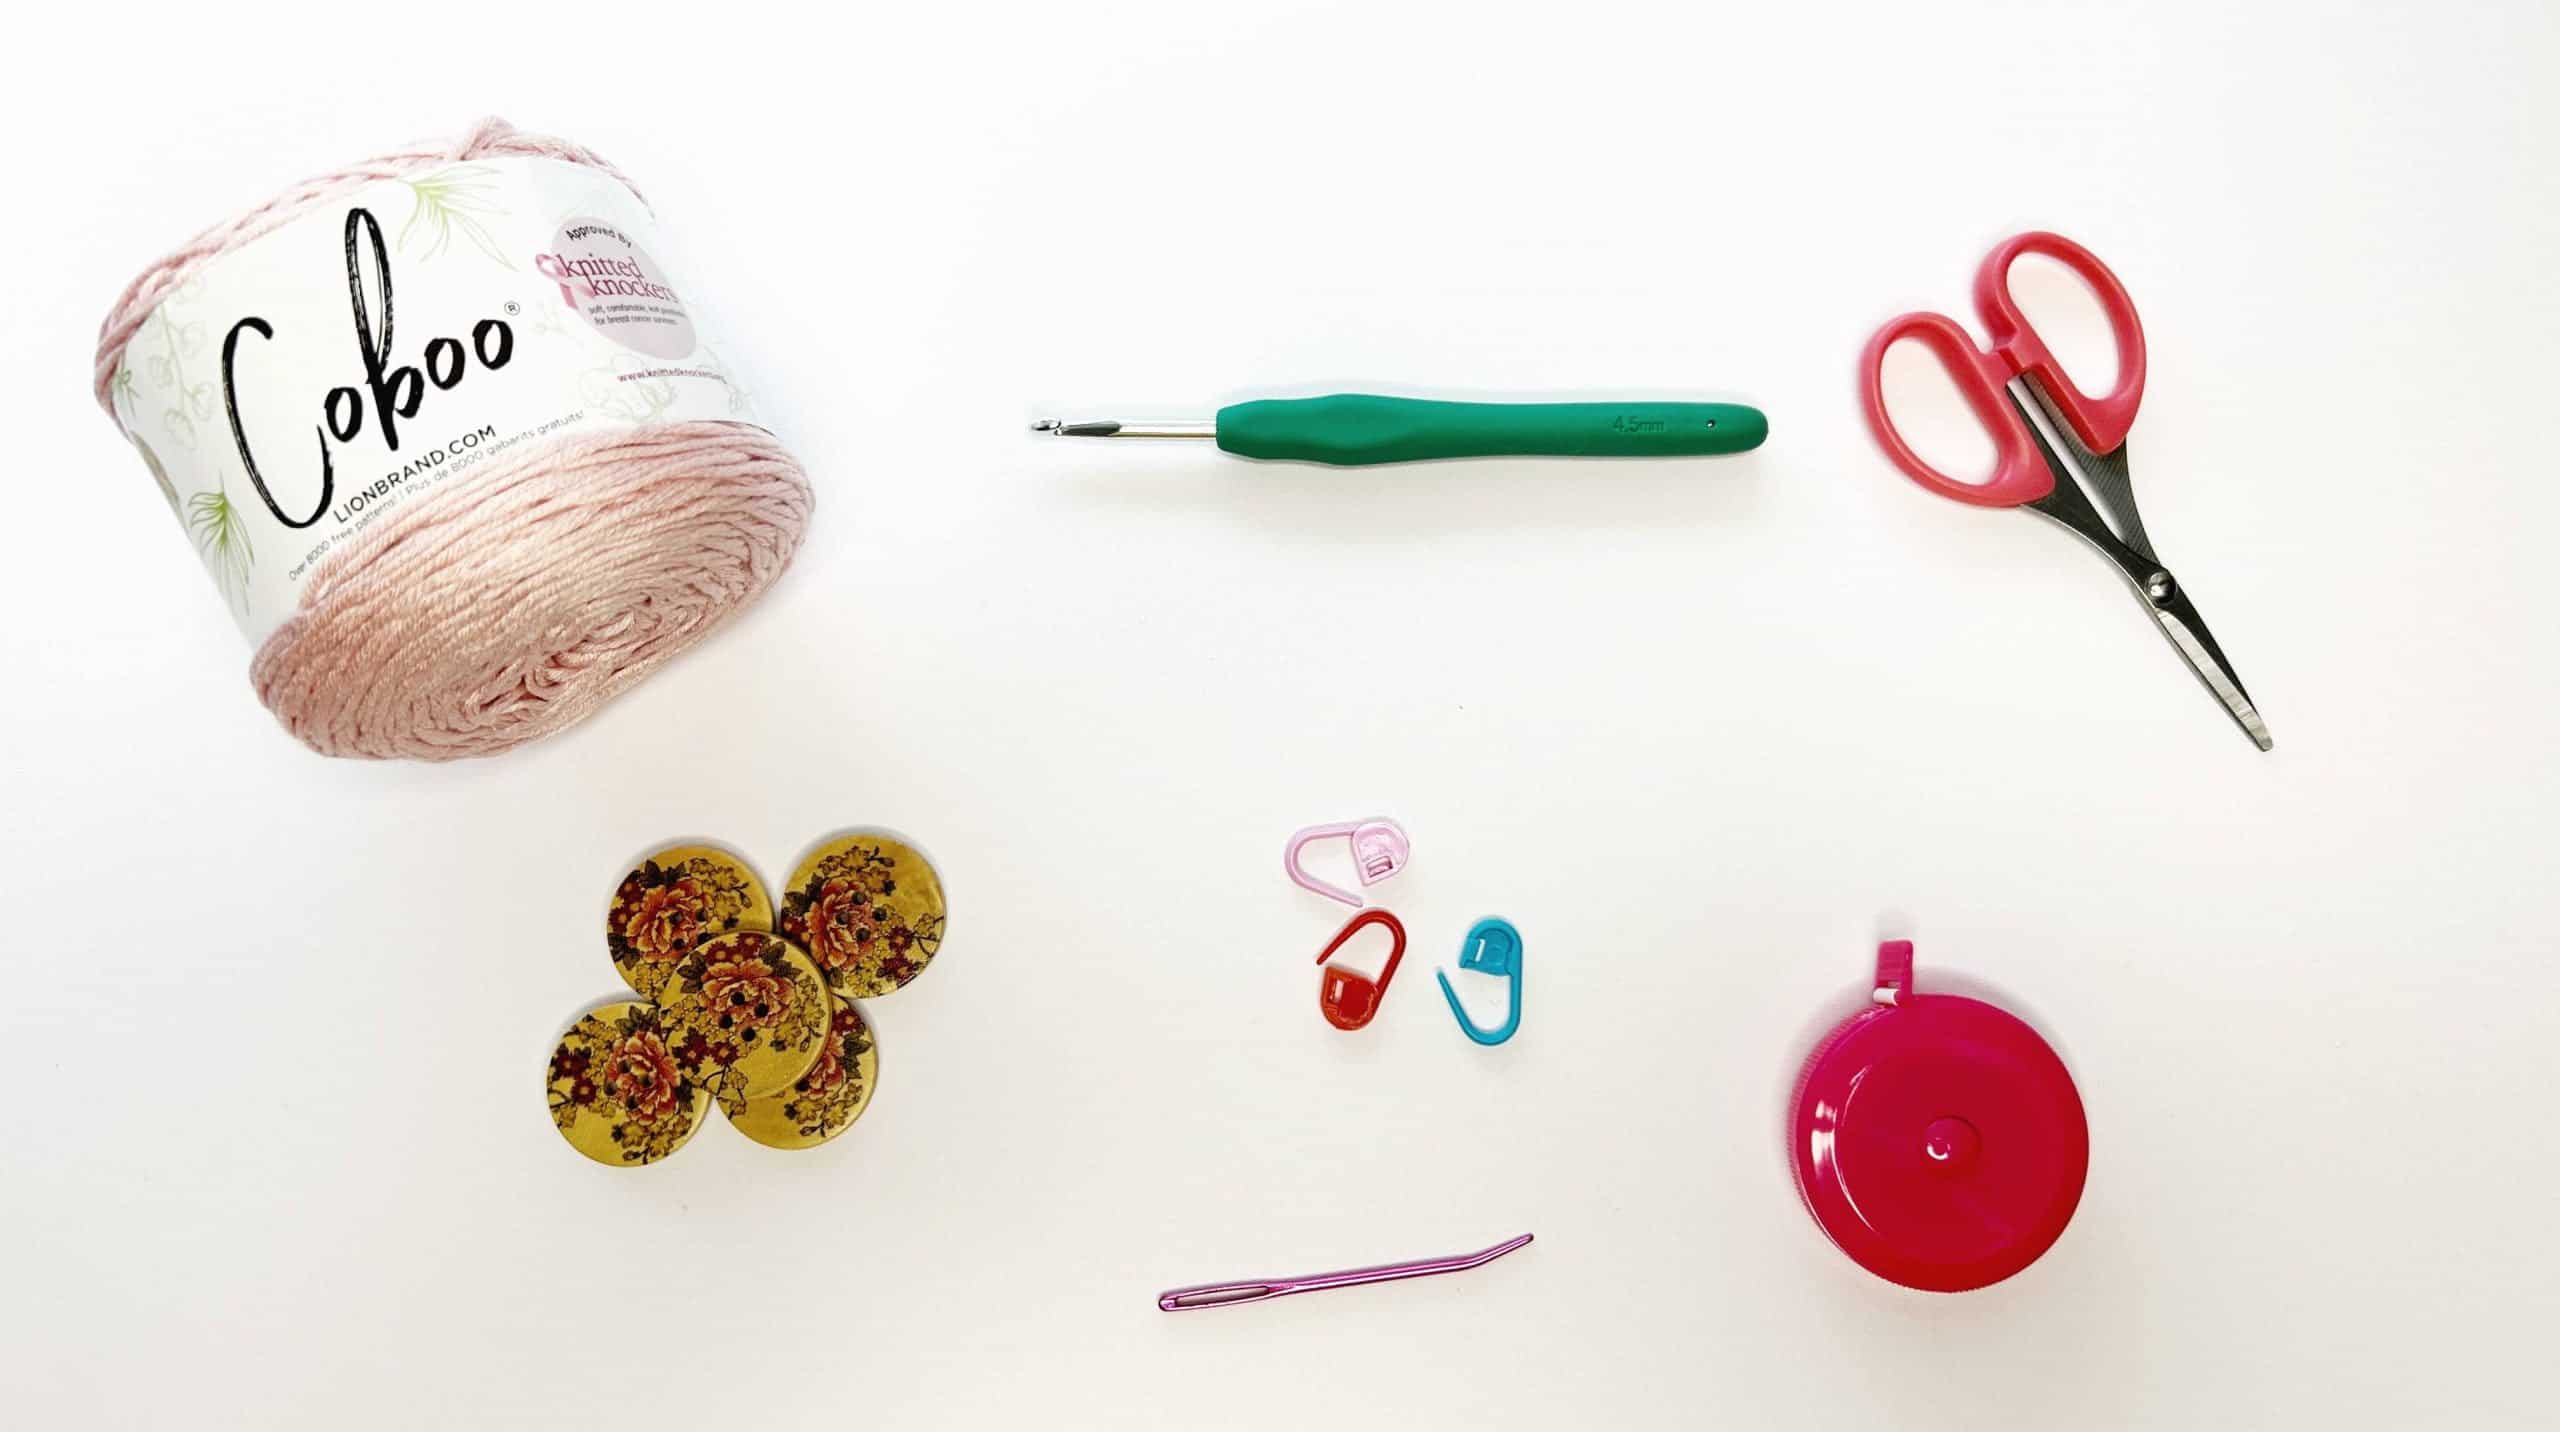
Tools And Materials:
Things to Note:
- Prepare a pattern gauge to get the right size. You may need to adjust your tension or change the hook size to achieve the same gauge.
- This pattern is worked in the Build As You Go method (BAYG).
- Pattern uses Single Crochet Stitches and Half Double Crochet stitches in rotation which may cause your work to tilt slightly. This is normal.
- The pattern also uses Alpine Stitches (Video Tutorial here)
- Turning chain does not count as a stitch unless mentioned otherwise
- Check out the Video tutorial here
- The abbreviation is available in English US format here.
**
Crochet Button-Up Cardigan – Free Pattern

Instructions
PART 1: Left Panel (Video Tutorial)

This part will be the entire right-side front and back body panel. You will determine the length of your Cardigan from here. Size is based on the chart given. You may adjust to your preference
- Foundation Row: Ch 131 [131/ 145/ 145/ 160] [160/ 174/ 174/ 189], Ch 1 to start the next row.
- Row 1: From the 2nd Ch from your hook, Work 1 Sc, Sc on each Ch across, Ch 1 turn
- Row 2: Hdc each St across, Ch 1 turn
- Row 3: Sc each St across, Ch1 turn
Row 2 and Row 3 will be considered as a 1-row set.
- Next Rows: Rep Rows 2 & 3 for 8 [10/ 11/ 12/ 13] [14/ 15/ 16/ 17] total sets of rows. Your last Row should end on Row 2.
Place a SM in the middle of the last Row
- Next Row: (Alpine): Work a Hdc in the 1st St, FP Dc on the 2nd post St. *(Hdc in the next St, FP Dc on the next post). Rep (*) until the SM, Hdc across, Ch 1 turn
- Next Row: Sc each St across, Ch1 turn
- Next Row: (Alpine): Hdc 2 Sts, FP Dc on the 3rd post St. *(Hdc in the next St, FP Dc on the following post). Rep (*) until the SM, Hdc across, Ch 1 turn
- Next Row: Sc each St across, Ch1 turn
- Next Rows: Rep Steps 6 – 9 for a total of 4[ 5/ 5/ 6/ 6] [7/ 7/ 8/ 8] sets of rows. Your last Row should be a Sc Row.
Part 2: Front Panel Decrease (Video Tutorial)
Place another SM on the 13 [11/ 10/ 11/ 10] [10/ 10/ 11/ 12] St across the front panel from the 1st SM.
- Next Row: From the last St, Hdc in the 1st St, FP Dc on the 2nd post St. *(Hdc in the next St, FP Dc on the following post). Rep (*) until the 3rd last St before the SM, Hdc2tog, Ch 1 turn
- Next Row: Sc each St across, Ch1 turn
- Next Row: Hdc 2 Sts, FP Dc on the 3rd post St. *(Hdc in the next St, FP Dc on the following post). Rep (*) until the 3rd last St before the SM, Hdc2tog, Ch 1 turn
- Next Row: Sc each St across, Ch1 turn
- Next Rows: Rep Steps 1 – 4 for a total of 4[ 5/ 5/ 6/ 6] [7/ 7/ 8/ 8] sets of rows.
- Bind off
Part 3: Back Panel (Video Tutorial)
- From the 1st SM on the back panel in Part 1 Step 10, Insert hook and draw up a loop at the SM, Ch 1 to secure
- Next Row: Hdc each St across, Ch 1 turn
- Next Row: Sc each St across until the SM, Ch1 turn
- Next Row: Rep Steps 2 & 3 for a total of 14 [14/ 15/ 15/ 16] [16/ 17/ 18/ 19] sets of rows. Your last Row should be a Sc Row.
- Bind off
Part 4: Front Panel Increase (Video Tutorial)
- Foundation Row: Count the number of Sts that you have on the last row of Part 2 Step 5 and work up the same number of chains, Ch 1 to start the next row
Note: Remember to count the Sts and not the post on the last row.
- Row 1: From the 2nd Ch from your hook, Sc each Ch across, Ch 1 turn
- Row 2: Hdc each St across, work 2 Hdc on the last St, Ch1 turn
- Row 3: Sc each St across, Ch 1 turn
- Row 4: Hdc in the 1st St, FP Dc on the 2nd post St. *(Hdc in the next St, FP Dc on the following post). Rep (*) until the 2nd last St, work 2Hdc on the last St, Ch 1 turn
- Row 5: Rep Row 3
- Row 6: Work 2 Hdc, FP Dc on the 3rd post St. *(Hdc in the next St, FP Dc on the following post). Rep (*) until the 2nd last St, work 2Hdc on the last St, Ch 1 turn
- Row 7: Rep Row 3
- Next Rows: Rep Steps 5 – 8 for a total of 4[ 5/ 5/ 6/ 6] [7/ 7/ 8/ 8] sets of rows.
- Next Row: From the last St (You should be on the Alpine Row), Ch 13 [11/ 10/ 11/ 10] [10/ 10/ 11/ 12] and bring the back panel in. Remove loop from the hook then pull loop through the last St of the Back Panel, Place a SM,
Tip: Make sure chains are not twisted and facing the WS
- Next Row: Working back towards the chains, Sc each Ch and each St across, Ch 1 turn
- Next Row: Alpine St across until the prev Ch row, Hdc each St across and place a SM on the last St on the Ch row, Hdc across the back panel, Ch 1 turn
- Next Row: Sc each St across, Ch1 turn
- Next Rows: Alpine St across until SM, Hdc each St across, Ch 1 turn
- Next Rows: Rep Steps 13 and 14 for a total of 4[ 5/ 5/ 6/ 6] [7/ 7/ 8/ 8] sets of rows.
- Next Row: Sc each St across until the SM, Ch1 turn
- Next Row: Hdc each St across, Ch 1 turn
- Next Rows: Rep Steps 16 & 17 for 8 [10/ 11/ 12/ 13] [14/ 15/ 16/ 17] total sets of rows. Your last Row should end on Step 16.
- Bind off
Part 5: Sleeves (Video Tutorial)

Fold Panel in half and place a SM on both ends.
- Place another SM on the 24[25/ 27/ 29/ 31] [33/ 34/ 36/ 38] St from the SM down to the front and back panel each, See Image 1 marked with an (X)
- Foundation Row: Insert hook through the 1st SM on the Front Panels side, and Ch 65 [65/ 65/ 65/ 62] [62/ 60/ 60/ 56] . Ch 1 to start the next row.
- Row 1: Sc each St across, Slst 3 on the next St on the body’s panel, turn
- Row 2: Skip prev 3 Slsts, Hdc across until last 11th St. Slst BLO for 10 Sts, Ch1 turn
- Row 3: Slst BLO in the next 10 Sts, Place a SM, Sc across, Slst 3 on the next St on the body’s panel, turn
- Row 4: Skip prev 3 Slsts, Hdc across until last SM. Slst BLO for 10 Sts, Ch1 turn
- Next Rows: Rep Row 3 & 4 until you reached the 3rd SM on the back panel.
Your last Row must end on Row 3
- Fold the Sleeves in half facing the WS and Sc both panels together to close up the sleeve.
- Cont to Sc across Body panels side to close.
- Bind off and rep Steps 1 – 9 on the other side.
- Bind off
Part 6: Edging (Video Tutorial)
FYI, button placement on women’s cardigans is traditionally sewn on the left side.
- From the front left panel (WS), insert your hook into the last St of the bottom panel, draw up a loop, and Ch 1 to secure.
- Foundation Row: Ch 8 + 1, turn
- Row 1: Sc across, Slst 3 on the body panel, turn
- Row 2: Skip 3 Slsts, Hdc BLO across, Ch1 turn
- Row 3: Sc BLO across, Slst 3 on the body panel, turn
- Next Rows: Rep Row 2 & 3 across.
- On the last Row, turn and cont with Row 2 & 3 on the Row side (see image 2) and all around the neckline (see image 3). Replace the last loop with a SM.
- Take your buttons and place your buttons evenly on the left edging, and place a SM in the middle corner of each button.
- Align the right panel and place SM on the opposite side of the left SM placement.
- Now thread a sewing needle or tapestry needle (depending on the size of your buttonholes), return the buttons on the left panel, and sew and tie 2 knots at the back to secure.

Part 7: Inner Pockets (Optional)

- I worked up 18 Sts for the height and 6 sets of rows for the width using the Sc & Hdc Rows in rotation. I ended the last row with a Sc and turned to the row/ post side and worked 2 rows of Sc. Bind off leaving a long tail for seaming.
- Next, place the pocket in the center bottom of the front panel (WS), secured each corner with a SM, and whip stitched along all 3 sides. (see Video Tutorial)
- Make another pocket on the other side.
- Bind off
END
If you are looking for the entire tools used to make this Crochet Button Up Cardigan pattern, I’ve listed them all right here:
♥ 4.5 mm Clover Crochet Hook
♥ Coboo Yarns
♥ 3cm Wooden Buttons
♥ Button Up Cardigan Printable PDF (Ad Free & Picture guided!)

Great job if you made it this far! If you have any questions about this pattern, do check out the video tutorial or get in touch with me by dropping a comment below.
And don’t forget to tag me on Instagram and Facebook @theknottylace, I would love to see your work!
By the way, If you would like to receive free written patterns and video tutorials straight into your inbox, you can join our mailing list now.
Happy hooking,
Shaz 💗


