Design Inspiration
Using simple crochet stitches, this crochet bikini bottom which is also an easy crochet bikini pattern to learn and so quick to make, making it the perfect choice for beginners eager to try their hand at crochet swimwear.
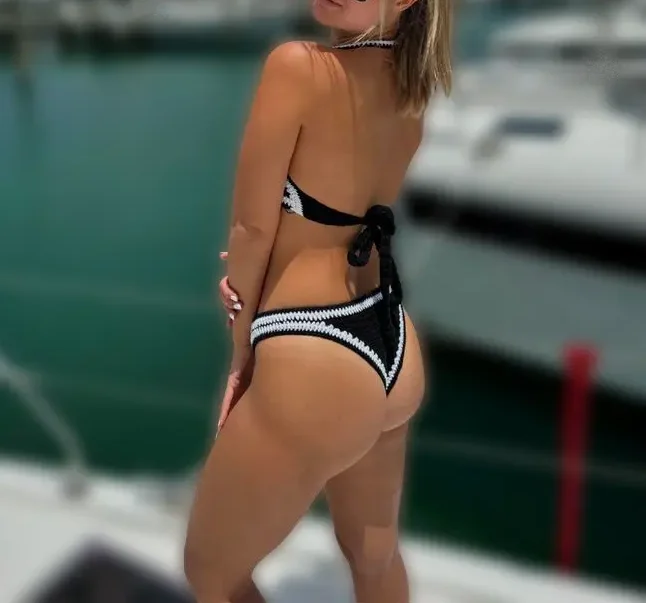
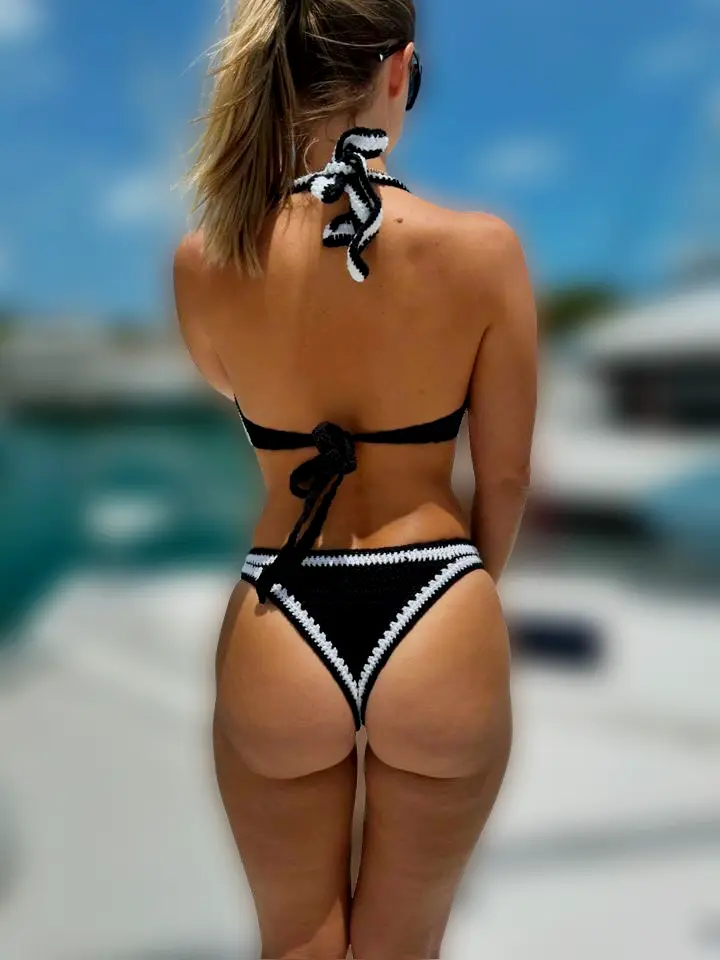
Inspired by bold colors like classic black and white which we don’t see very often in crochet wear, this design will be able to encourage you to embrace the challenge of working with black yarn. But don’t worry, there’s a step-by-step video tutorial packed with tips to help you master black yarn in no time!
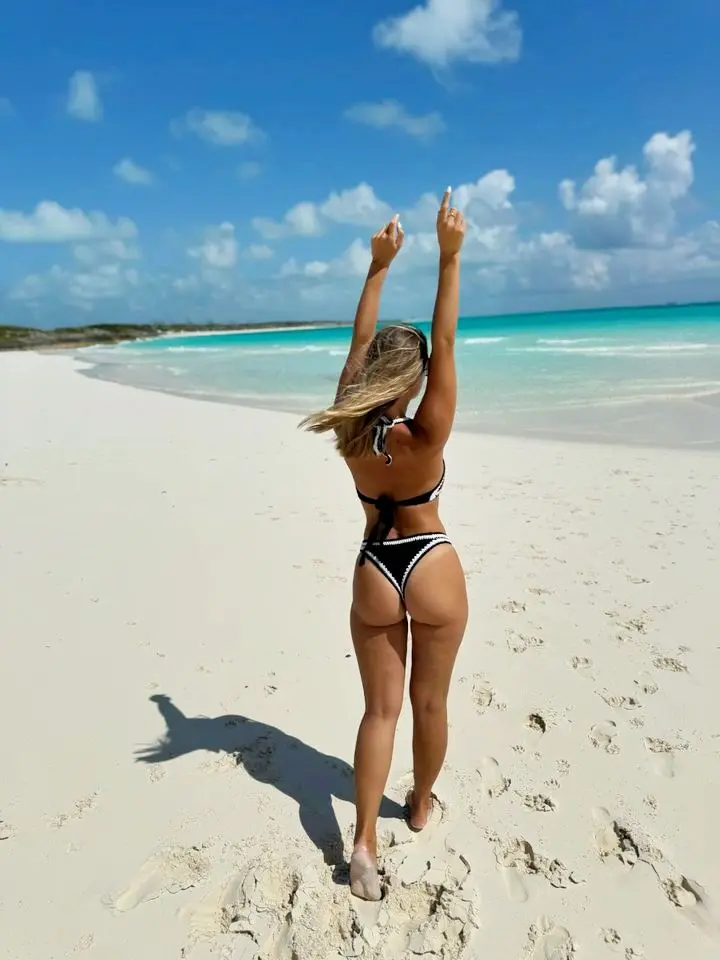
Create a crochet bikini bottom that’s not just pretty, but also practical and versatile with its easy-to-adjust back, you’ll feel comfortable and confident all day long.

And when paired with its matching bralette, it’s the ultimate summer duo bikini set. So go ahead and create something beautiful for yourself! It’s made to fit all sizes and body type so everyone can feel fabulous in it.
Construction
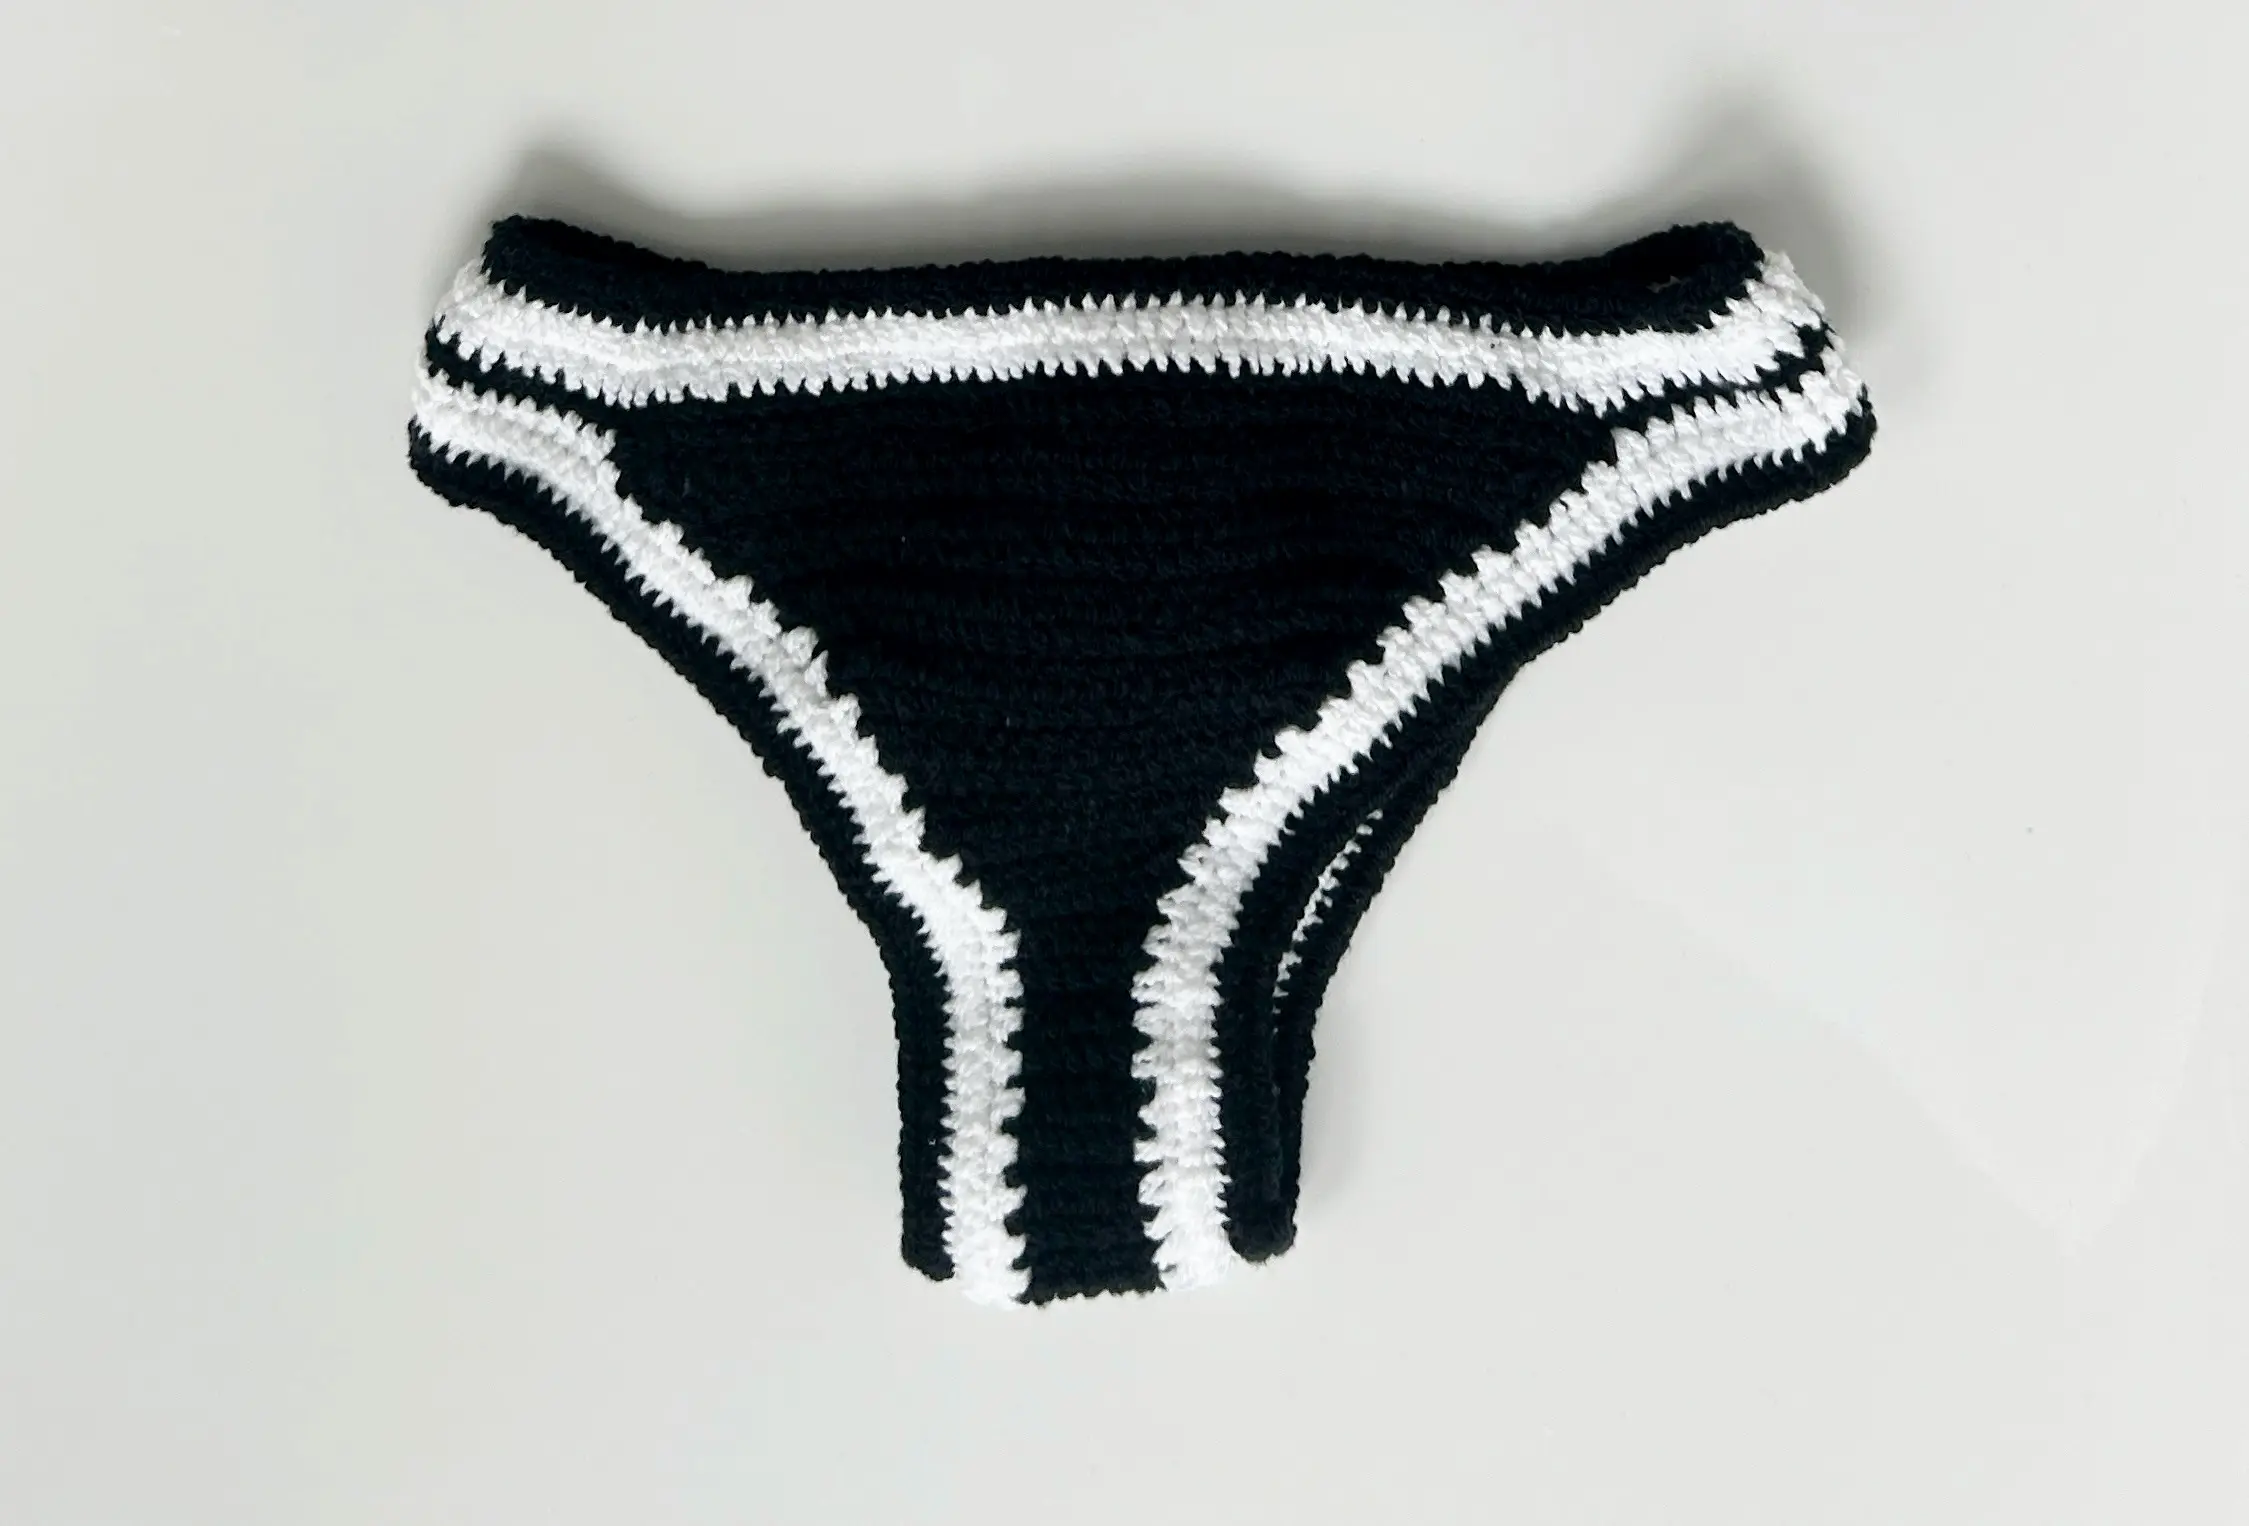
The Crochet Penelope Bottom is full of joy and built to last! Each stitch uses basic stitches you already know and love, like the single crochet and half double crochet.
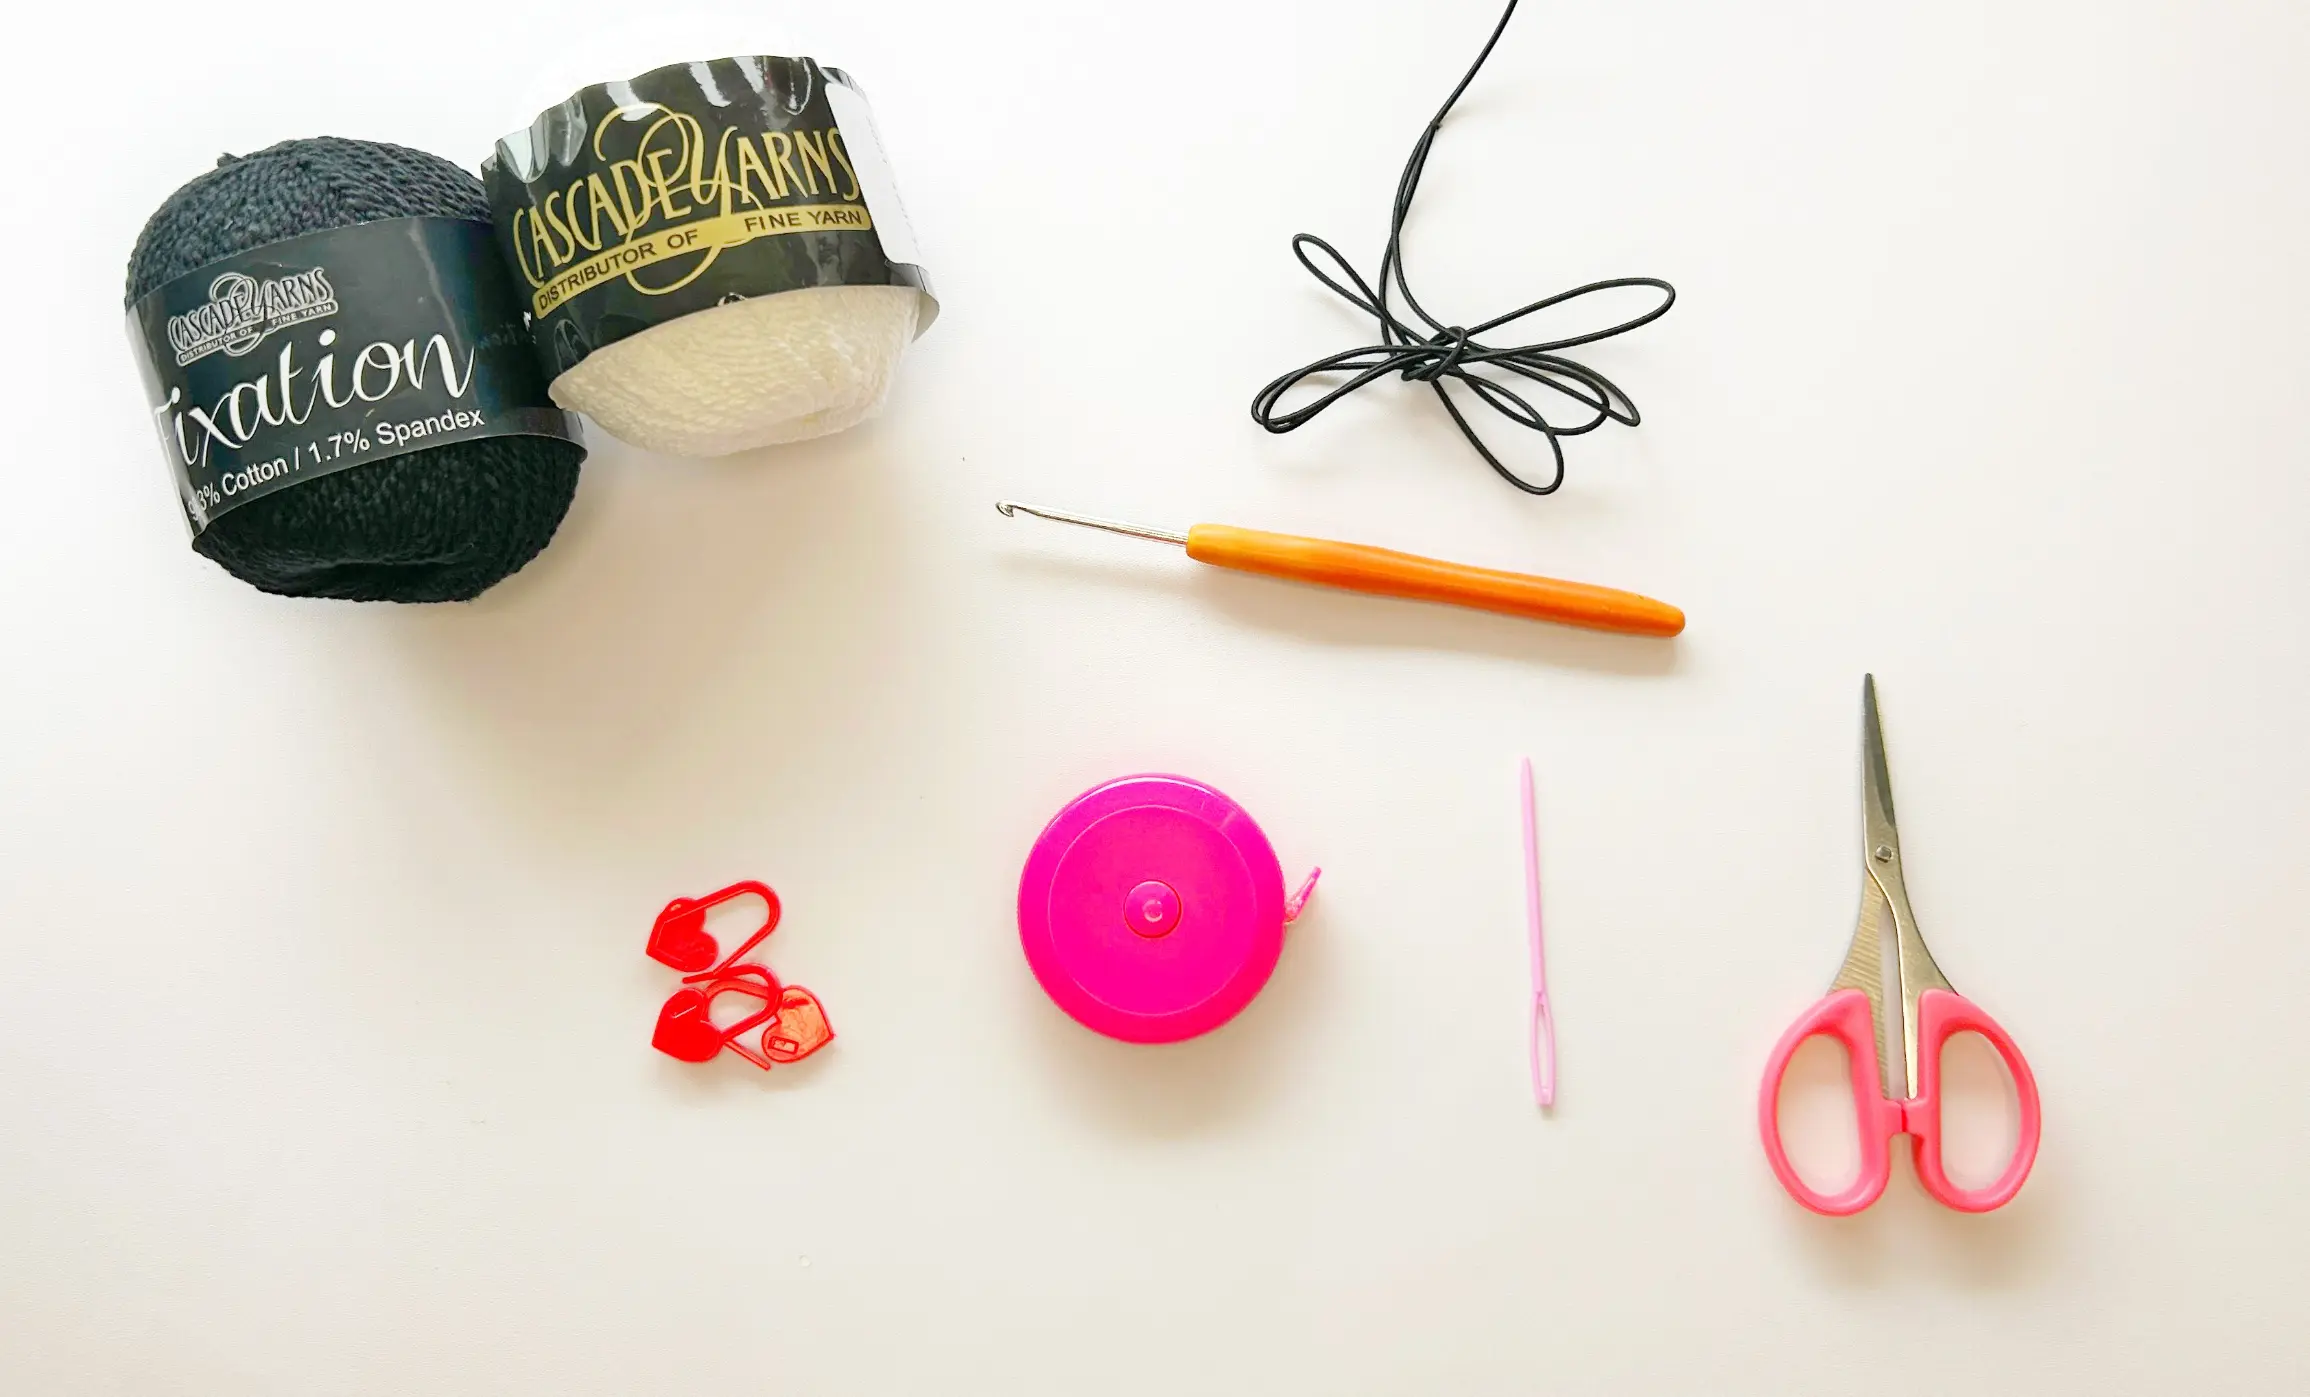
I’m using a water-approved yarn by Cascade Fixation that’s not only perfect for swimming but comfortable and soft to be worn all day long. It’s a cotton yarn blend with spandex fiber, making it the ultimate summer yarn.
I am also using a 3.0 mm crochet hook, which will create nice snug stitches that hold everything securely in place.
This sport weight yarn is not just stretchy and comfy, it’s tough too! You can splash around, or catch some rays without worrying about your crochet sagging or stretching in any way.
And because comfort is key at the beach, this Penelope Bottom offers a stretchy elastic band along the hips and leg openings.
The band will gently hug your curves in all the right places, ensuring you stay comfortable and confident all summer long.
Plus you won’t even need a lining for this one, although you’re always welcome to add one in if it gives you extra peace of mind
Also, feel free to add your own personal touch.
Adjustability and Comfort
Making your own bikini should be a blast, and feeling amazing in it is even better! This pattern is all about creating a swimsuit that looks fantastic and lets you feel comfortable and confident all day long.
We know everyone has different tastes, so this design is all about adjustability.
The cheeky cut at the back of the bikini can be easily adjusted to a wider style if you prefer more coverage. Plus, the bands’ width is easy to adjust too fit your hips nice and snug, so you will be able to find the perfect fit no matter your size.
We’ve also chosen a soft cotton yarn that has a special blend of spandex with different colors to choose from.
And if you would like to try out other crochet swimwear yarns, have a look a the list of best yarns for crochet swimwear and bikinis here.
Here are some free crochet bikini bottom patterns which you might like to have a look at.
How to Care for your Crochet bikini wear

To care for your crochet swimwear and keep it looking great, it’s essential to follow a few simple steps.
Firstly, always hand wash your crochet swimwear in cold water with a mild detergent to help preserve the delicate fibers and stitches. Avoid using bleach or harsh chemicals, as they can damage the fabric and cause it to lose its shape and color.
After washing, gently squeeze out excess water and avoid wringing or twisting the garment, as this can cause the crochet stitches to stretch or distort.
Lay your crochet flat to dry in a shaded area, away from direct sunlight, to prevent fading and ensure that it retains its shape.
To prevent snagging or tearing, store your crochet bikini wear in a cool, dry place, away from sharp objects or rough surfaces.
If you need to pack it for a trip, place it in a soft bag or pouch to protect it during transportation.
By following these care instructions, you can extend the lifespan of your crochet wearables and continue to enjoy them for many summer seasons to come.
Things to Note:
- Prepare a pattern gauge to get the right size. You may need to adjust your tension or change the hook size to achieve the same gauge.
- Do note this bottom is stretchable when using the mentioned yarn (recommended).
- Pattern uses two colors Yarn A (Black) and Yarn B (White).
- This Bottom is a cheeky cut however it can be easily adjusted
- Abbreviation page available in English US format
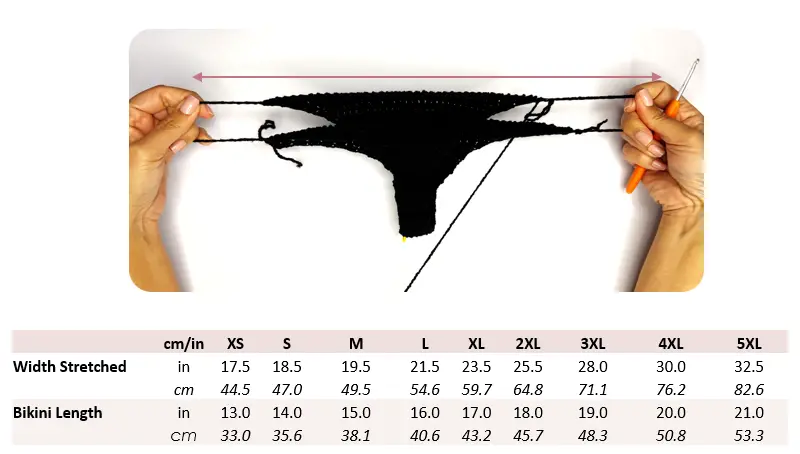
- Refer to the measurement Chart below
- Video Tutorial available here
Crochet Stitches Used
Ch – Chain stitch(s)
Sc – Single Crochet
Sl st – Slip stitch
Hdc – Half Double Crochet
Dc – Double Crochet
Hdc2tog/ dec – Half Double Crochet two Stitches together / decreaseHdc3tog/ dec –
Rep – Repeat
SM – Stitch marker
***
Instructions
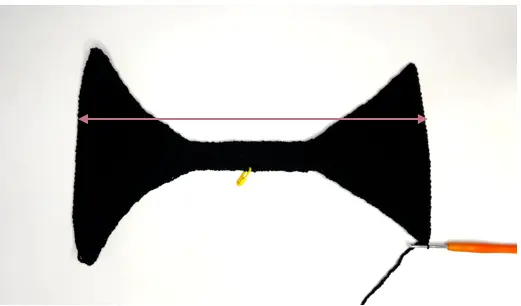
PART 1: Front Side to the Back Side
- Foundation Row: With Yarn A, Ch 48 [50/ 52/ 54/ 56] [58/ 60/ 62/ 64] + Ch 1, turn
- Row 1: In the 2nd Ch from hook, Hdc2tog, Hdc across until the last 3rd St. Hdc2tog, Ch 1 turn
- Row 2: (Hdc2tog) 2x, Hdc across until the last 5th St, (Hdc2tog) 2x, Ch 1 turn
- Row 3 – 8: Rep Row 2 for 6 more rows. Ch1 turn
- Row 9: Hdc2tog, Hdc across until the last 3rd St, Hdc2tog, Ch 1 turn
- Row 10: Rep Row 9 for 5 [6/ 6/ 7/ 7] [8/ 8/ 9/ 9] more rows. You should have 6[ 6/ 8/ 8/ 10] [10/ 12/ 12/ 14] Sts remain.
- Next Row Crotch: Hdc same number of Sts across for 9 [10/ 11/ 12/ 14] [15/ 17/ 18/ 19] total rows. – Place a SM in the last Row. Ch 1 turn
The SM is where the crotch folds. If you would like a wider back, proceed to Step 9. For a cheeky cut (like what the model is wearing) proceed to step 8.
- Next Row: Hdc same number of Sts across for 9 [10/ 11/ 12/ 14] [15/ 17/ 18/ 19] total rows. Ch 1 turn
- Next Row: Work 2Hdc in the 1st St, Hdc across until the 2nd last St, 2Hdc. Ch 1 turn
- Next Rows: Repeat step 9 increase until the entire length reaches 13 [14/ 15/ 16/ 17] [18/ 19/ 20/ 21] inches or 33 [35.6/ 38.1/ 40.6/ 43.2] [45.7/ 48.3/ 50.8/ 53.3] cm . Do not bind off.
PART 2: Side Band
- From the last St, Ch 25 [26/ 30/ 34/ 36] [43/ 45/ 46/ 52], Slst through the FRONT Sides 1st St, Ch 1 to secure, leave a long tail and bind off.
- From the corner St on the front Side, insert hook and Ch 25 [26/ 30/ 34/ 36] [43/ 45/ 46/ 52], Slst through BACK Side’s corner St, Ch 1
- Rnd 1: (RS) Sc into the prev Slst and into each Ch in the round. On the last St, Slst to join with Yarn B. (Watch Video on how to change yarn colors seamlessly)
- Rnd 2: Work a Hdc into the prev Slst, and Hdc into each St in the round. Slst to join.
- Rnd 3: Work a Hdc into the prev Slst, and Hdc into each St in the round. On the last St, Slst to join with Yarn A.
- Last Rnd: Take your elastic band and place them along the edge, between the yarn and the hook, and work a Hdc into each St while working around the elastic band.
- Once you have reached approx. 10 Sts before closing, tug the rubber band so it is laying straight with the Sts. Just make sure it is not bunched up or spread apart.
- Tie a double knot and snip of elastic band leaving a long tail end.
- Cont to Hdc the remaining Sts while working around the tail and band. Slst to join, Ch 1 to secure and bind off.
- Bind off any access rubber band tail.
PART 3: Leg Opening
- Rnd 1: (RS) With Yarn B, insert hook anywhere along the crotch side and draw up a loop. Work 2 Hdc Sts into each row across and 1 Hdc St along the side band. Hdc in the round, Slst to join.
- Rnd 2: Hdc into the prev Slst and cont to Hdc each St in the round, Slst to join and switch the Yarn A.
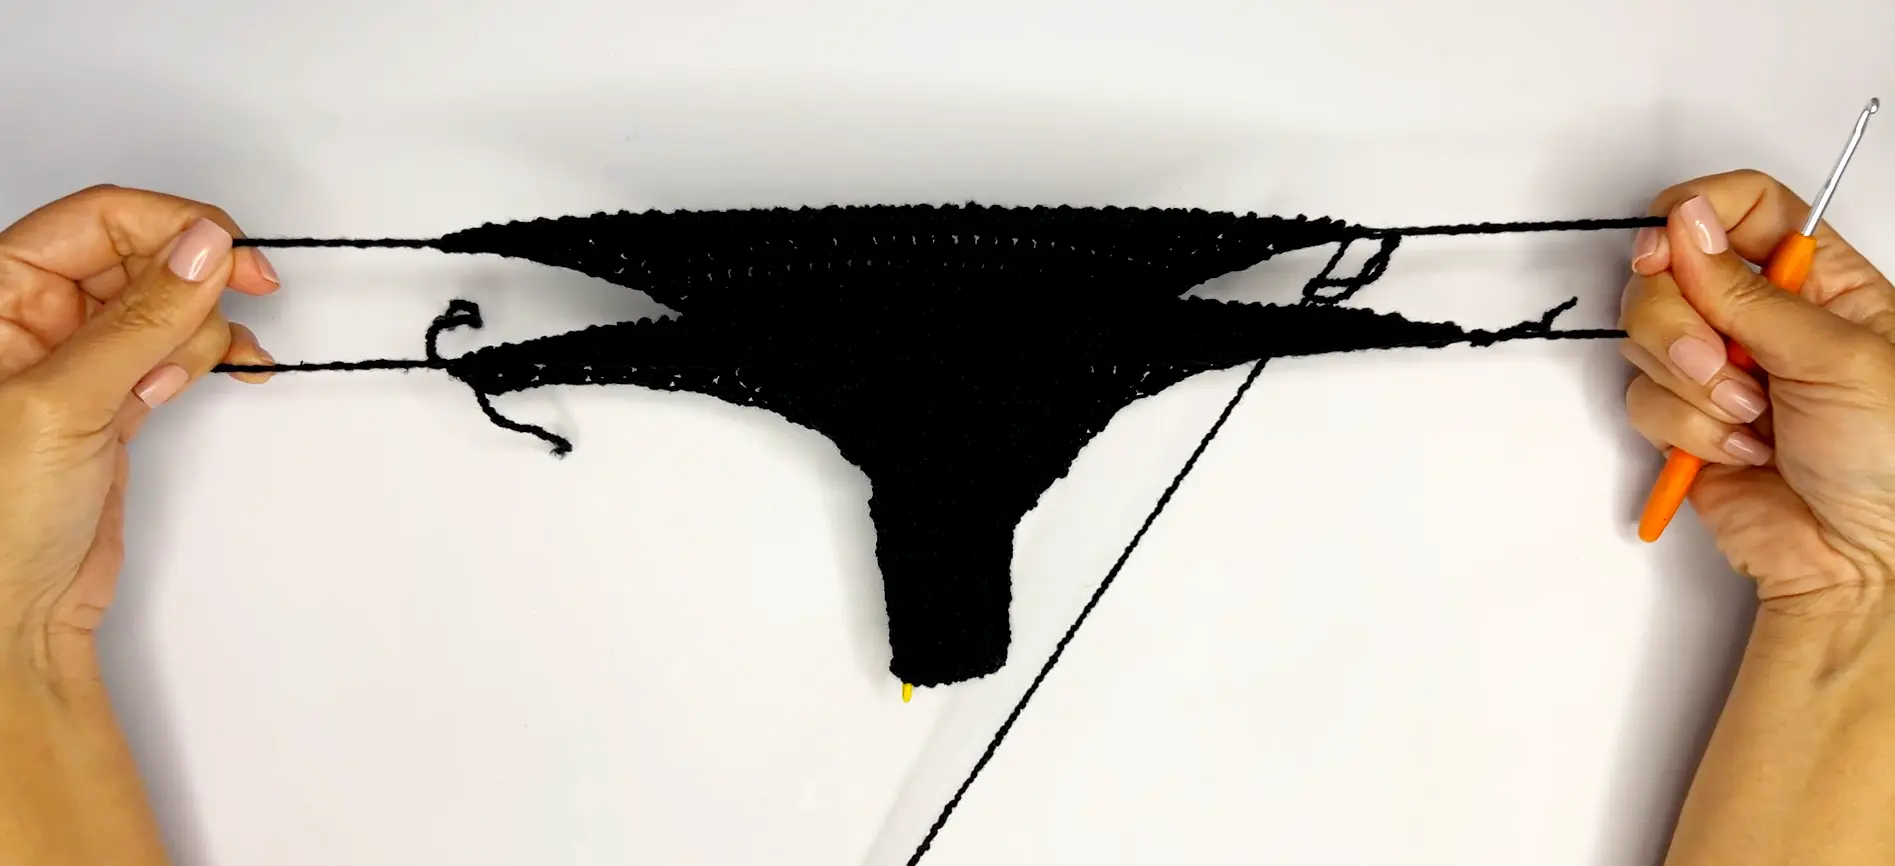
Once sides are done, stretch and measure (ref to chart for sizing). Open up chains and adjust accordingly if needed.
- Last Rnd: With Yarn A, place rubber band between the yarn and the hook and work a Hdc around the rubber band.
- Cont to Hdc each St until you have reached approx. 10 Sts before closing, tug the rubber band so it is laying straight with the Sts. Just make sure it is not bunched up or spread apart.
- Tie a double knot and snip of elastic band leaving a long tail end.
- .Cont to Hdc the remaining Sts while working around the tail and band.
- Slst to join, Ch 1 to secure and bind off.
- Snip off any access rubber band tail.
- Rep all steps in Part 3 on the other side.
- Weave in all loose ends.
END
TIP: Attaching Rubber band
- Make sure the elastic band is placed along the side, in between working yarn and loop St.
- Keep tugging elastic band in order to have a taut finish. Not too tight or loose.
- Stop 2” / 5cm or 10 sts before closing and tie a knot (twice). Stitch over and around the knot while hiding the cord and strand, Slst to close. Ch 1 to secure.
- Cut any cord tail poking out.
- Best to use round face elastic band like this.