
Lightweight, soft, and stretchy , this is the kind of top that feels really comfortable while still looking stylish and flattering.
If you’ve been looking for a crochet top that feels as good as your favorite yoga tank but looks like it belongs on a beach vacation, this one’s for you.
The Zen Crop Top is a halter-style crop with three delicate tear-drop cutouts down the center front, soft neck and side ties, and a seed stitch texture that makes it feel more special than your average summer top, without being hard to make.
It’s a free pattern available in all 9 sizes, perfect for beginners, and comes with a step-by-step video tutorial.
The full pattern is available right here on the blog, worked up in size Medium, and the ad-free PDF pattern is available for purchase on my Shop.
Or just save this post for later and come back when you’re ready to hook.
Why you’ll love making this top
If you enjoy crochet patterns that are wearable, stretchy, and beginner friendly, this one checks a lot of boxes.
It’s worked entirely in one simple two-stitch repeat (no counting complicated stitch patterns), it’s sized inclusively from XS all the way to 5XL, it comes with a full video walkthrough, and it finishes into a top with genuine “did I really make that?” details. The tear drop slits and halter ties look far more advanced than the stitches actually are.
How the Zen Crop Top Was Born

This design actually started on my yoga mat, and not by my crochet hook. 😅
I’d been rolling up my mat most mornings a few years ago, and I kept noticing the same thing: every top I owned for yoga was either too structured to move in, or so basic it didn’t feel like me. I wanted something I could wear to a morning flow and then just keep wearing.
Something soft, something with a bit of stretch and give through the chest and shoulders, something that moved with me through a sun salutation instead of fighting me.
And selfishly, I wanted it to look pretty in the mirror too, because comfortable and cute are not mutually exclusive, no matter what fast fashion tries to tell us.
That’s really where the name came from. “Zen” because it was born out of that quiet, grounded, on-the-mat headspace, and because I wanted making it to feel the same way. A calm, repetitive, meditative kind of project, not a pattern that has you counting stitches under your breath.
So I reached for my yarn with real stretch to it (more on that in a minute), and I built the whole top around the seed stitch which is a gentle, two-row rhythm of single crochet and half double crochet that’s honestly a little hypnotic to work once you get going. It felt right that a top inspired by slowing down would also be made by slowing down.
From there, the design took on a life of its own. I added the three teardrop cutouts down the center front because I wanted a little unexpected detail without adding fuss, and the halter ties and side ties came next so the fit could be fully adjustable, because bodies change day to day, and your top should be able to keep up.
What started as “I need a better yoga top” turned into a top I now reach for on hot days, beach trips, and yes, still on the mat.
And if you’re looking for more similar crochet tank top patterns and summer tops here are some free crochet patterns to check out.


How This Top Is Constructed
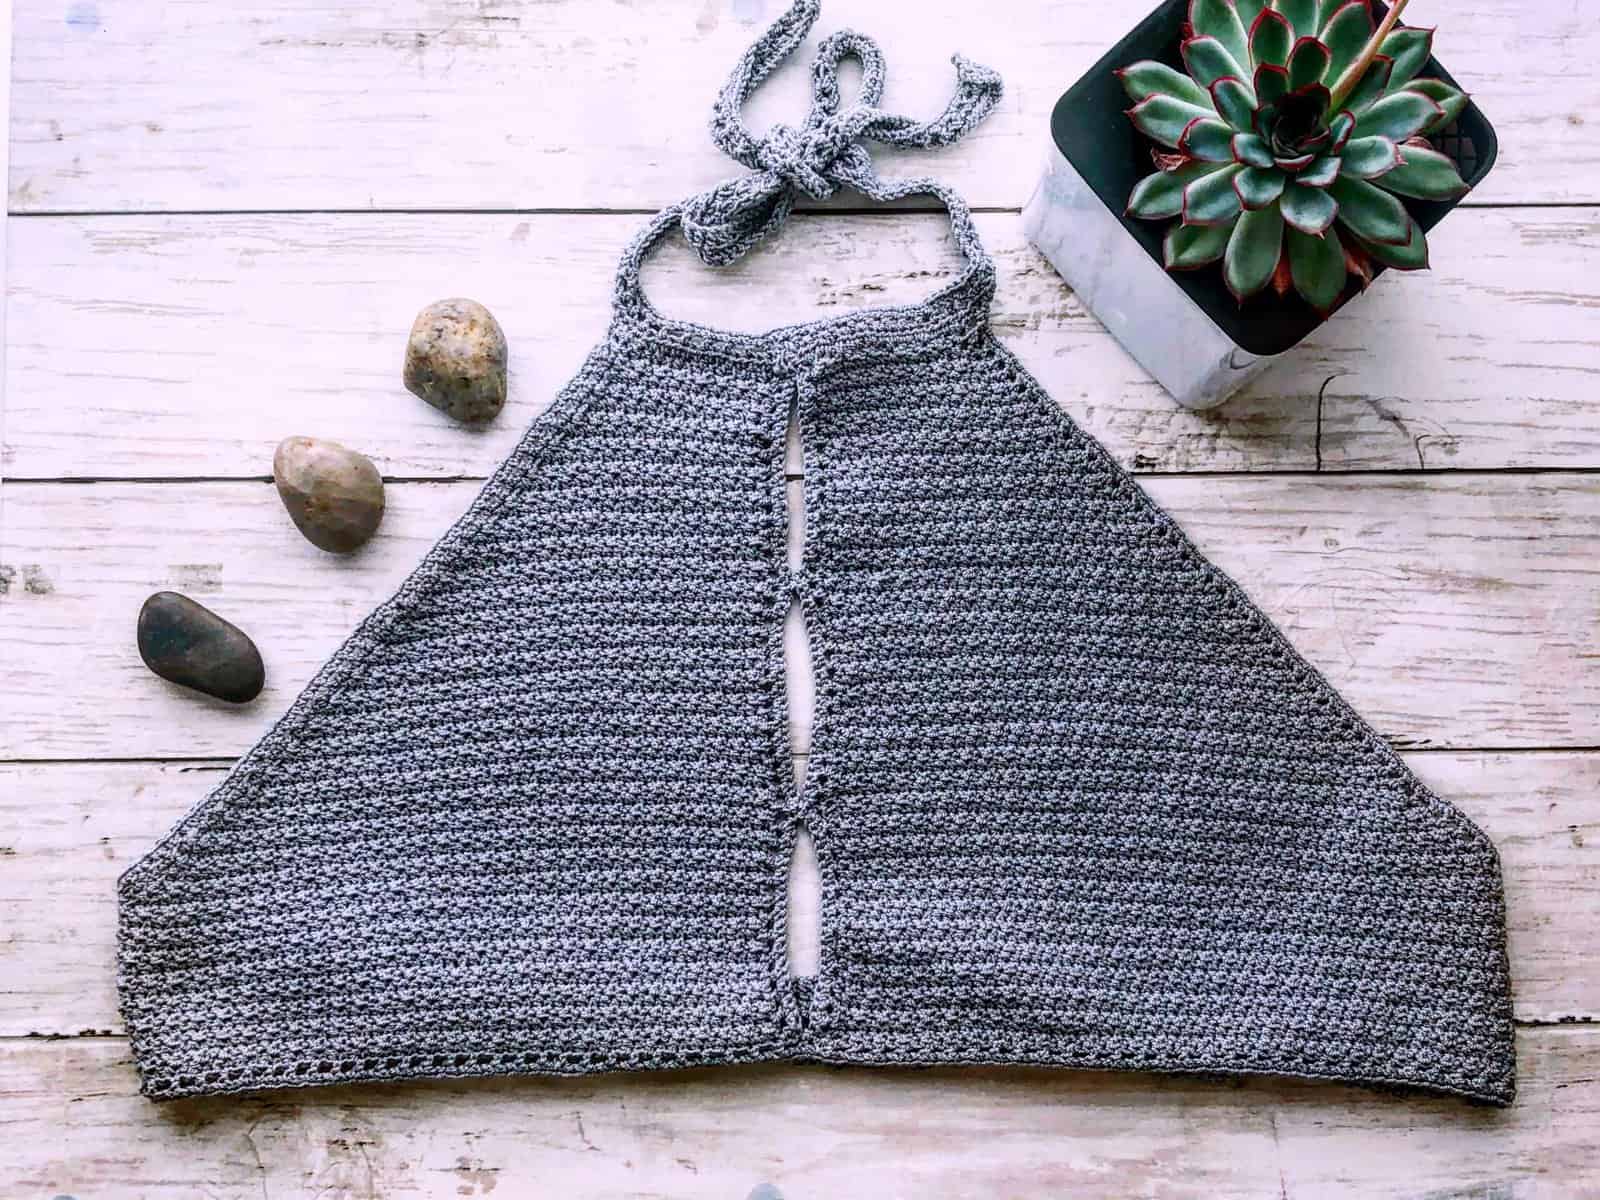
The Zen Crop Top is worked in two mirrored front panels, starting at the top of the halter neckline and increasing down into a triangle shape using the seed stitch. Each panel is edged along its center (non-increase) side to create clean posts to join later.
Once both panels are made, the halter neckline and ties are worked directly across the top of both panels in one continuous piece, joining them at the center.
The two panels are then partially seamed together down the middle using slip stitch markers to leave three deliberate gaps which become the teardrop cutouts that give the top its signature look. Side ties are added along the bottom edges so you can cinch the fit exactly where you want it, and a final round of single crochet and half double crochet edging finishes the piece off cleanly.
It sounds like a lot of steps written out, but because every part reuses the same seed stitch and simple edging technique, it comes together quickly once you’ve got the rhythm down.
Working With Stretchy Yarn

This pattern calls for Alize Diva Stretch, which is a category 1 yarn with excellent stretch and a lovely silky sheen. That stretch is exactly what gives the Zen Crop Top its snug, body-hugging fit and its negative ease. It’s one of my favorite yarns to work with for anything meant to move with you.
If you want to substitute yarn, look for a lightweight category 1 (fingering/sport-adjacent) yarn with stretch a yarn with elastane or spandex blended in will behave most similarly to Alize Diva Stretch just like the Cascade Fixation yarn (my other favorite!).
If you use a yarn without stretch, expect the fit to run a little smaller and than your actual measurements rather than negative-ease snug, so consider sizing up or adjusting your stitch counts.
This pattern is designed around a yarn with a good amount of stretch, and that changes a couple of things about how you should work it:
Your gauge swatch matters more than usual. Stretchy yarn can measure differently depending on how much tension you’re holding it with, so always make a swatch before you start and measure it unstretched, lying flat and relaxed, not pulled taut.
Expect negative ease. Because the yarn has give, this top is designed with 5in/12cm of negative ease, meaning the finished garment measurements are meant to be a little smaller than your actual body measurements. The stretch fills that gap. If you swap to a non-stretch yarn, you’ll want to size up or add a bit of extra width to compensate.
Keep your tension even, not tight. It’s tempting to pull stretchy yarn snug as you go, but crocheting too tightly fights the yarn’s natural give and can leave you with a stiffer, less flattering finish. Aim for relaxed, consistent tension throughout.
Handle seams gently. When joining the panels at the center slits, avoid over-pulling your slip stitches — stretchy yarn can bunch or pucker along a seam if it’s cinched too tight.
Getting the Perfect Size

This pattern includes all 9 women’s sizes, XS through 5XL, so start with the measurement guide below rather than going off your usual ready-to-wear size. If you’re in between sizes, size up, or measure along using the body width and height adjustment notes in the pattern. Both are easy to customize as you go.
How to Care for Your Crochet Crop Top
The best care method always follows the yarn label for the fiber you choose. Since this pattern uses a stretch yarn blend, checking the yarn label for the most accurate washing and drying guidance is the safest option.
In general, handmade crochet garments, especially stretchy ones hold their shape best when treated gently. Hand wash in cool water, lay flat to dry rather than hanging (hanging can pull the fibers and stretch the top out of shape over time), and store folded rather than on a hanger to help it keep its fit wear after wear.

Tips for Beginners
If this is your first time making a crochet top, here are a few extra tips to set yourself up for success:
Hook size matters. Pay close attention to the recommended hook size. Using the wrong size can significantly affect your gauge, and with a stretch yarn, that also affects how much negative ease you end up with.
Don’t fear the ties. The neckline, back, and side ties look intricate in photos, but they’re all worked using the same chain-and-hdc technique you’ll already know from the rest of the pattern. Take them one row at a time.
Use stitch markers generously. Part 6 (securing the middle joints) relies on placed stitch markers to line up the keyhole slits evenly so don’t skip this step, and don’t be shy about using a few extra markers if it helps you keep track.
Customize your fit. Don’t be afraid to add your own touch such as adjust the tie lengths, lengthen the body before the under bust row, or size up your hook slightly for a looser drape.
Swatch first. Always take the time to make a gauge swatch. This first step is what keeps your finished top true to the sizing chart.
More tips and suggestions here: How to crochet for beginners
Things to Note:
- Pattern consists of 9 sizes.
- Measurements above are only an estimate of the finished garment based on gauge, not your body size.
- Body width and height can be easily adjusted to your liking.
- If you are in between sizes, size up or measure along.
- There is a negative ease of 5in/12cm when using the same yarn.
- Model is wearing size Medium.
Crochet Abbreviations (US term)
Ch = chain
Ch Sp = chain space
St(s) = stitch(es)
Sk = skip
Sc = single crochet
Hdc = half double crochet
Dc = double crochet
Dc2tog = double crochet 2 stitches together
Slst = slip stitch
SM = stitch marker
RS = right side
WS = wrong side
Rep = repeat
cont = continue
inc = increase
dec = decrease
approx = approximate
beg = beginning
bet = between
Zen Crop Top Measurement Chart:

- Prepare a pattern gauge to get the right size. You may need to adjust your tension or change the hook size to achieve the same gauge.
- Pattern consist of the Seed stitch which is a rotation between a Sc and Hdc St.
- Material is very stretchable when using mentioned yarn
- Abbreviation is written in English US format
**

Part 1: Seed Stitch

- The seed stitch is a 2-stitch repeat between a Sc and Hdc st.
- Simply Hdc on the Sc st and Sc on the Hdc st. (Alternate)
Part 2: Front Panel
- Foundation Row: Working from the top down, ch 14 + 1.
- Row 1: Insert hook through the second chain from hook and work 1 Sc, then 1 Hdc on the next st. Rep the seed stitch (1 Sc then 1 Hdc) across until the last st (the last st should be a Hdc). Ch 1, turn.
- Row 2: Work 1 Sc st then 1 Hdc on the next st. Alternate Sc/Hdc sts until the last st (the last st should be a Hdc).
- Row 3 (Inc): Work 1 Sc and 1 Hdc in the 1st st, seed st until the end (the last st should be a Hdc). Ch 1, turn.
- Next rows: Rep Rows 3 & 4 for a total of 40 [43/ 47/ 50/ 54] [57/ 60/ 64/ 67] rows.
- Next row: Stop increasing and continue to work the same number of sts on that row for 12 more rows, or until you’ve reached your total height from your neckline to your underbust.
Keep in mind there is a negative ease of 5in/10cm when using this yarn.
- Bind off and repeat Part 2 to make a second piece.
- On the last panel, do not bind off.
Part 3: Edging
- Working on the middle/non-increase post side, insert your hook through the top first row’s post, draw up a loop and ch 1, Hdc in that same post. *(Ch 1, sk 1 row, Hdc in the next row’s post).
- Rep from * until the last row. Bind off.
- Repeat Steps 1 & 2 on the other panel in reverse order. Start by inserting your hook through the last row’s post, draw up a loop and ch 1, Hdc in the same post, then rep from * until the end.
- Bind off.
Part 4: Neckline & Ties
- Foundation Row 1: Insert your hook through the first st on the Right panel and ch 120, bind off.
- Foundation Row 2: Insert your hook through the last st on the Left panel, ch 120 + 1, turn.
- Row 1: Hdc into the second ch from hook and on each ch, down and across the collar until the end of the Left panel. Next, join the Right panel by continuing to work a Hdc st into the first st of the Right panel. Continue to Hdc across and throughout the chs made earlier until the end of the chain. Ch 1, turn.
- Row 2: Work 1 Hdc into the first st, *(ch 1, sk 1 st, Hdc). Rep from * across until the end of the opposite tie. Ch 1, turn.
- Row 3: Sc across the entire row, bind off.
Part 5: Adding Side Ties
- Turn to the bottom left side of your work and count 12 rows up. Insert hook through the first post and work 1 Dc st.
- Row 1: Work 1 Dc across each row’s post. Ch 1, turn.
- Row 2: Dc each st across. Ch 1, turn.
- Row 3 (Dec): Dc2tog through the 1st and 2nd st, 1 Dc across. Ch 1, turn.
- Next rows: Rep Rows 3 and 4 until you have 4 sts remaining.
- Stop decreasing and continue to Dc 4 sts on each row until you’ve reached 18” total length, or your preferred length.
- Bind off and repeat on the other side.
Part 6: Securing Middle Joints/Slits
- Count 19 [22/ 24/ 26] rows from the top down and place a stitch marker on that row. Repeat counting 19 [22/ 24/ 26] rows and place a stitch marker 2 more times.
Note: this row count is currently only listed for 4 of the 9 sizes — double-check/add the counts for XL, 2XL, 3XL, 4XL, and 5XL before this goes live.
- On the RS, working along the stitch-marker row, insert hook through the 1st Hdc st on the Left panel (at the bottom marker) and work *(1 Sc in the Hdc st and 1 Sc through the chain sp). Cont from * until you’ve reached the 2nd marker.
- Sandwich both panels together and turn to the unworked panel side.
- Release the working loop, insert your hook into the opposite side of the last st, and draw up the loop.
- Work 1 Sc in that st and across the row.
- Slip stitch into the beginning st and bind off. The completed Sc round should look like the reference image.
- Draw up a loop through the st at the 2nd marker and ch 1.
- Work *(1 Sc in the Hdc st and 1 Sc through the ch sp). Cont from * until the next marker.
- Repeat Steps 3–6.
- Repeat the same process again for the last slit. Bind off.
Part 7: Final Embellishments
- Turn to the WS of your work and insert hook through the last row’s post (just above the side ties) and ch 1.
- Row 1: Work 1 Hdc st in the same st, *(ch 1, sk 1 row, Hdc in the next row). Rep from * until the last row (just before the top ties). Slip stitch into the 2nd st of the neck ties. Ch 1, turn.
- Row 2: Work *(1 Sc on the ch sp and 1 Sc in the Hdc st). Rep from * across until the last st, just before the bottom ties. Slip stitch into the 1st row of the back tie. Bind off.
- Turn to the WS of your work and, from the top left side (just at the left tie), insert your hook through the 2nd st of the neck tie and ch 1.
- Row 1: Work 1 Hdc st in the same st, *(ch 1, sk 1 row, Hdc in the next row). Rep from * until the last row, just at the bottom ties. Slip stitch through the 1st post on the bottom tie. Ch 1, turn.
- Row 2: Work *(1 Sc on the ch sp and 1 Sc in the Hdc st). Rep from * across until the last st just before the ties. Slip stitch into the next st of the neck tie. Bind off.
Part 8: Finishing the Bottom Edge
- Turn work bottom-side up, facing the WS, and insert your hook through the first st at the bottom right of the row (just after the ties).
- Row 1: Ch 1, Hdc in same st, *(ch 1, sk 1 st, Hdc). Rep from * until the last st (just before the ties). Ch 1, turn.
- Row 2: *(1 Sc in Hdc st, 1 Sc through ch sp). Rep from * across.
- Bind off and weave in all loose ends.

END


If you are looking for the tools used to make this Crochet Zen Crop Top pattern, I’ve listed them all right here:
♥ 2.5 mm crochet hook
♥ Alize Diva Stretch (Smoky)
♥ Zen Halter Top Crochet Pattern (Ad Free & Picture guided!)
♥ Video Tutorial

Zen Halter Top Crochet Pattern
$4.99
If you would like to receive free written patterns and video tutorials straight into your inbox, join our mailing list now. Don’t forget to tag me on Instagram and Facebook @theknottylace, I would love to see your work!
Enjoying our content? Make us a preferred source on Google.
Add us as a Preferred Source on GoogleHappy hooking
Shaz