
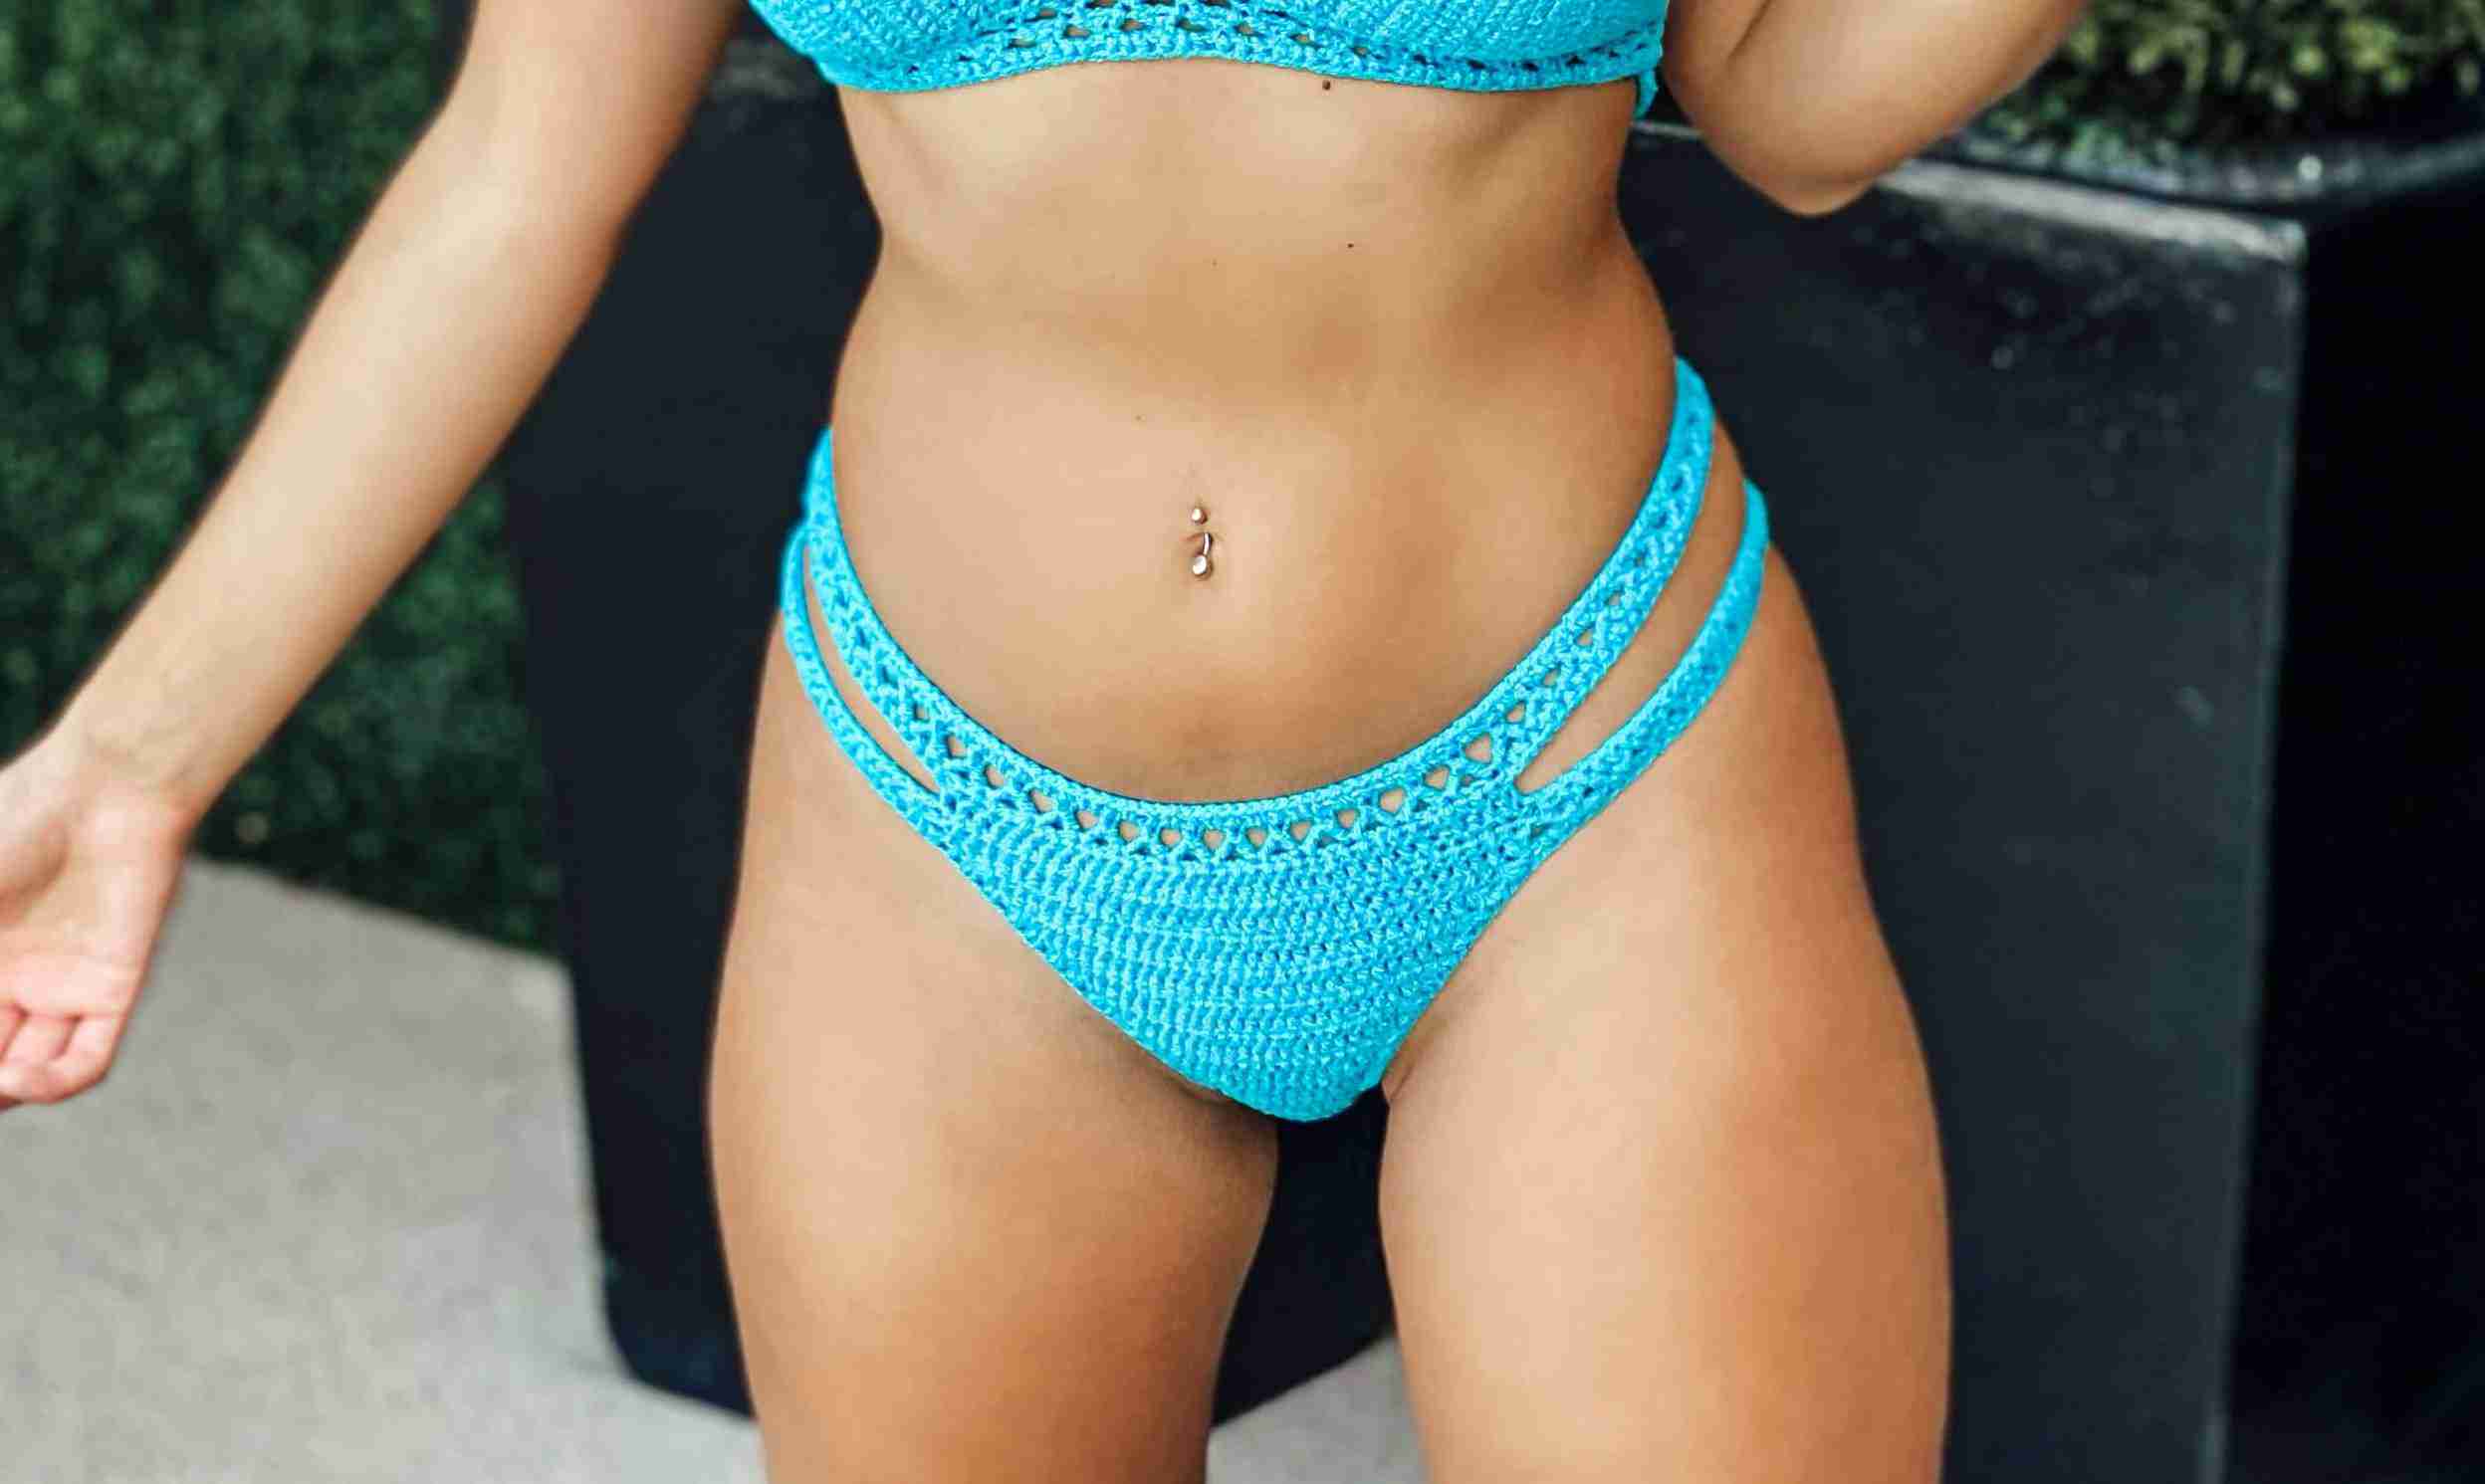
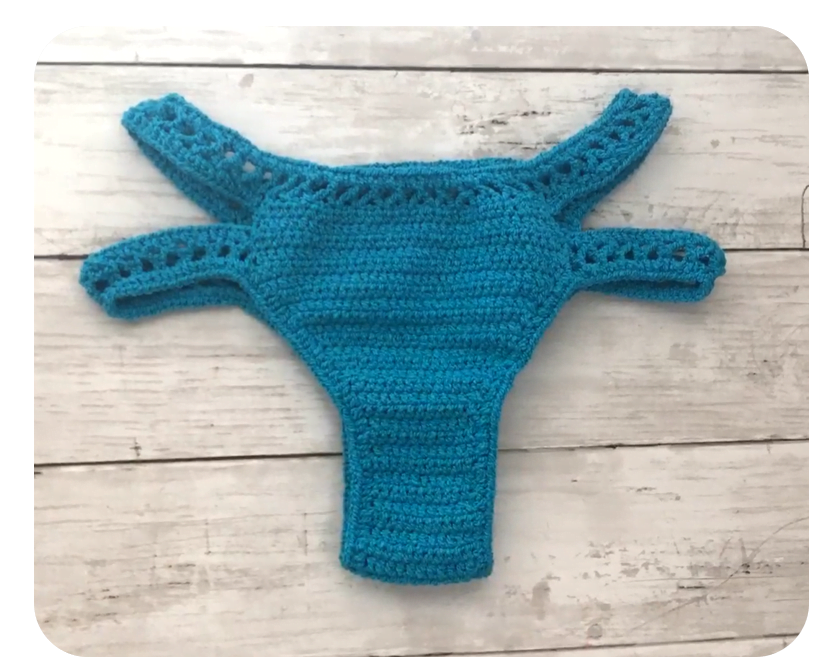
Yes, it is super cheeky! This Sahara crochet bikini bottom offers a stunning double-sided band, that is fun and modern perfect all year round.
It also comes with a matching top too, the Sahara Bralette. You can check out the free written pattern of this bralette here.
This bottom also comes in 9 sizes and is easily adjustable when measured along.
DESIGN INSPIRATION
This design was one of the more popular designs years ago when I was selling made-to-order bikinis. But at that time I didn’t have a written pattern for it yet. But now that I do, I wanted it to come in as a pair, hence the Sahara Bikini Set was born.
The double-sided bands offer more texture and support, while it’s all party at the back. It’s both snug and stretchy when you use these stretchable yarns, You’ll be able to swim and feel comfortable all day long.
As you already know, we have plenty more great tops you can also match this bottom with. Check out our range of free top patterns here
This pattern tutorial is also available on my YouTube channel where it is worked up in size Medium. However, If you would like a printable ad-free PDF copy of this pattern, it is available for purchase in my shop. Or you can add this to your Ravelry queue
DESCRIPTION
Working from the front panel down towards the back, this crochet bikini bottom slowly increases towards the back panel giving it a nice cheeky cut. It is then connected to the sides with the upside-down triangle pattern.
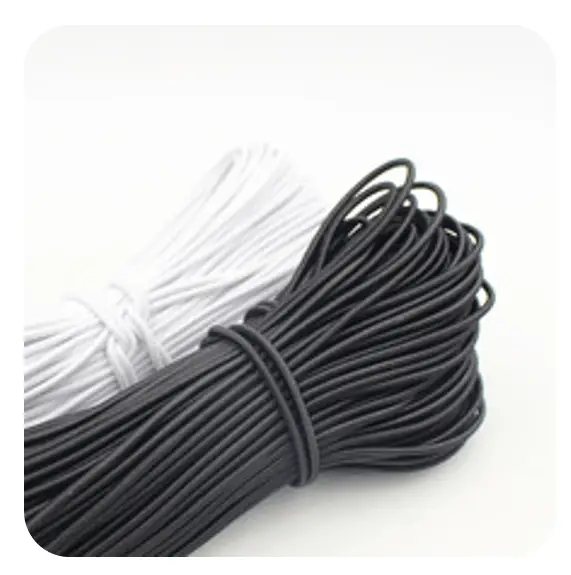
Adding elastic rubber bands is essential and remember, bikinis need elastane too, so do use the correct yarn type. This will offer elasticity and support when swimming or lounging in the pool. Nobody wants saggy bottoms!
And if you would like to learn how to make your own adjustments and what fits you the best then you will have to check out my Ultimate Crochet Bikini Bottom Guide.
If you would like to see more video tutorials like this you can check them out here on the blog or Subscribe to my Video Channel on YouTube.
Tools and Materials:
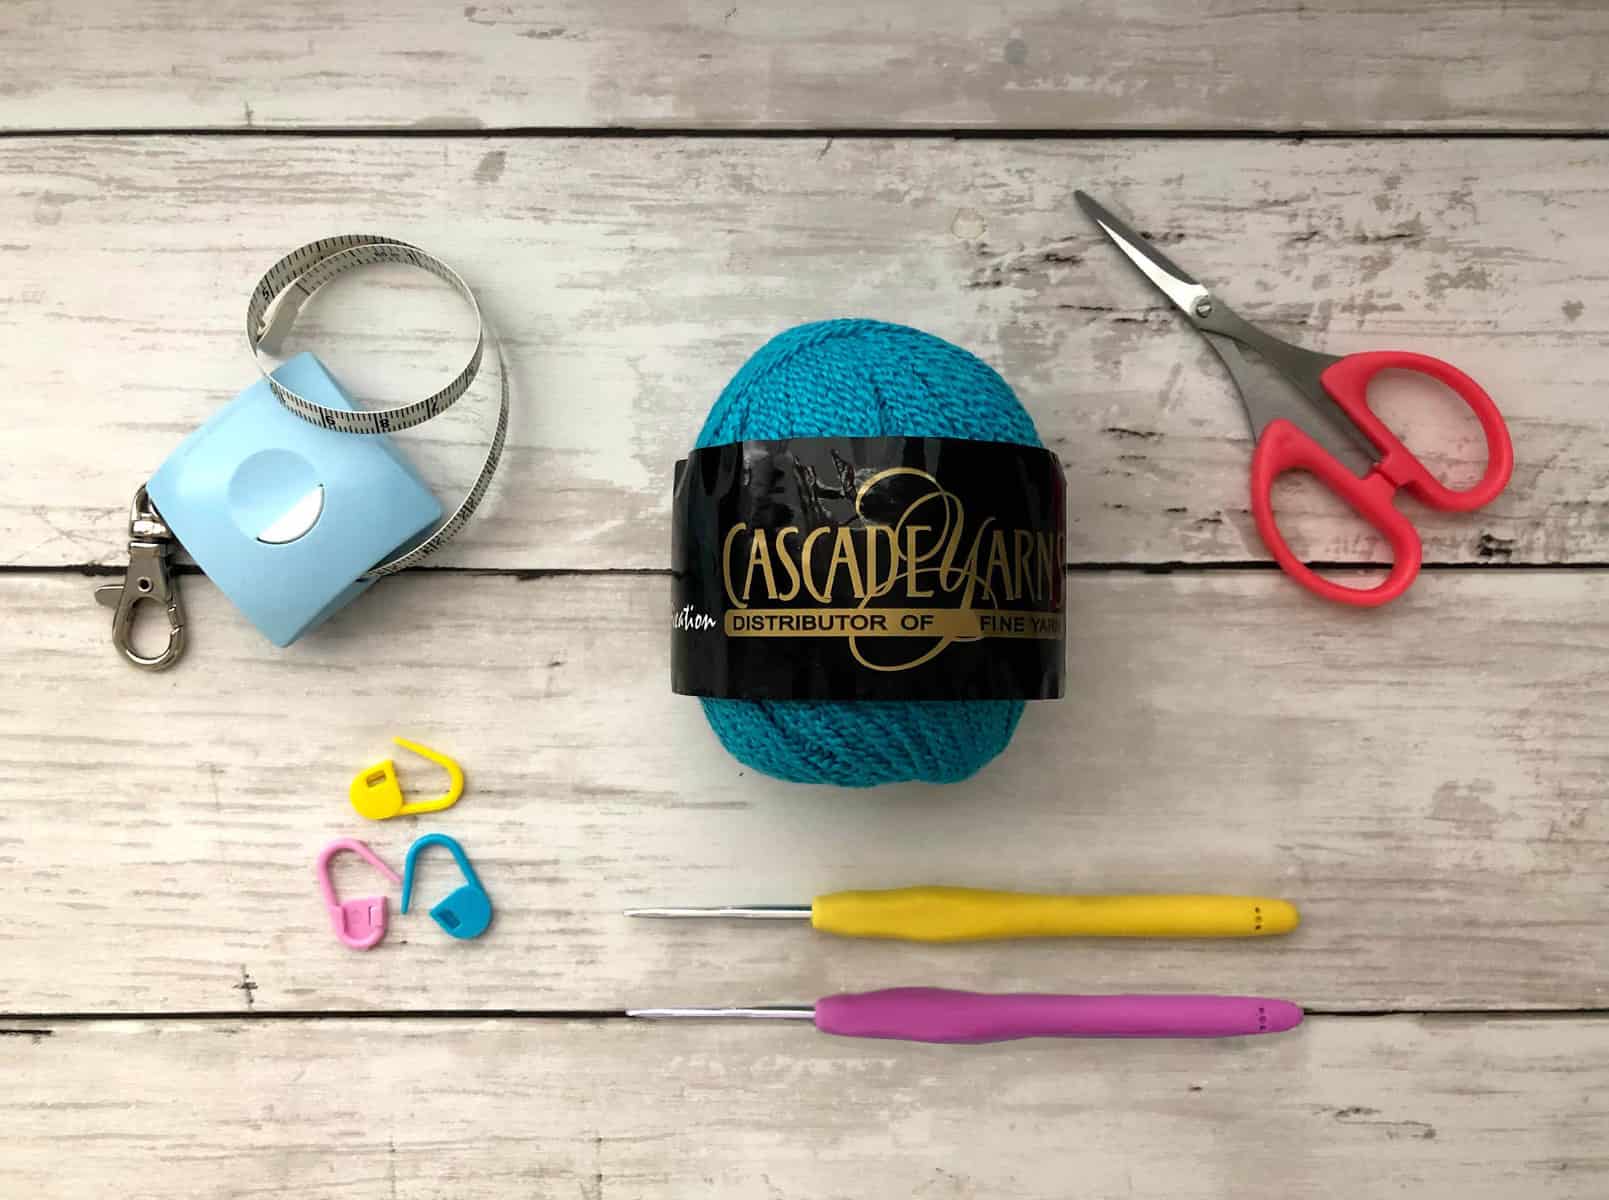
Yarn weight: DK Category 3
Brand: Cascade Fixation
Color: Teal
Hook: 2.25mm
Gauge: 24 Hdc Sts x 16 rows = 4”x 4”
No. yarns (balls): XS[S/M/L/XL] [2XL/3XL/4XL/5XL] –1 [1/ 1.5/ 1.5/ 2] [2/ 2/ 2.5/ 2.5]
Tools: tapestry needle, measuring tape, scissors, stitch markers, rubber band
Skill: Easy
This post contains affiliate links designed to provide a commission on purchases made at no cost to you. As an Amazon Associate, I earn from qualifying purchases which support my work in providing new content and information on this site.
If you like this pattern, you might also like these:
Chevron Cheeky Bottom / Hanna Cheeky Bottom / Gaia Brazilian Bottom
or check out more Crochet Bottoms here
If you would like to receive free written patterns and video tutorials straight into your inbox, just click Subscribe to get into our mailing list.
Things to Note:
- Prepare gauge to get the right size
- This is a cheeky cut style
- Turning chain does not count as a stitch unless mentioned otherwise
- Material is stretchable when using mentioned yarn
- Definition of 2Dc Vs Dc2 : Work 2 Dc in the same St vs 1 Dc in the next 2 Sts.
- Abbreviation page available in English US format
Your body measurement:
- Your hip size: XS [S/ M/ L/ XL] [2XL/ 3XL/ 4XL/ 5XL] – 32 [34/ 36/ 40/ 44] [48/ 53/ 55/ 57/ 62] inches or 86 [91.5/ 101.5/ 111.5/ 122] [134.5/ 139.5/ 144.5/ 157] cm (size up if you are in between sizes)
- Hip size refers to the circumference of the widest part of your bum area and not the actual finished garment.
- Refer to the measurement chart here
* For ref, the model is wearing Size M for this bottom as shown here. Size up if you are in-between sizes.
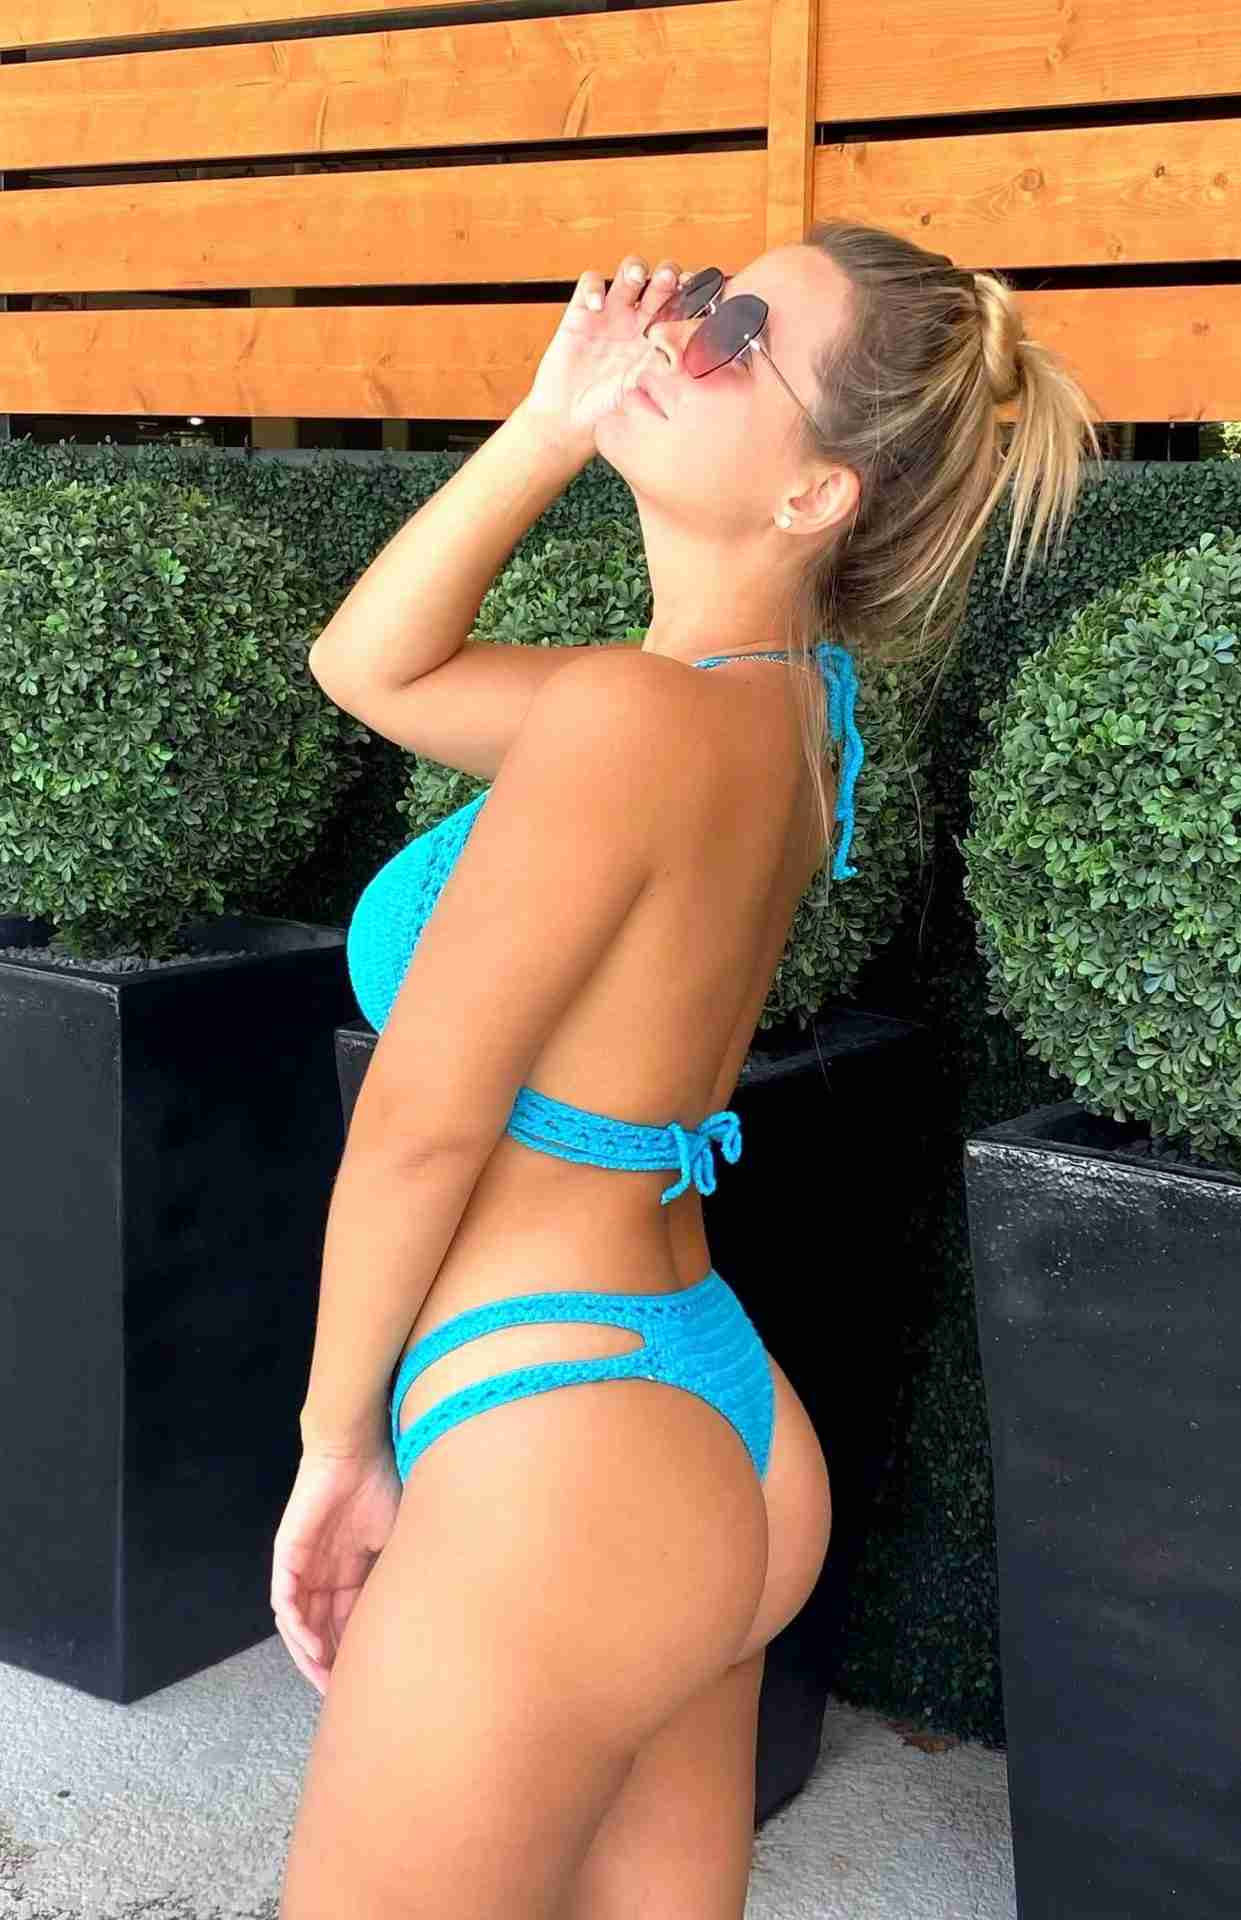
- Cheeky at the back
Sahara Double Sided Band Cheeky bikini Bottom Free Crochet Pattern
PART 1: Front to Crotch to Back
- Chainless Foundation Row: Ch 38[40/ 42/ 44/ 46] [48/ 50/ 52/ 54] + Ch 1, turn (Check out the step by step chainless foundation guide here)
- Row 1 – 4: On the 2nd Ch from hook, work 1 Hdc St and across, Ch 1 turn
- Row 5 – 8: Hdc2tog 2x, Hdc across until the last 5th St, Hdc2tog 2x, Ch 1 turn
- Row 9: Hdc2tog, Hdc across until the last 3rd St. Hdc2tog, Ch 1 turn
- Rep Row 9 for 6 [6/ 7/ 8/ 9] [9/ 10/ 11/ 12] total rows. You should have (10 [12/ 12/ 12/ 12] [14/ 14/ 14/ 14] Sts remain.
- Next Row Crotch: Hdc same number of Sts across for 24 [28/ 30/ 32/ 34] [38/ 40/ 42/ 44] rows. Ch 1 turn
- Next Row: Work 2Hdc in the 1st St, Hdc across until the 2nd last St, 2Hdc. Ch 1 turn
- Next Rows: Repeat step 8 increase for 10 [10/ 11/ 12/ 13] [13/ 14/ 15/ 16] rows
- Last 4 rows: Hdc each St across for 4 rows until the entire length reaches 13 [14/ 15/ 16/ 17] [18/ 19/ 20/ 21] inches or 33 [35.6/ 38.1/ 40.6/ 43.2] [45.7/ 48.3/ 50.8/ 53.3] cm ** Do not bind off**
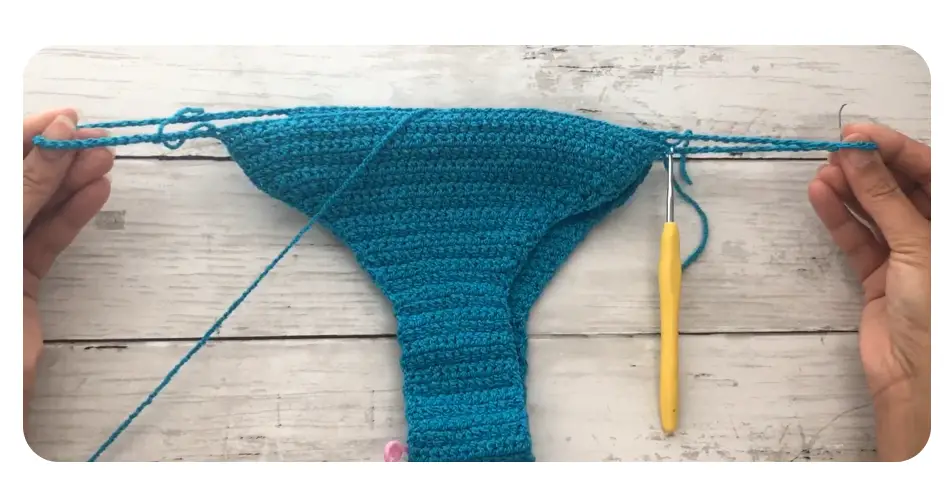
PART 2: Join sides
- From the last Hdc St, Ch 36 [38/ 40/ 46/ 52] [58/ 66/ 72/ 80] Slst through FRONT sides 1st St. Bind off
- Insert hook through the last Hdc St on the same row of the BACK side, draw up a loop and Ch 36 [38/ 40/ 46/ 52] [58/ 66/ 72/ 80], Slst through the FRONT sides last St of the 1st row
You should have approx. 17.5 [18.5/ 19.5/ 21.5/ 23.5] [25.5/ 28/ 30/ 32.5 ] inches or 44.5 [47/ 49.5/ 54.6/ 59.7] [64.8/ 71.1/ 76.2/ 82.6] cm hip width when fully stretched outwards. If not adjust accordingly
3. Ch 5,4. Yo, insert hook through the same St, draw up a loop, Yo, Pt 2, 5. Yo, Sk 2 Sts, insert hook, draw up a loop, 6. (Yo, Pt 2) 3x, 7. Ch 3
7. Rep step 3 – 6 in the round
8. On the last 4th St, Yo, insert hook through the same St, draw up loop, Yo, Pt 2, insert hook through the first triangle chain Sp, Yo, Pt all to close, Ch 1
9. Place rubber band along the edge, between the yarn and the hook, and work a Hdc around the rubber band. Work 2 Sts on each Ch Sp and 1 Hdc on the next St.
10. Once you have reached the 4th last stitch, tug the rubber band so it is laying straight with the Sts. It should be bunched up slightly and not spread apart.
11. Tie a knot (twice) work 4 Hdc over and around the knot while hiding rubber band knot and strand, Slst to close.
12. Cut any remaining rubber band.
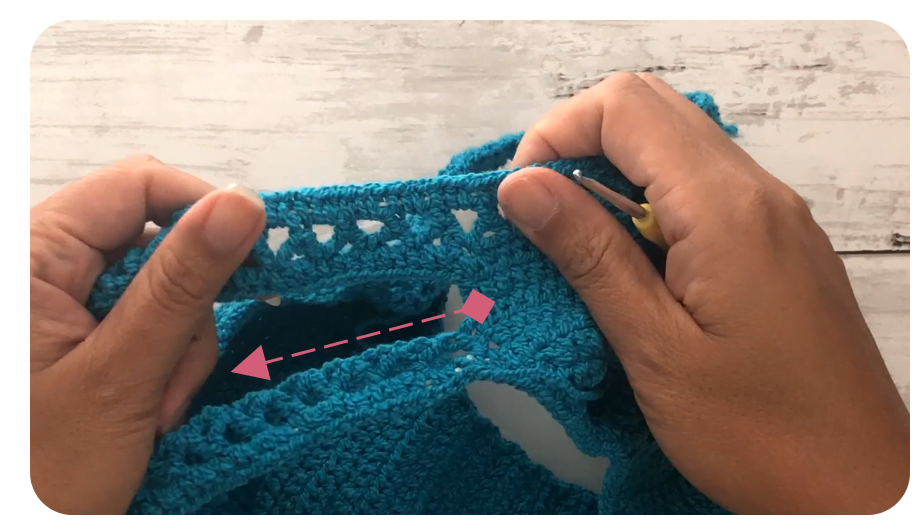
Part 2.1: Joining Sides
1. Turn work upside down, on RS insert hook through the next row and Hdc along the bottom band. Work 2 Hdc on each Ch Sp and 1 Hdc on the next St.
2. At the end of the row, Slst on rows post, and Slst up 2x.
3. Ch 36 [38/ 40/ 46/ 52] [58/ 66/ 72/ 80] and Slst through the post on the 3rd row from the WS.
4. Slst up 2x, Ch 5 turn
5. Yo, insert hook through the same St, draw up loop, Yo, Pt 2, Yo, Sk 2 Sts, insert hook, draw up loop, (Yo, Pt 2) 3x, Ch 3
6. Rep step 5 until the last 4th St
7. Yo, insert hook through the same St, draw up a loop, Yo, Pt 2, insert hook through the next post, Yo, Pt all to close, Slst up 2x, Ch 1 turn to the row side
8. (RS) We will be working down along the leg opening/crotch. Place rubber band along the edge, between the yarn and the hook, and work a Hdc around the rubber band. Work 2 Sts on each row and 1 Hdc on the next St and 2 Hdc on each Ch Sp in the round.
9. Once you have reached the last 10 stitches, tug the rubber band so the band is hidden between the Sts. It should be bunched up slightly and not spread apart.
10. Tie a knot (twice) work 4 Hdc over and around the knot while hiding rubber band knot and strand, Slst to close.
11. Cut any remaining rubber band.
12. Turn work right side up, on RS insert hook through the 3rd row and Hdc along the top edge of the second band. Work 2 Hdc on each Ch Sp and 1 Hdc on the next St. Rep across. Slst to close.
13. Rep Part 2.1 on the other side.
14. Bind off and weave in all loose ends
END
TIP: Attaching Rubberband (See Video)
- Make sure rubber band is behind work and in between Sts.
- Keep tugging rubber band in order to have a taut finish. Not too tight or loose.
- Stop 2” / 5cm or 10 sts before closing and tie a knot (twice) Sc over and around the knot while hiding rubber band and strand, Slst to close.
- Cut any remaining rubber band
- Best to use round face elastic rubber band like this.
**If you are looking for the entire tool used to make this Sahara Cheeky Double Band Bikini Bottom crochet pattern, check them out here below:
- 2.25 mm Clover Amour Crochet Hook
- Elastic Rubber Band
- Cascade Fixation Yarn in Teal
- Sahara Cheeky Bikini Bottom Pdf Pattern file
If you would like to receive free written patterns and video tutorials straight into your inbox, join our mailing list now.
Don’t forget to tag me on Instagram and Facebook @theknottylace, I would love to see your work!
Happy hooking
Shaz 🧶


2 Responses
No where in that pattern on the blog does it state which hook size to use for which part. You have to watch the YouTube tutorial to figure that out. Also, there is a typo in step 1 for the chainless foundation for how many stitches to use for the plus sizes. It should be in the 50s not 40s. On step 5 it says to repeat row 9 for 9 total rows when working a 2xl and that there should be 14 remaining stitches….once I get to 6 additional rows it’s already at 14 so could you provide clarification?
Hi Savannah, Thanks for letting me know…there is actually no need for 2 hook sizes (not neccesary) so I removed it entirely. As for the foundation stitch of 48 chains is correct, but feel free to adjust the size to any width that you prefer. Step 5 is correct is you started with 48 stitches. You would have subtracted 16 sts from row 5 – 8, and then another 18 sts for that 9 rows. That will give you 14 sts remaining on the 18th row. Hope that clarifies. Thanks